Claude Code UI Design Workflow That Doesn't Look AI-Generated
A six-step Claude Code UI design workflow: inventory states, choose a visual direction, codify rules, build to a target, then verify screenshots.
The best Claude Code UI design workflow decides the interface before coding and verifies it afterward. List every screen and state, compare three distinct visual directions, record the chosen rules in CLAUDE.md, install Anthropic's frontend-design plugin, build one screen at a time against a concrete target, then compare screenshots at two widths.
For one screen or feature, use Claude Code /design. For a stakeholder prototype or deck, use Claude Design. Use Figma when a designer owns the system. For a complete multi-screen app with every state and two-way coding-agent sync, use Mowgli. We make Mowgli.
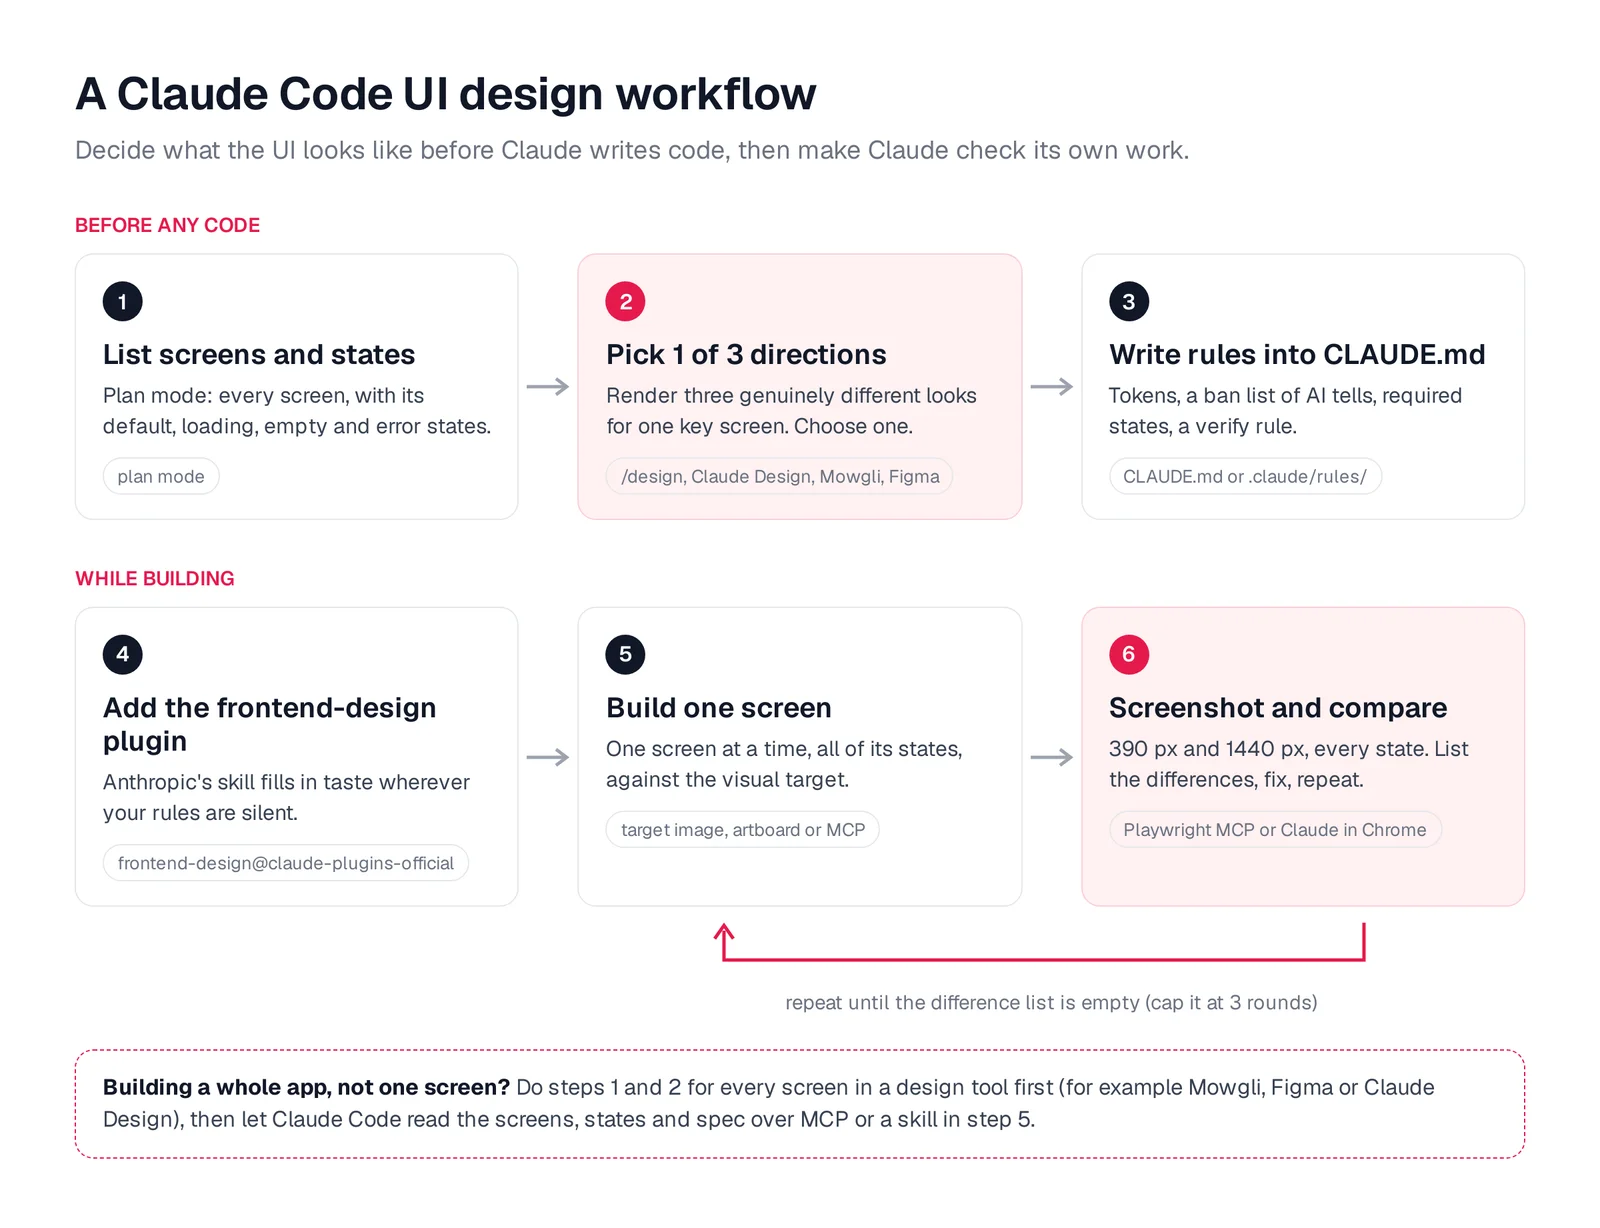
Caption: The workflow at a glance. Steps 1-3 happen before any code; steps 5 and 6 repeat per screen.
The Claude Code UI design workflow at a glance
| Step | Tool | What it fixes |
|---|---|---|
| 1. List every screen and its states | Plan mode | Missing empty, loading and error states |
| 2. Pick 1 of 3 distinct directions | /design, Claude Design, Mowgli or Figma | The "average of the internet" look |
| 3. Write tokens, a ban list, state rules | CLAUDE.md or .claude/rules/ | Drift between screens and sessions |
| 4. Install the frontend-design plugin | /plugin install | Generic choices where your rules are silent |
| 5. Build one screen against a target | Image, artboard, Figma MCP or Mowgli MCP | Claude inventing layout |
| 6. Screenshot, list differences, fix | Playwright MCP or Claude in Chrome | "Looks done" without being checked |
The order matters. Planning establishes what must exist. A visual direction defines how it should look. Persistent rules keep later screens consistent. Screenshot verification catches the gap between the target and the implementation.
Why Claude Code UI looks AI-generated
Anthropic calls the problem "distributional convergence." Without a specific visual direction, generated interfaces gravitate toward familiar patterns instead of making deliberate product-specific choices.
Anthropic's frontend-design skill identifies recurring combinations such as cream with terracotta, near-black with acid green, repeated rounded cards with soft shadows, all-caps eyebrow labels and arrows appended to buttons. Other useful items for your ban list include purple gradients, Inter everywhere and the centered hero followed by three feature cards.
These patterns are not fixed by adding more vague adjectives. "Modern," "clean" and "premium" do not define a type pairing, density, palette or layout structure. Read more about why every AI-built app looks the same.
Replace adjectives with decisions. Name the typefaces. Record the colors. Specify the layout. Then inspect the rendered result rather than accepting a textual claim that the interface is finished.
Step 1: List every screen and state in plan mode
Start Claude Code in plan mode before it writes UI code. Press Shift+Tab until plan mode appears in the status bar, or launch it with claude --permission-mode plan.
Use this prompt:
Before writing any UI code, list every screen this feature needs.
For each screen give: its job in one sentence, the data it shows,
the primary action, and every state it can be in. At minimum cover
default, loading, empty, error and success. Add any state specific
to this screen (permission denied, offline, partially filled form,
destructive confirm). Output a table. Do not write code yet.
Review the output before choosing a visual style. Every list needs an actionable empty state. Every form needs validation. Every asynchronous action needs loading and error states. Add offline, permission-denied, partially completed and destructive-confirmation states wherever they apply.
This inventory prevents the visual direction from being designed around only the happy path. Use the states checklist and screen x state matrix, then check the user flows and screen list.
Step 2: Generate three distinct directions and choose one
Ask for three directions that differ in type pairing, palette, density and layout structure. Each direction also needs a reason tied to the product and audience. Three palette swaps of the same card layout are not three directions.
Using the screen list above, propose 3 visual directions for the
[Today / Dashboard / Home] screen. Make them genuinely different:
different type pairing, palette, density and layout structure.
For each: a name, 4-6 named hex colors, typefaces and their roles,
a one-sentence layout concept, and what makes it specific to this
product and audience. None of them may use: purple or indigo
gradients, Inter as the only face, a centered hero with three cards,
or all-caps eyebrow labels. Then render all 3 so I can compare.
Choose the rendering tool by job:
-
Claude Code
/designhas been a research preview since August 2026. It creates editable artboards on a canvas inside the CLI and Claude Code Desktop. It requires Pro, Max, Team or Enterprise and version 2.1.265 or later. -
Claude Design is an Anthropic Labs product launched April 17, 2026. Use it for prototypes and decks, then export its handoff bundle to Claude Code.
-
Figma fits a workflow where a designer owns the design system and visual direction.
-
Mowgli fits a complete multi-screen product. Its moodboard offers 16+ styles and style steering, so you can select a theme before generating every screen.
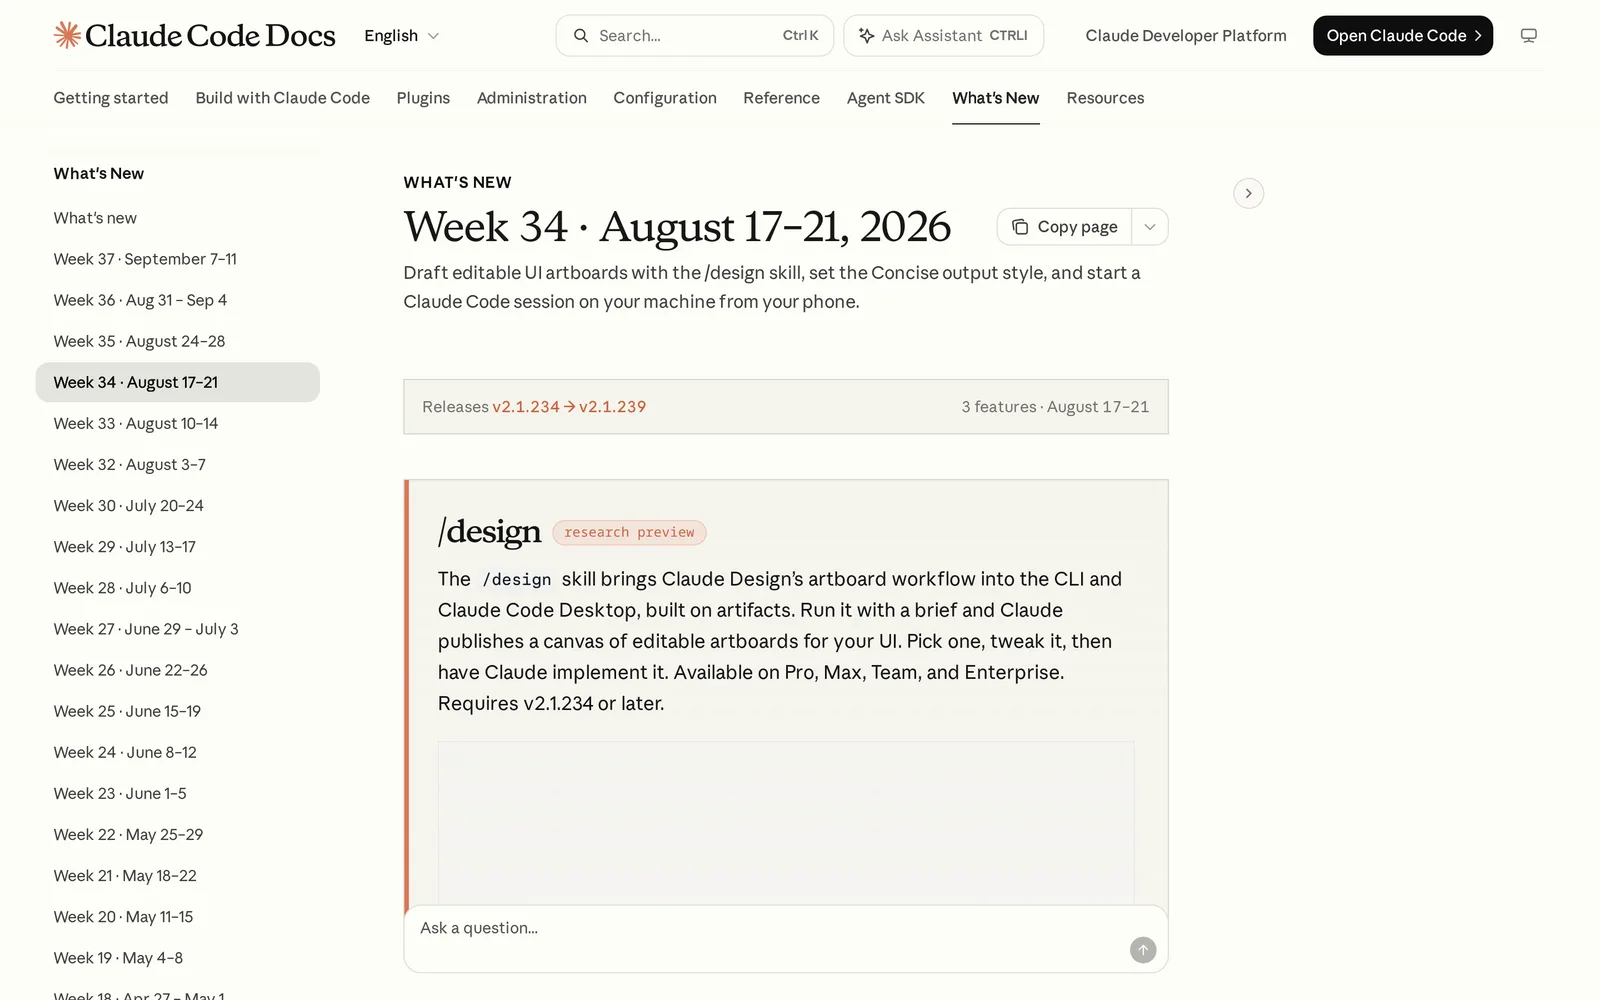
Caption: Anthropic's announcement of /design. Source: Claude Code Docs, captured October 2026.
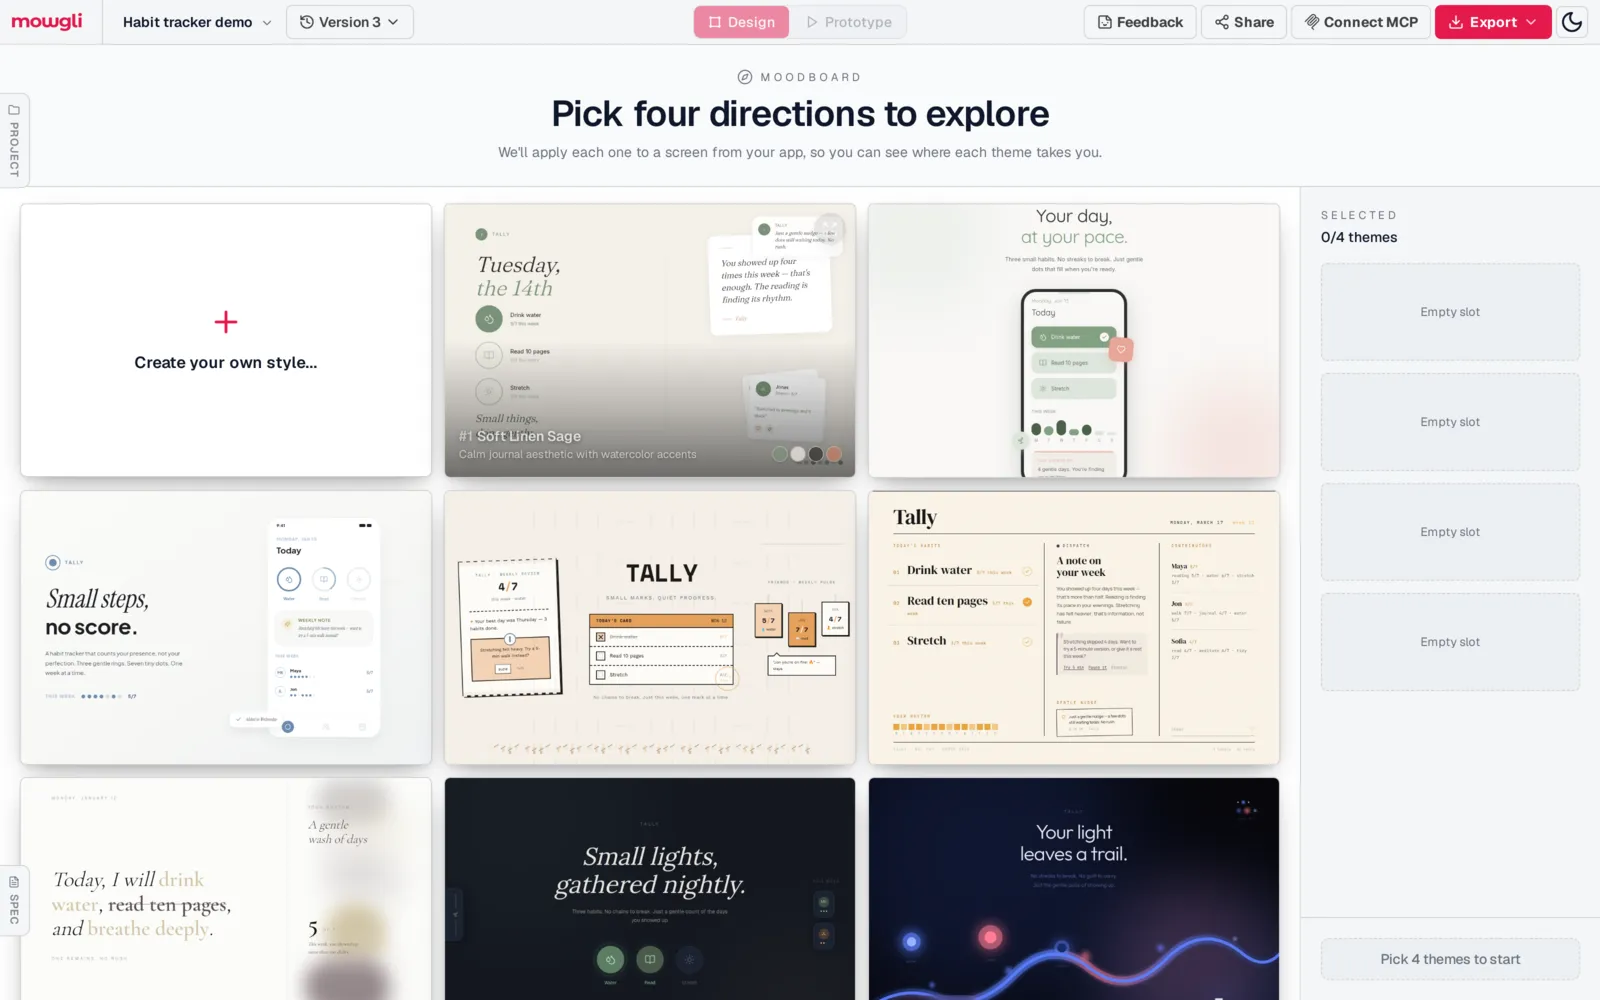
Caption: Mowgli's moodboard for a habit tracker demo: distinct directions, not palette swaps. Captured October 2026.
The important decision is not which tool renders the options. It is that you compare materially different options and commit to one. See how to get multiple design directions.
Step 3: Put the chosen design rules in CLAUDE.md
Preserve the selected direction across sessions. Record tokens, reusable components, prohibited patterns, required states and the UI definition of done. Anthropic recommends placing design tokens where Claude can find them, including CLAUDE.md or a theme file.
## Design system (source of truth: src/styles/tokens.css)

- Colors: use CSS variables only, never raw hex in components.
  --bg #F3F5F7, --surface #FFFFFF, --ink #14213D, --muted #5B6474,
  --accent #0F766E, --accent-soft #CCFBF1, --danger #B42318
- Type: "Bricolage Grotesque" for display (h1-h2 only), "IBM Plex Sans"
  for everything else. Scale: 14 / 16 / 20 / 28 / 40. Body line-height 1.5.
- Spacing: 4px grid (4, 8, 12, 16, 24, 32, 48). Radius: 6px inputs,
  12px cards, full for pills. One shadow token: --shadow-1.
- Components: reuse src/components/ui/* before creating anything new.

## Never do (AI tells)

- Purple, indigo or blue-to-purple gradients; gradient text
- Inter or system-ui as the only typeface
- Centered hero + three identical feature cards
- All-caps eyebrow labels above headings; "A - B - C" meta strings
- Identical rounded cards with the same shadow for every block
- Emoji as icons; arrows appended to every button label
- Placeholder copy ("Supercharge your workflow", lorem ipsum)

## Every screen must implement

- default, loading (skeleton matching the final layout), empty (what
  to do next + one primary action), error (what happened + retry)
- Validation state on every form; confirm step on destructive actions
- Keyboard focus visible; works at 390px and 1440px

## Definition of done for UI work

- Screenshot every state at 390px and 1440px, compare to the target,
  list differences, fix. Do not say "done" without screenshots.
Keep each CLAUDE.md file under about 200 lines. If the frontend guidance grows, move it to .claude/rules/frontend.md. Use paths: frontmatter such as "src/**/*.{ts,tsx,css}" so the rules apply to the relevant files.
Persistent instructions help, but DESIGN.md is not enough. Claude Code still needs a concrete target and a verification loop.
Step 4: Install Anthropic's frontend-design plugin
Anthropic's first-party frontend-design plugin is intended to create distinctive, production-grade interfaces while avoiding generic AI aesthetics. After installation, Claude Code uses it automatically for frontend work.
Install it during a session:
/plugin install frontend-design@claude-plugins-official
Or install it from the shell with claude plugin install frontend-design@claude-plugins-official. On a fresh machine, first run claude plugin marketplace add anthropics/claude-plugins-official.
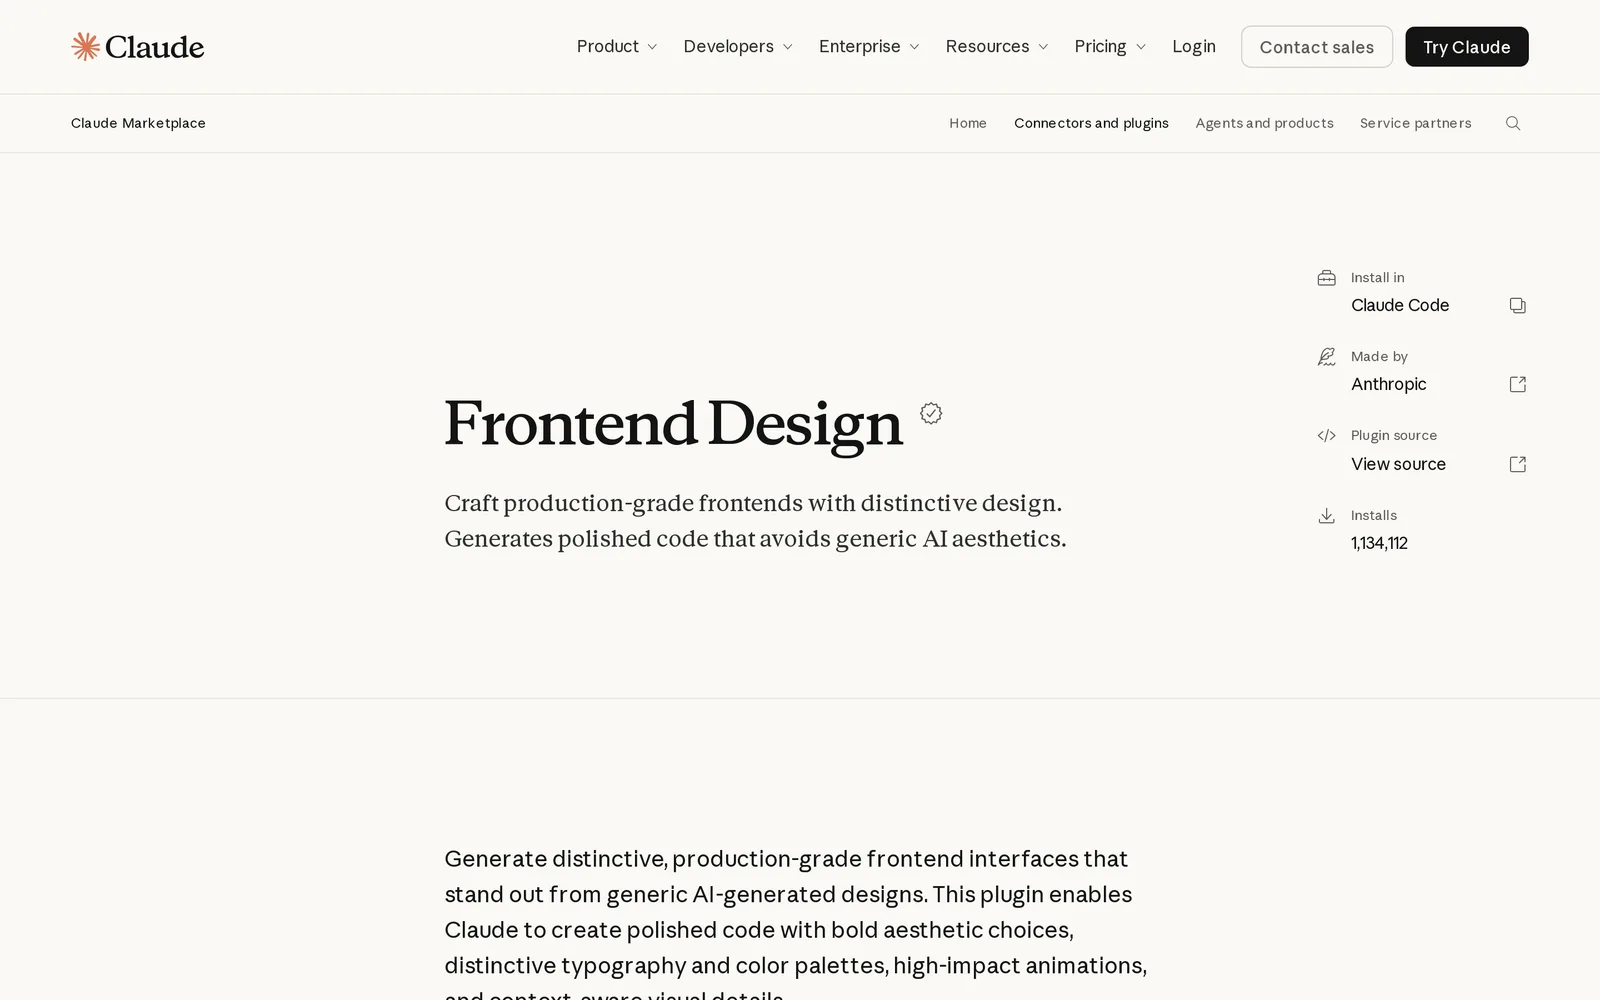
Caption: The Frontend Design plugin page. Source: claude.com, captured October 2026.
The plugin plans a palette, typography and layout concept, checks its proposal for generic defaults, then builds and critiques through screenshots. Install it after selecting and documenting your direction. That lets it complete unspecified details without replacing the system you chose.
Its own instruction is clear: "where the brief pins down a visual direction, follow it exactly."
Step 5: Build one screen at a time against a target
Give Claude Code a pasted screenshot, a /design artboard, a Figma frame or a Mowgli screen. Build one screen and all of its states in the same pass.
Make every state directly previewable through a query parameter or Storybook. That turns screenshot verification into a repeatable process instead of a manual attempt to trigger loading or failure conditions.
Implement the [Today] screen to match the attached target.
Use only tokens from src/styles/tokens.css and components from
src/components/ui. Implement every state from the screen list
(default, loading, empty, error, ...) and add a way to preview each
one (a ?state= query param or a Storybook story). Plan first, then
build. Where the target and CLAUDE.md conflict, ask me.
For Figma, install the plugin with claude plugin install figma@claude-plugins-official, or add its remote MCP server with claude mcp add --transport http figma https://mcp.figma.com/mcp.
Figma MCP access depends on the seat. Starter, View or Collab seats receive up to 20 tool calls per month. Dev and Full seats receive up to 200 per day on Professional and Organization, or up to 600 per day on Enterprise. The same design-handoff principles apply when getting designs into Cursor.
Step 6: Screenshot, compare and fix with Playwright
Anthropic recommends a closed loop: implement from a target, screenshot the result, list the differences, fix them and repeat.
Add Playwright MCP:
claude mcp add playwright npx @playwright/mcp@latest
Then give Claude Code a bounded verification task:
Start the dev server. With Playwright, open the [Today] screen at
390x844 and 1440x900 and take a screenshot of every state.
Compare each to the target. List the differences in a table
(element, expected, actual, fix). Fix them, re-screenshot, and repeat
at most 3 rounds. Then show me the final screenshots side by side
with the target and list anything you could not match.
Check every state at both 390x844 and 1440x900. Require a difference table with the element, expected result, actual result and fix. Stop after three automated rounds and review manually. A revision cap prevents the process from continuing without a judgment point.
You can also install Playwright CLI with npm install -g @playwright/cli@latest, followed by playwright-cli install --skills. Claude in Chrome is another option: launch with claude --chrome; design verification is listed as a core use. Finish with /verify.
When to design the whole app before Claude Code builds it
The screen-by-screen workflow works for a contained feature. Design the whole product first when screens, flows and edge states must be decided together.
Mowgli turns a short questionnaire into a product spec covering user journeys, constraints and the data model. Its moodboard offers 16+ styles with style steering. After you choose a theme, it generates every screen and state, including 30+ screens and states on an infinite canvas, and produces an interactive prototype. You can export to Figma or React + Tailwind.
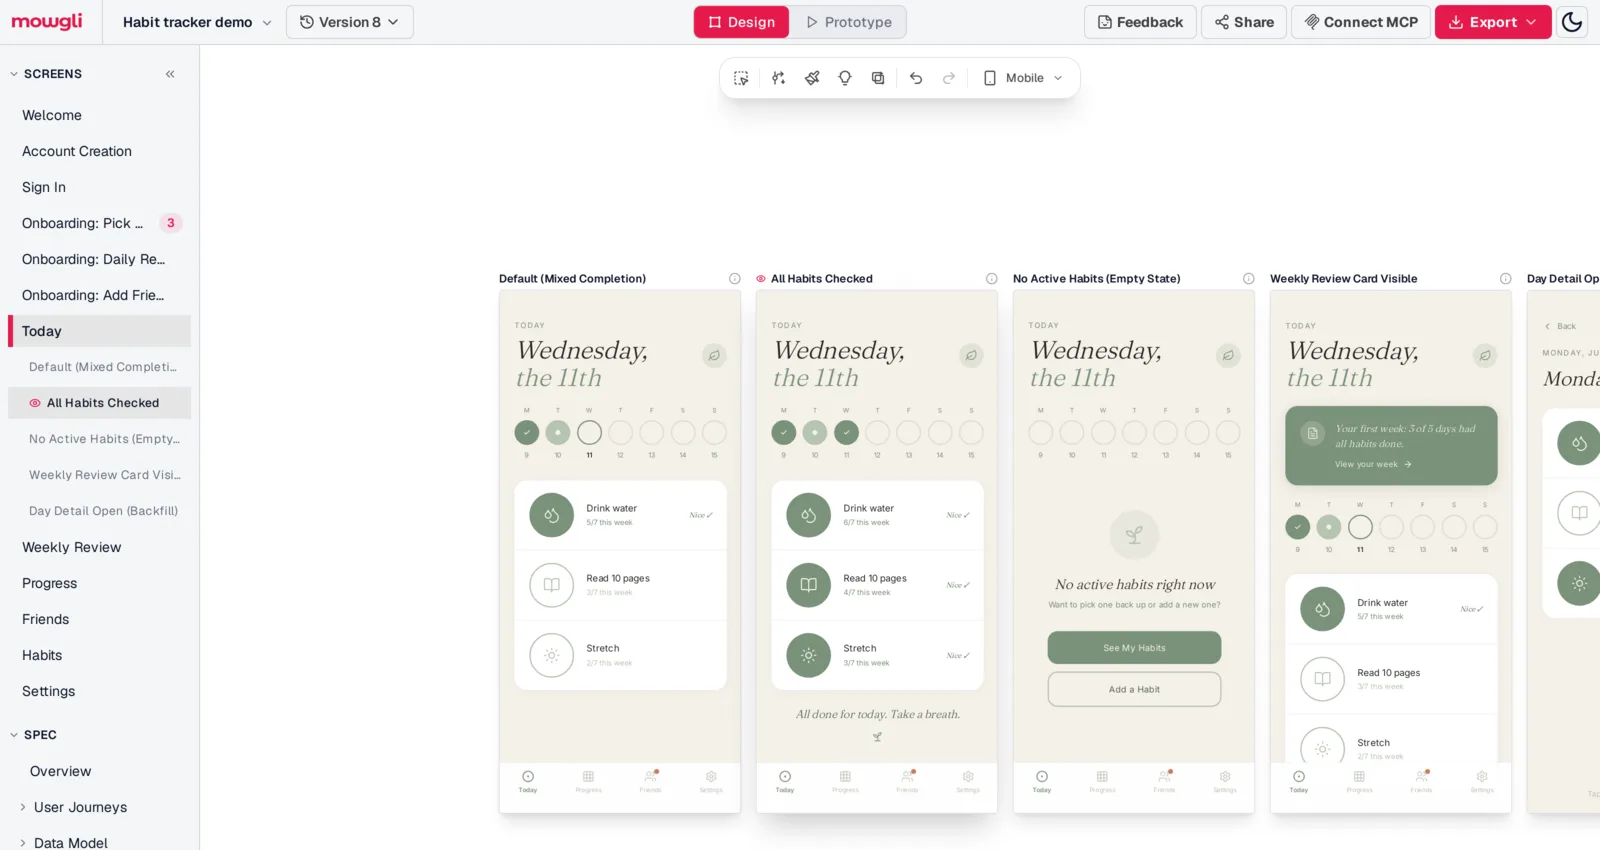
Caption: One screen, every state, side by side on the Mowgli canvas (habit tracker demo, captured October 2026).
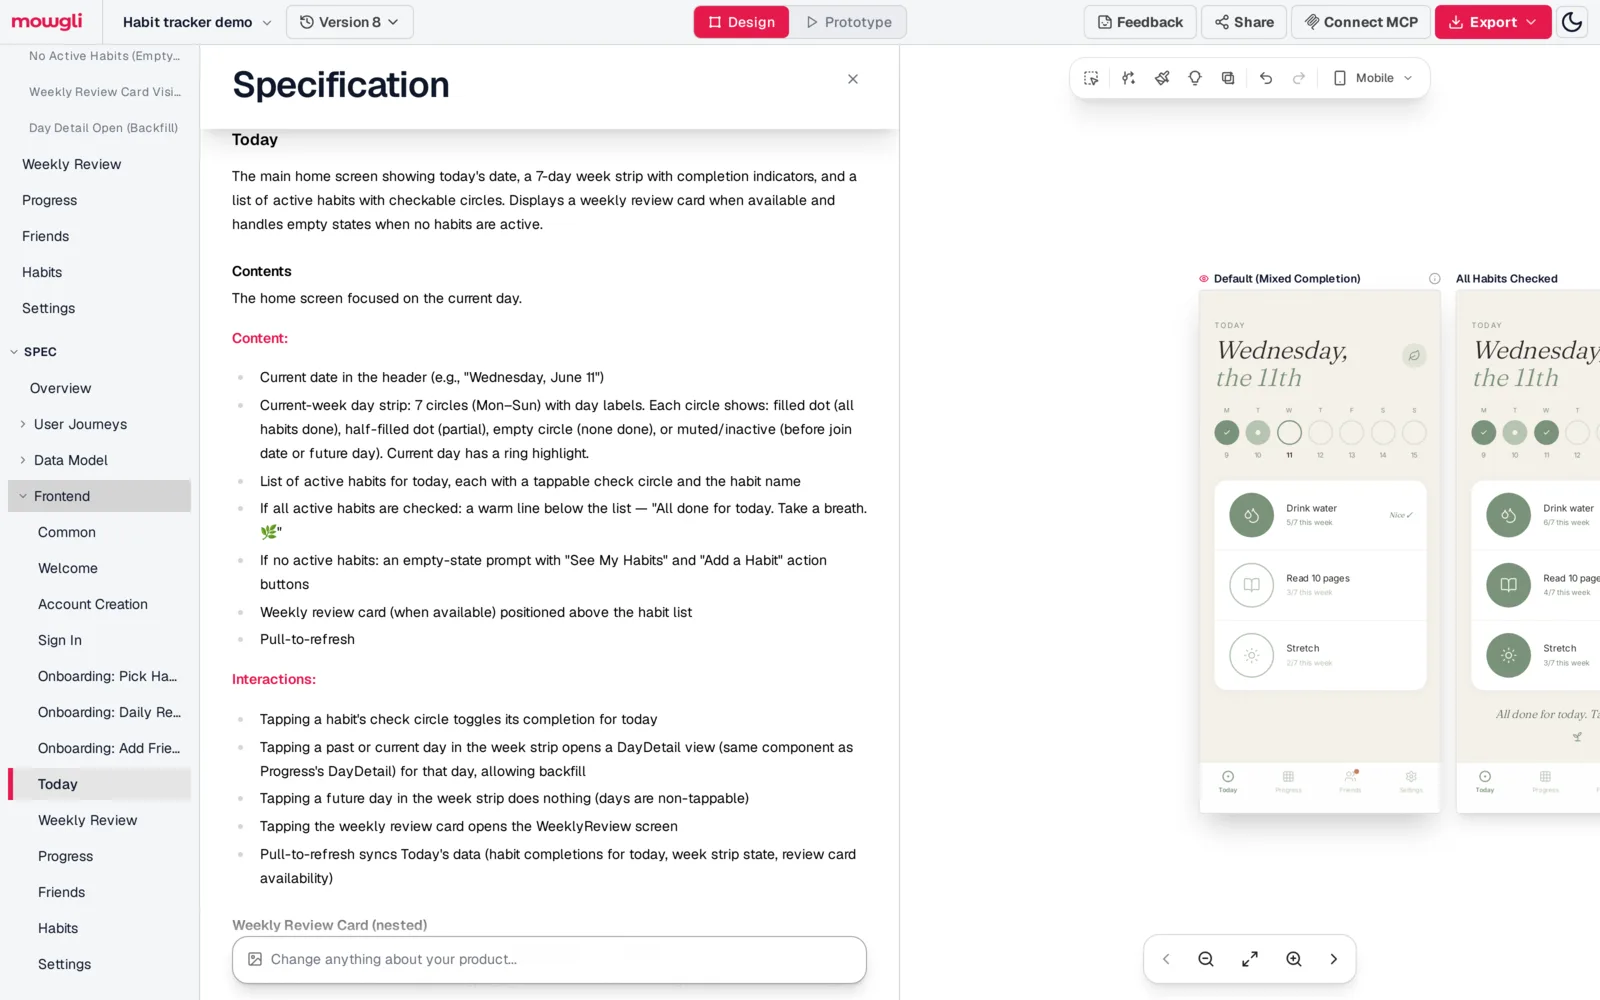
Caption: The spec entry Claude Code reads for the same screen: content, states and interactions.
Claude Code receives SPEC.md with the pitch, user journeys and data model; frontend.xml with screens and states; and one <ScreenId>.tsx file per screen. Each screen is a React + Tailwind component with a single state prop.
The connection works in both directions. You can describe a product or import an existing codebase, push existing code into the design canvas, then pull updated designs back into code. Connect through the Mowgli skill, Mowgli MCP or CLI. The agent skill command is npx skills add mowgli-ai/skills. The CLI is mowgli-cli. The MCP server is https://app.mowgli.ai/mcp, and the direct command is claude mcp add --transport http mowgli https://app.mowgli.ai/mcp.
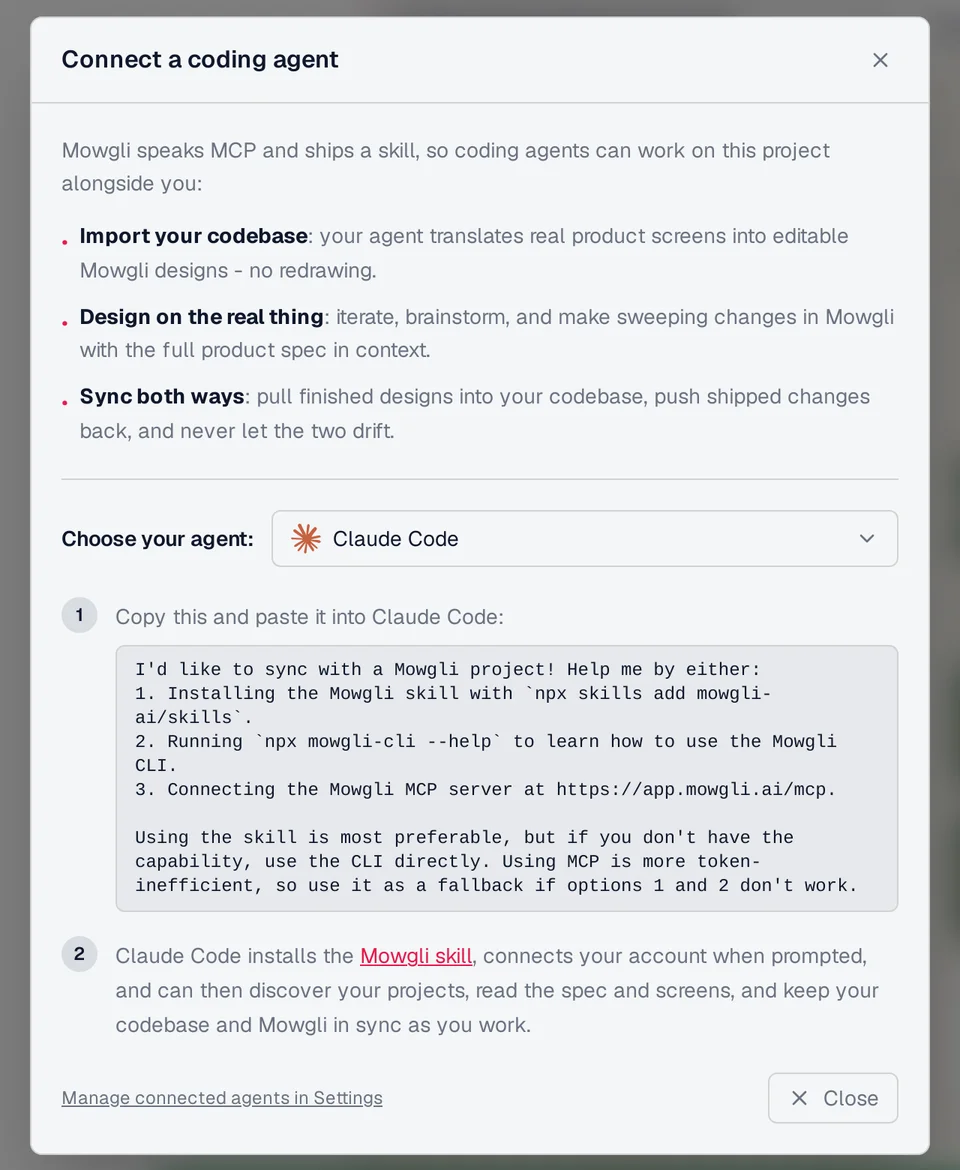
Caption: Mowgli's actual Connect a coding agent dialog with Claude Code selected (captured October 2026).
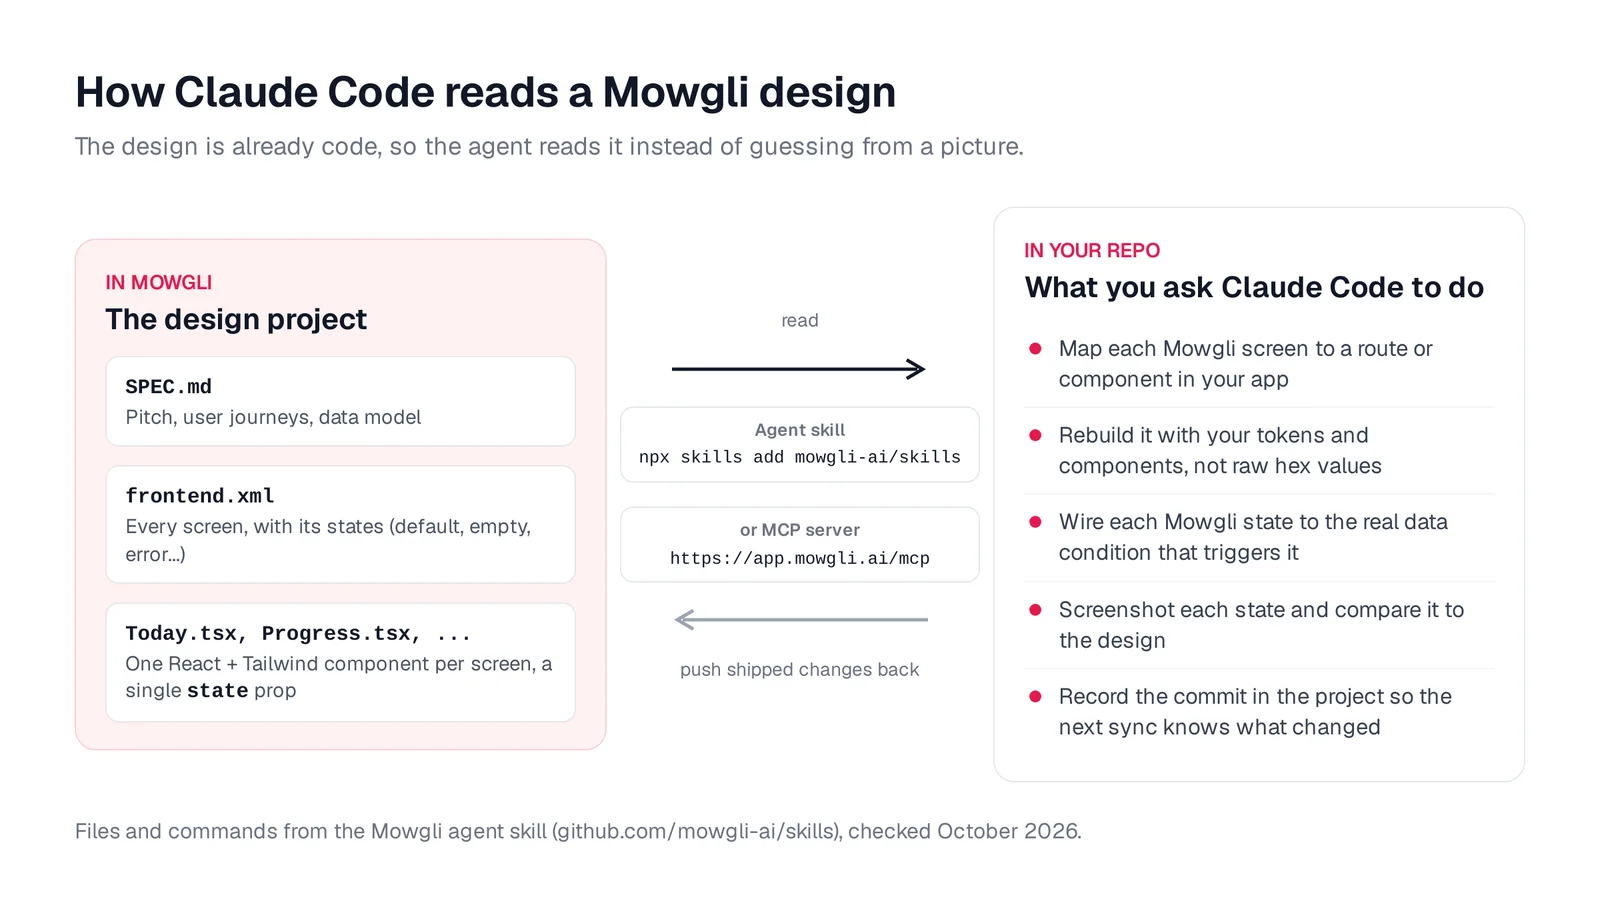
Caption: What Claude Code reads from a Mowgli project, and what you ask it to do with it.
See the Claude Code handoff page for the complete workflow. Mowgli designs and prototypes; to host and ship, you hand off to a builder or coding agent (Claude Code, Codex, Cursor, Lovable).
Claude Code /design vs Claude Design vs Figma vs Mowgli
Choose by job rather than looking for a universal winner.
| Design source | Where it runs | What you get | How Claude Code gets it | Best for | Price |
|---|---|---|---|---|---|
Claude Code /design | CLI and Claude Code Desktop | Editable artboards on one canvas | Same session | One feature or screen | Included in Pro ($20/mo) and up |
| Claude Design | claude.ai | Prototypes, designs, decks | Handoff bundle | On-brand prototypes and decks | Pro and up; shares Claude usage limits |
| Figma + Figma MCP | Figma | Designer-made frames and components | Figma MCP server | Teams with designers | MCP: 20 calls/month on Starter or View/Collab; 200-600/day on paid Dev/Full |
| Superdesign | Agent skill + web canvas | Branchable drafts from your codebase | Same agent session | Redesigns from the terminal | See vendor site |
| Mowgli | Web canvas | Every screen and state as React + Tailwind, plus a spec | Skill, CLI or MCP, two-way | A whole product, kept in sync with code | Free to start (300 credits); credit packs from $12; plans from $15/mo |
Prices are from each vendor's pricing page, October 2026.
For an existing screen or feature, use /design and implement it in the same session. For a prototype or deck, use Claude Design and hand off the result. For a designer-controlled system, use Figma MCP with a suitable seat. For a whole app with every screen and state, use Mowgli with its skill, CLI or MCP. For a small side project, CLAUDE.md plus the frontend-design plugin may be enough.
For related workflows, read the backend developer's design playbook, design handoff to coding agents and Codex for frontend design.
Common Claude Code UI workflow mistakes
Using vague adjectives
Replace "modern and clean" with named typefaces, hex values, density and layout decisions. Claude Code needs choices it can implement and you can inspect.
Building too many screens at once
Implement one screen and all its states per pass. This keeps the target, code and screenshot comparison focused.
Designing only the happy path
Specify empty, loading, error, validation and destructive-confirmation states before implementation. Do not treat them as cleanup work.
Checking one viewport
Verify at 390 px and 1440 px. A correct desktop screenshot does not verify the mobile layout.
Allowing unbounded revisions
Cap automated screenshot revisions at three rounds. Review the remaining differences manually.
Skipping token mapping
Map the target's colors and spacing to the project's token system before continuing. Otherwise, later screens can drift even when the first screen appears close.
FAQ
How do I get better-looking UI out of Claude Code?
Decide the visual system before implementation. Put tokens, prohibited patterns and state requirements in CLAUDE.md, build against a concrete target, and verify every state with screenshots.
What is the /design command in Claude Code?
/design is a research-preview skill available since August 2026. It creates editable UI artboards on one canvas and requires Pro, Max, Team or Enterprise with Claude Code version 2.1.265 or later.
What is the difference between Claude Code /design and Claude Design?
/design creates UI options inside a Claude Code session for the feature being implemented. Claude Design runs in claude.ai, creates prototypes, decks and brand systems, and exports a handoff bundle for Claude Code.
Should I use Figma, Claude Design or Mowgli before Claude Code?
Use Figma when a designer owns and maintains the system, Claude Design for a prototype or stakeholder presentation, and Mowgli for a complete multi-screen app with every screen and state plus a two-way Claude Code connection.
What should a CLAUDE.md frontend design section include?
It should include tokens, reusable components, a ban list for recurring AI patterns, required screen states, accessibility expectations and a screenshot-based definition of done. Keep each CLAUDE.md under about 200 lines.
Can Claude Code read Mowgli designs?
Yes. Connect with npx skills add mowgli-ai/skills, mowgli-cli or https://app.mowgli.ai/mcp. Claude Code reads SPEC.md, frontend.xml and each screen's React + Tailwind component. Existing code can be pushed into the design canvas, and updated designs can be pulled back into code.
Sources
- Claude Code What's New, August 2026
- Claude Code artifacts
- Claude Code best practices
- Claude Code memory and CLAUDE.md
- Discover and install Claude Code plugins
- Claude in Chrome
- Claude Code skills
- Claude Design announcement
- Getting started with Claude Design
- Improving frontend design through skills
- Anthropic frontend-design skill
- Claude Code frontend-design plugin
- Frontend Design plugin page
- Claude pricing
- Playwright MCP
- Playwright CLI
- Figma MCP rate limits and access
- Figma MCP server guide
- Superdesign skill
- Mowgli
- Mowgli MCP server
- Mowgli agent skills
- Mowgli pricing