How to Generate a Full Multi-Screen App Design From a Description
Describe the users and flows, review a generated spec, choose a style, then generate every screen and state in one pass.
The short answer: plan the product before drawing it
To generate a complete multi-screen app design from a description, describe the product rather than listing screens. Name the audience, jobs, roles, objects, main flow, live state and tone. Then resolve product questions, review a generated spec and screen list, choose a visual direction, and generate the full app.
This planning step prevents the common result of getting attractive login, home and profile screens with no complete journey between them.
Use this sequence:
- Describe the audience, job, roles, objects, main flow, live state and tone.
- Answer clarifying questions that affect scope or behavior.
- Review the journeys, data model, rules, screen list and important states.
- Test visual directions on a busy screen.
- Generate the full app.
- Check every journey, branch and state.
- Apply shared content or styling changes across screens.
- Prototype, export and hand off.
Name every user role explicitly. Identify empty, error, loading and lifecycle states early. If your tool generates screens in batches, establish a shared system or reference screen before creating later batches.
You can also derive this structure with the app idea to user flows and screen list method, move directly from a PRD to designs, and audit the result with the empty, error and loading states checklist.
What the worked example produces
We make Mowgli.
Mowgli turns a short questionnaire into a product spec, presents visual themes before full generation, and generates every screen and state defined by the spec. You can inspect the work on an infinite canvas, revise it through chat, build an interactive prototype, and export to Figma, React + Tailwind or coding agents.
For this example, a 125-word pet-sitting brief became a spec of about 7,000 words. It contained 8 user journeys, 123 numbered journey steps, a 13-entity data model, 23 screens and 77 states. The final result included a clickable prototype for both marketplace roles.
The complete run took about 40 minutes, including about 10 minutes of hands-on work.
Free to start (300 credits); credit packs from $12; plans from $15/mo.
Mowgli designs and prototypes; to host and ship, you hand off to a builder or coding agent (Claude Code, Codex, Cursor, Lovable).
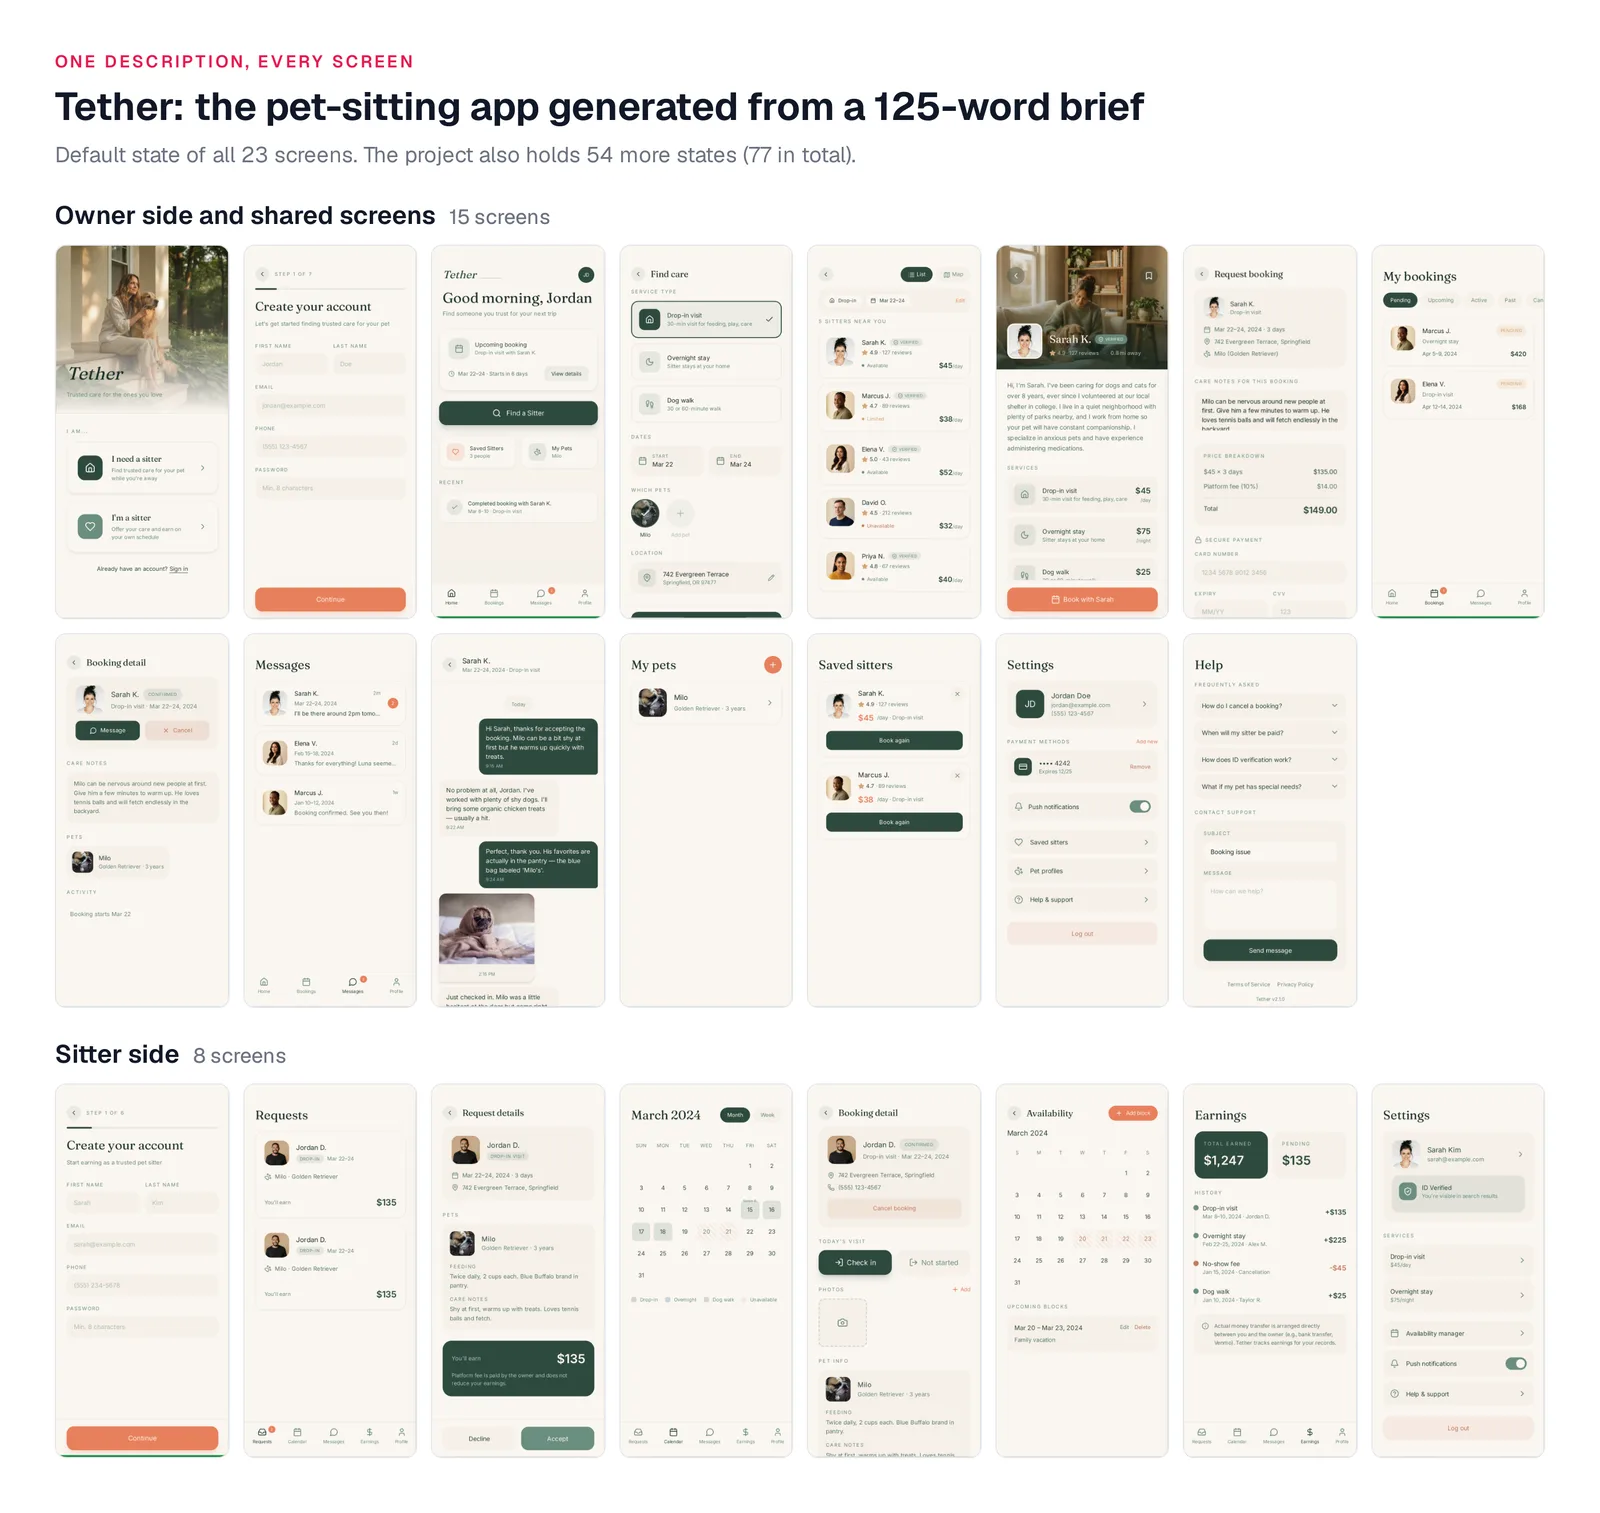
Caption: The default state of all 23 screens Mowgli generated from the brief below. Pet sitting demo project, October 8, 2026.
Here is the complete input:
A mobile app for pet owners who need someone trustworthy to look after their dog or cat while they're away. Owners add their pets (photos, breed, feeding and medication notes, vet contact), search for sitters nearby by dates and service type (drop-in visits, overnight stays, dog walks), compare sitter profiles with reviews, rates and a verified ID badge, then request a booking and pay in the app. While a booking is active the owner gets photo updates and a short daily report from the sitter, can message them, and sees check-in and check-out times. Sitters have their own side of the app: a calendar of upcoming jobs, new requests to accept or decline, and their earnings. It should feel warm, calm and trustworthy, not cutesy.
1. Describe the whole app in one paragraph
A useful app description contains six ingredients:
- The platform, audience and user's job.
- The core objects and their important fields.
- The main flow in chronological order.
- What happens while the service or transaction is live.
- Every secondary role and its jobs.
- The desired tone and visual territory to avoid.
Do not prescribe a screen inventory, hex codes or interface details. Those decisions should follow the product model.
In Mowgli, start a project, choose "Design an app from scratch," paste the description and keep "Explore with a moodboard" selected. Write the brief directly. The prompt screen warns that prompts written with ChatGPT or other assistants lead to worse results.
If you already have a product requirements document, paste it instead and follow the PRD to designs workflow.
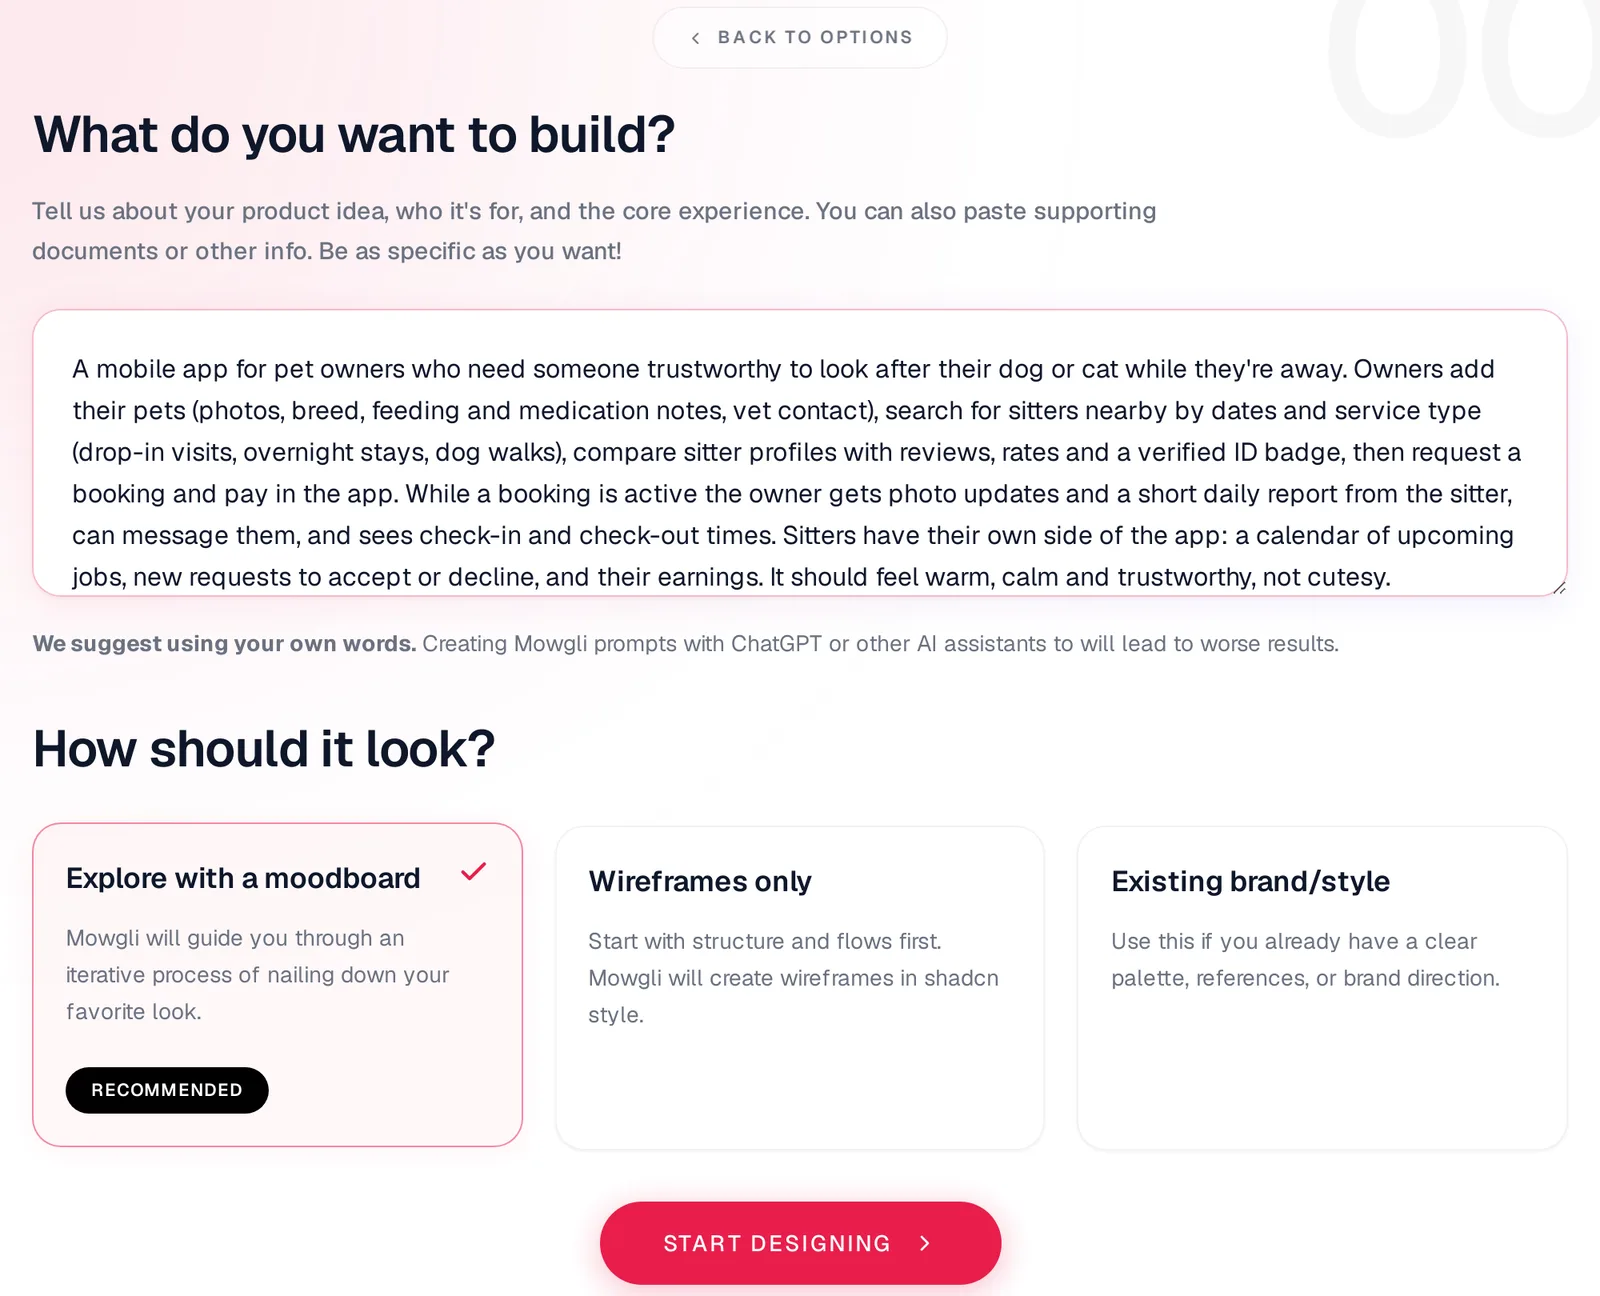
Caption: Step 1 in Mowgli: the brief goes in one box; the look is decided later on the moodboard.
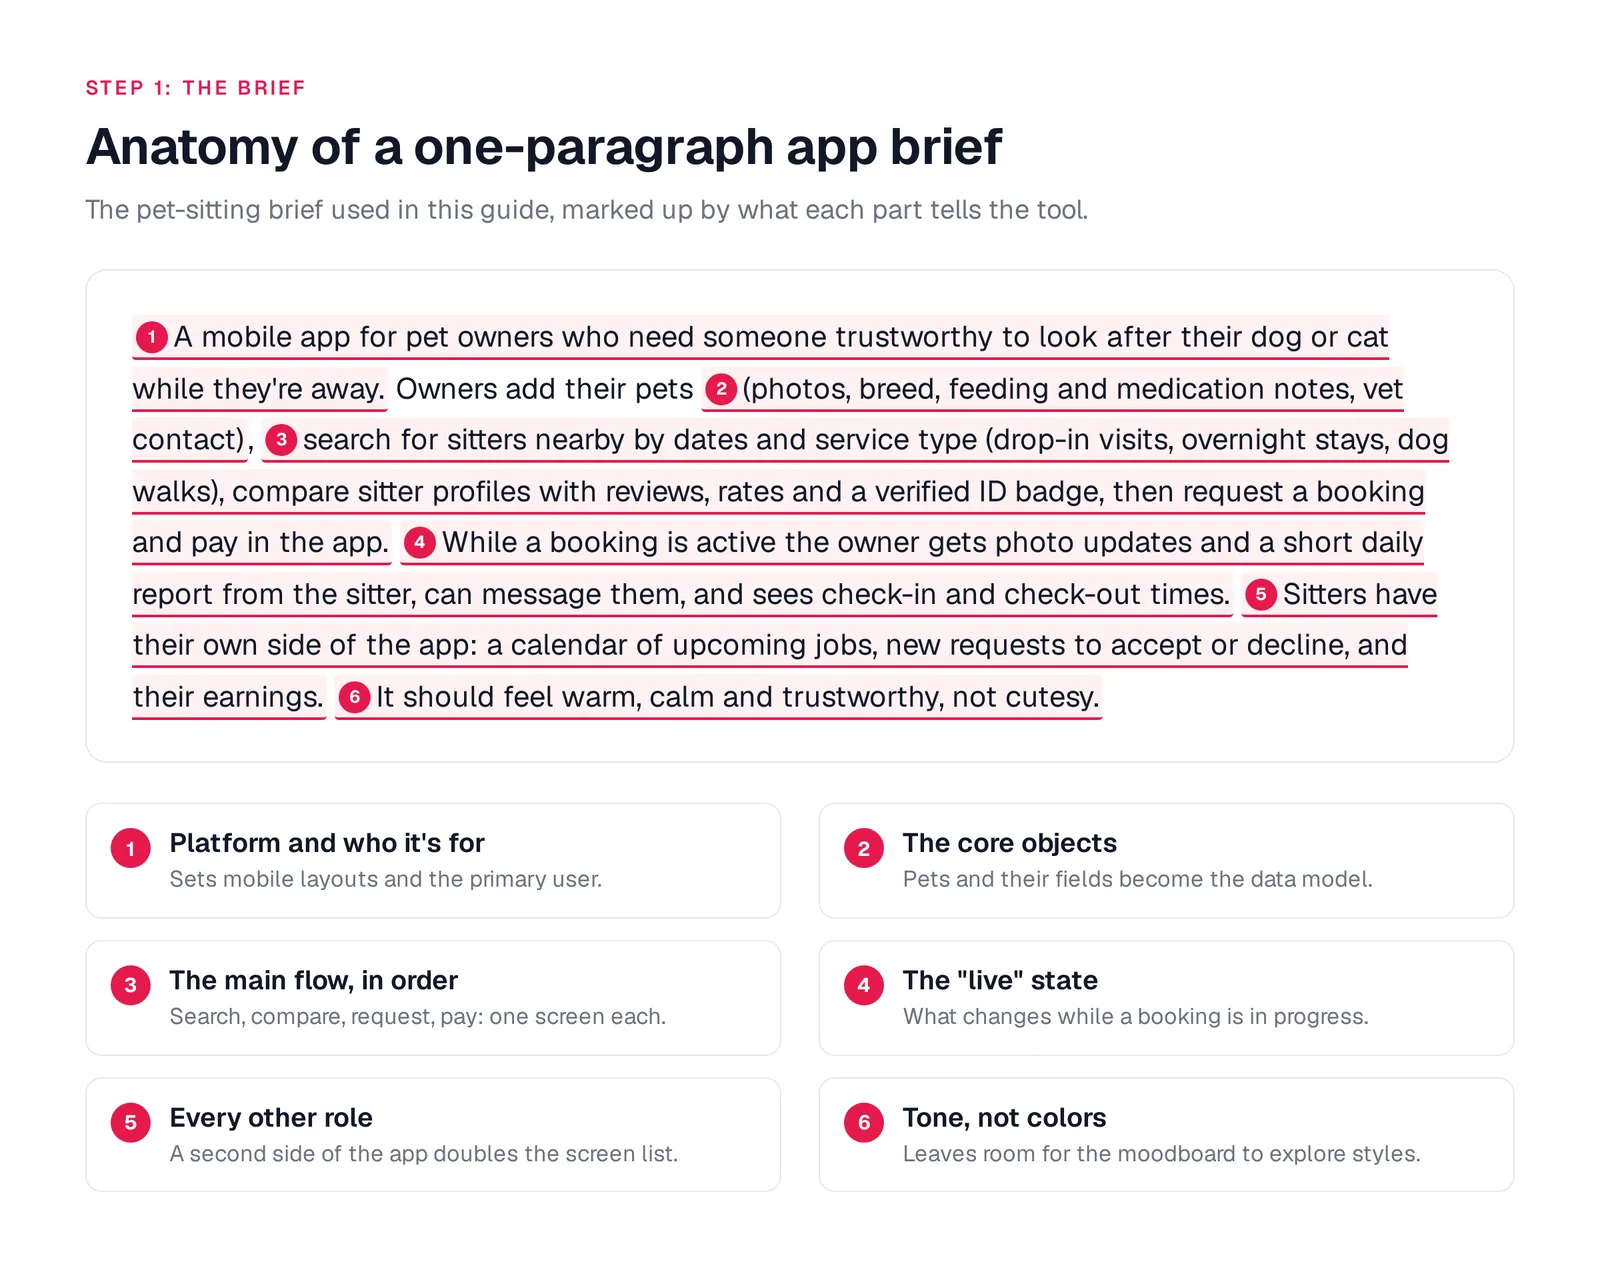
Caption: What each part of the brief tells the tool. Original graphic.
Use this template:
A [platform] app for [who] who need [the job]. [Main user] can [core objects and their key fields], [main flow in order: find, compare, act, pay]. While [something is live], [what they see and can do]. [Second role] have their own side of the app: [their 2-4 jobs]. It should feel [three tone words], not [what to avoid].
Before continuing, confirm that every role, object and flow appears. Do not impose a screen list. In this example, mentioning the sitter role accounted for 8 of the 23 generated screens.
You can perform the same planning method by hand.
2. Answer questions that change the product
The example questionnaire asked 12 questions across two rounds. Each question addressed a fork that would change screens, states or rules.
The recorded answers established that sitter verification required government ID plus a basic profile. Cancellations were free until 48 hours before a booking, followed by a no-show fee. Payment was held until completion. Each account had one role, customers paid at booking, and the platform fee appeared as a separate line item.
The free-text answer also required an active booking to lead the owner home screen, plus empty states for no pets, no available sitters and a new sitter with no requests. All three empty states appeared in the output.
Answer for version 1 rather than every possible future version. Treat any "go deeper" option as added review scope, and state critical edge cases explicitly. The product describes this stage as one that "massively impacts the quality of your output."
Read more about why Mowgli asks before designing.
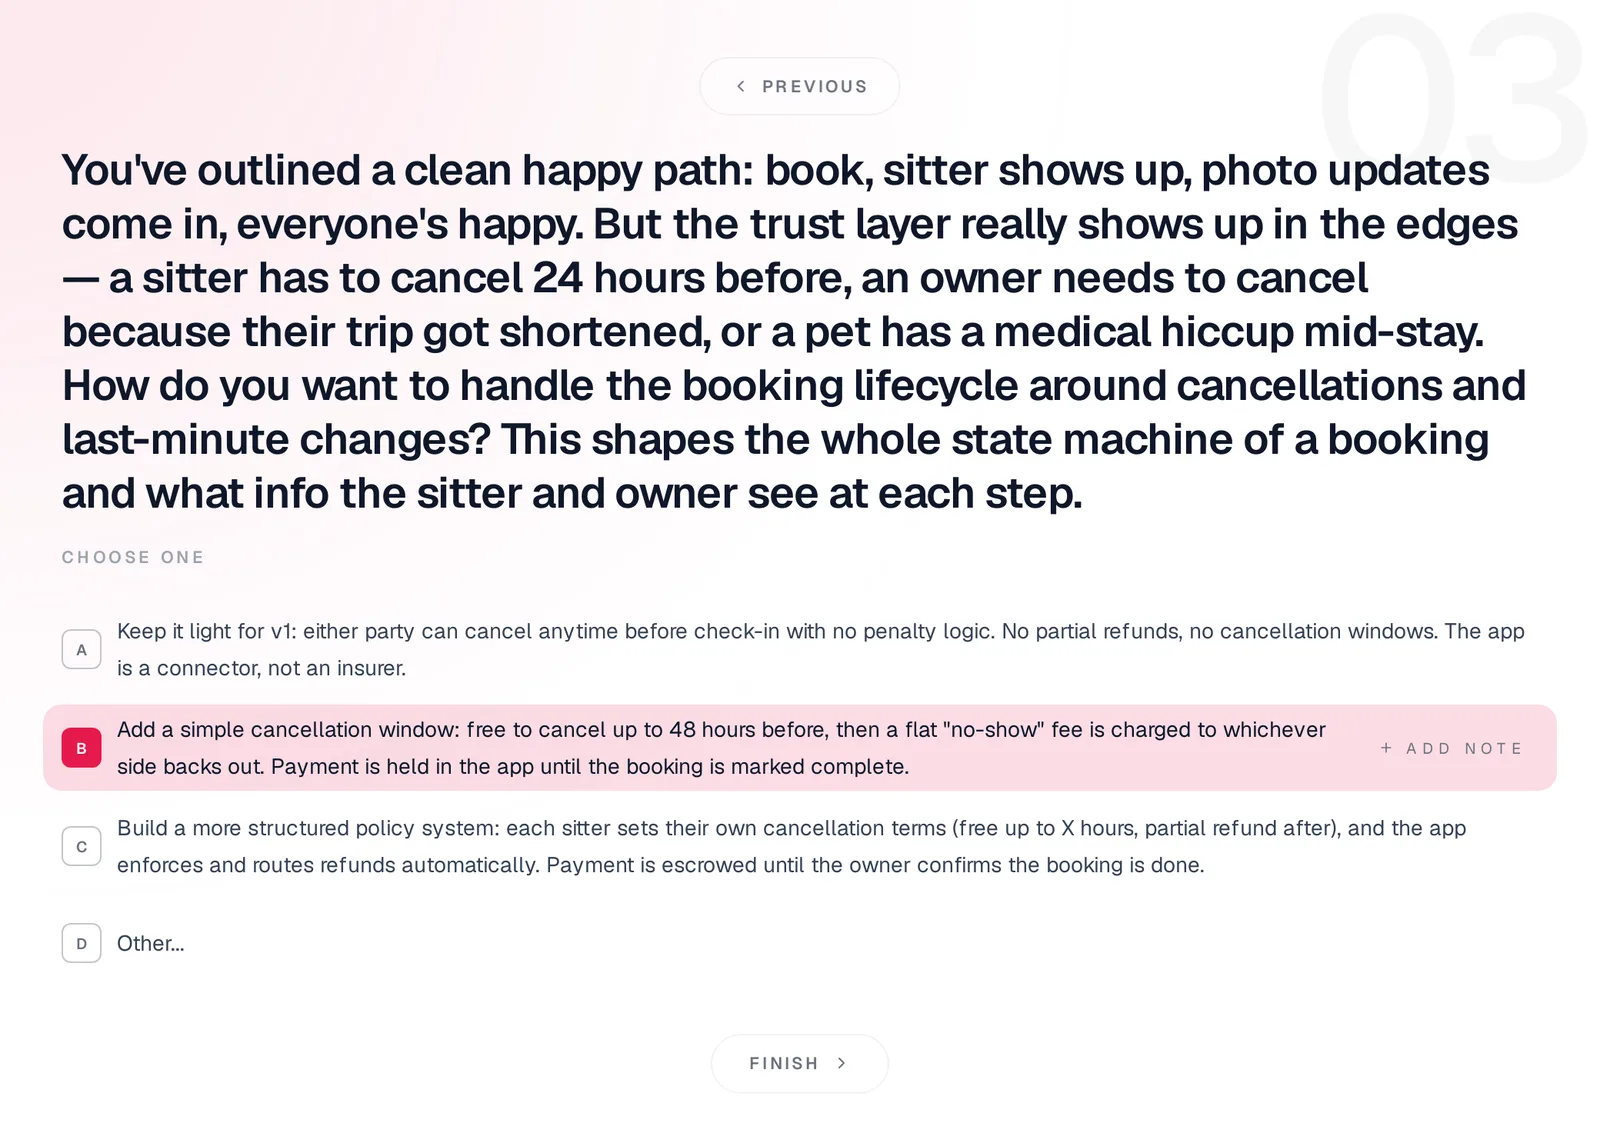
Caption: Question 3 of 12. This one answer later produced two different cancel sheets (see step 5).
3. Review the spec before generating pixels
The generated spec was about 7,000 words. It included an elevator pitch, 8 user journeys with 123 numbered steps, 13 entities and a frontend list of 23 screens. The data model covered entities such as User, Pet, Booking, CheckInEvent and DailyReport.
Each screen documented content, interactions and empty states. Four journeys covered owners and four covered sitters.
Review whether each questionnaire answer became an explicit product rule. In this run, the cancellation answer became a 20% fee charged to whichever party cancels inside 48 hours. The empty results state received useful copy: "No sitters match your search. Try expanding your dates or location."
Make product-level corrections here, before visual generation. Changing a rule in the spec is clearer than correcting its effects across several finished screens.
See how spec-driven design keeps product context beside the interface.
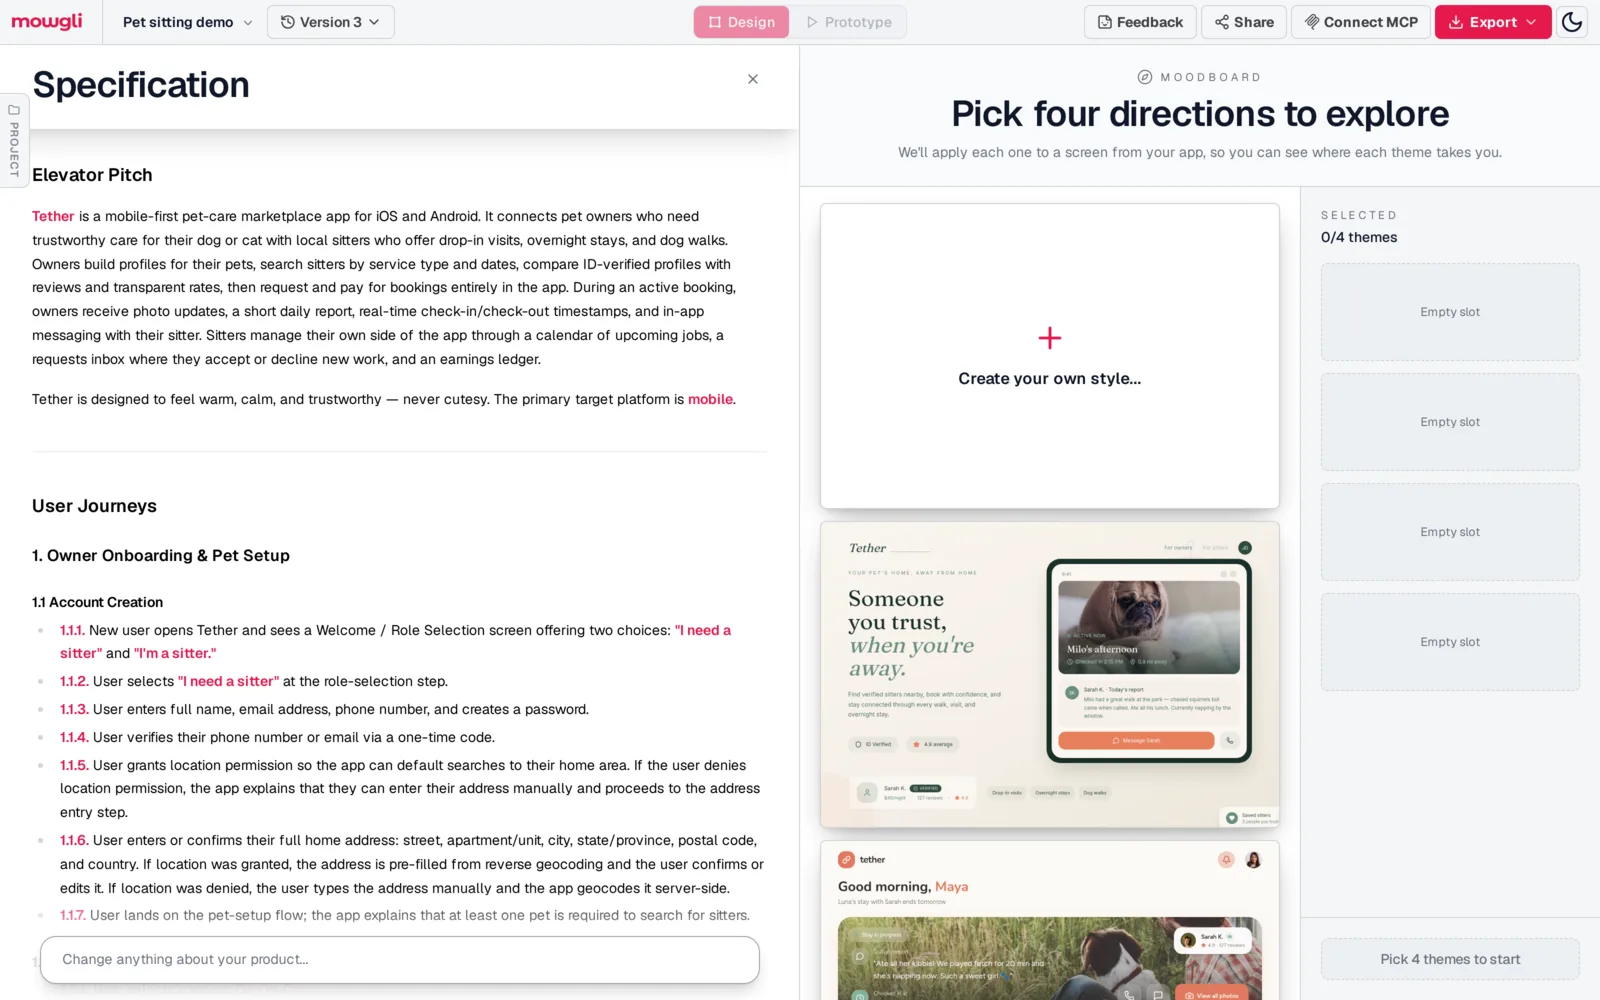
Caption: Step 3: the spec opens next to the moodboard, so you can read it while styles render.
4. Pick a visual direction using a real screen
The moodboard produced 16 named directions, including Warm & Trusted, Editorial Calm, Nostalgic Scrapbook, and Dusk & Dawn. All were ready about 3 minutes after the final questionnaire answer.
Four selected directions were then applied to Owner Home and all four of its states. That preview took 2 minutes 12 seconds. Warm & Trusted became the final choice.
Compare styles on the busiest screen, not a generic sample. Inspect default and exceptional states, then check buttons and small text for readability. This exposes practical differences that a color palette alone cannot show.
See the method for exploring visual styles before full generation.
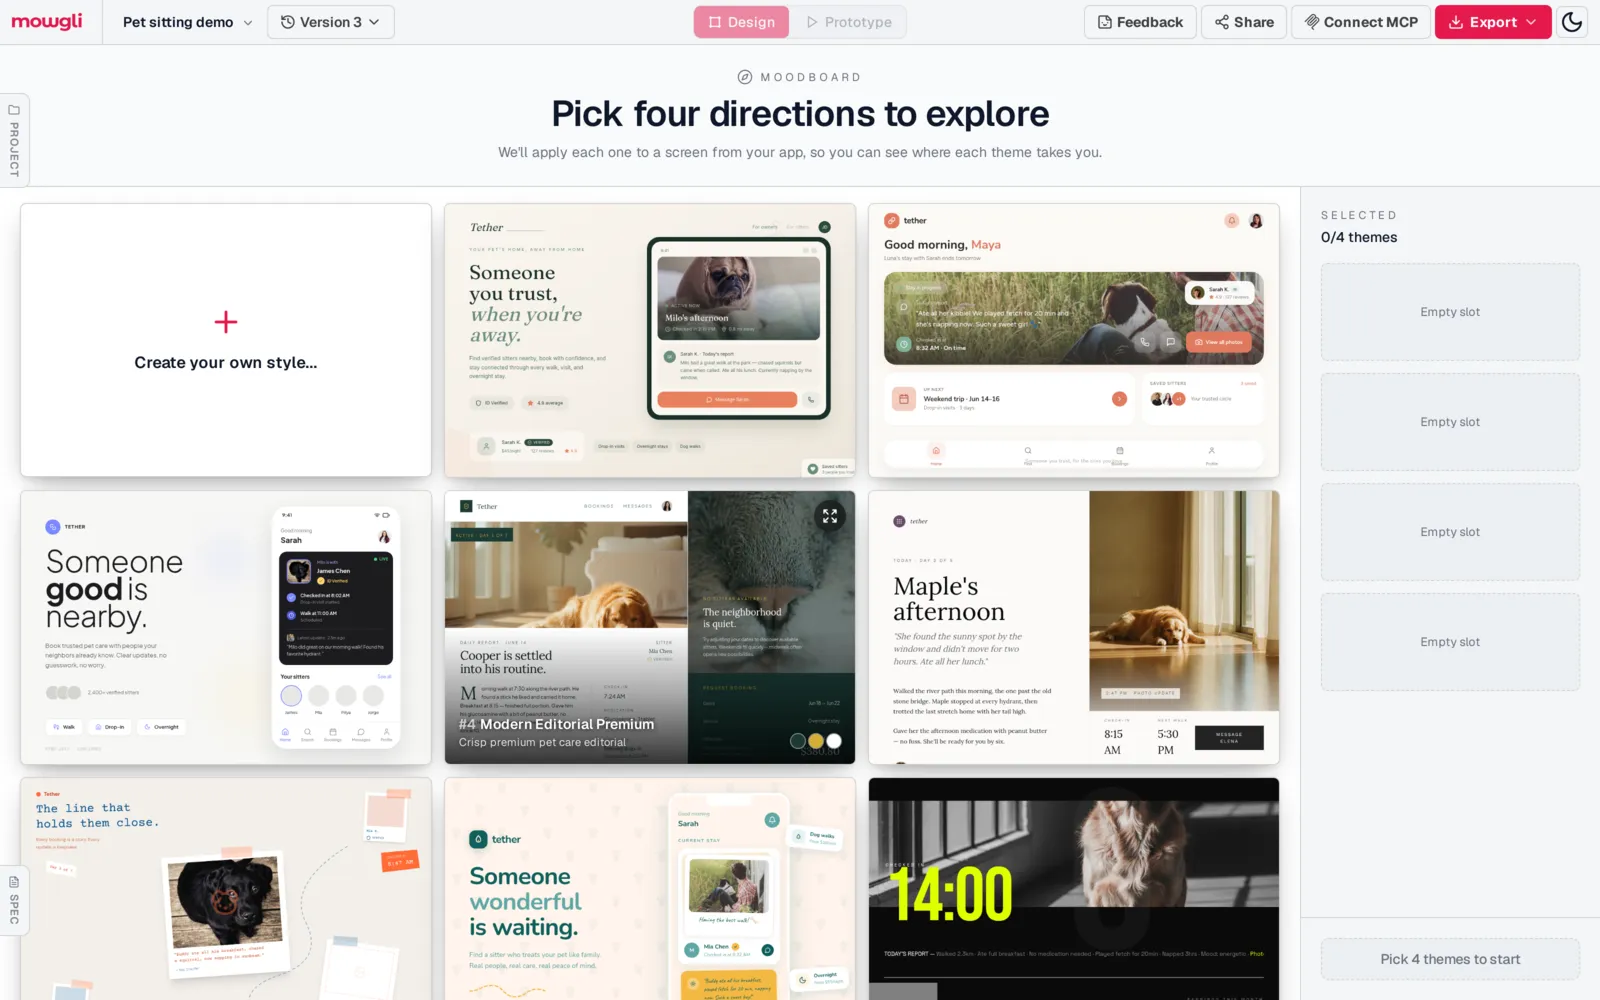
Caption: Step 4: 16 directions generated for this brief, each already showing Tether content.
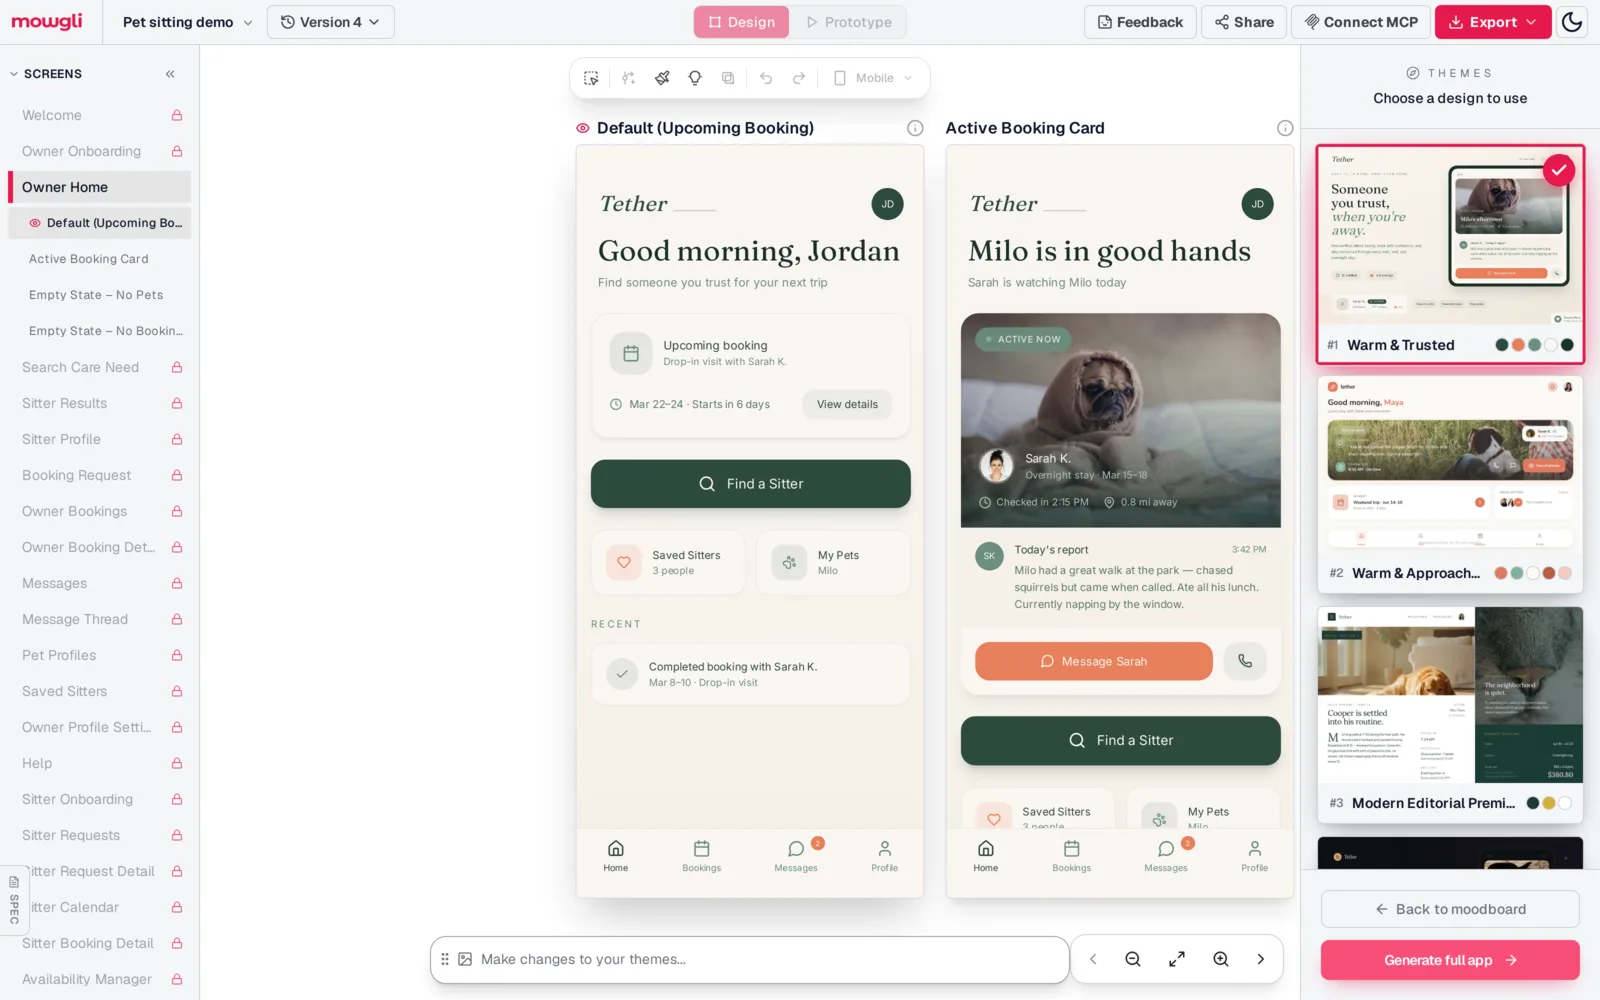
Caption: The theme preview uses your busiest screen, not a generic sample.
5. Generate and audit every screen and state
Selecting "Generate full app" started generation in spec order. The process took about 20 minutes and produced 23 screens with 77 states.
| Screen | States |
|---|---|
| Owner onboarding / sitter onboarding | 7 steps / 6 steps (incl. ID upload, verification pending) |
| Owner home | Upcoming booking, active booking, no pets, no bookings |
| Sitter results | List, map, map with sheet, no results |
| Booking request | New card, stored card, request sent |
| Owner bookings | Pending, upcoming, active, past, cancelled |
| Owner booking detail / sitter booking detail | 9 (image below) / 6 |
| Pet profiles, saved sitters, messages, requests, earnings | Each with an empty state |
| Sitter settings | Verified, ID pending, ID rejected |
| 9 more screens | Welcome, search, sitter profile, thread, settings, help, request detail, calendar, availability: 2-3 states each |
Match the generated screen count against the frontend list. Here, both counts were 23. Verify that every list has an empty state, then audit error and loading states separately with the states checklist.
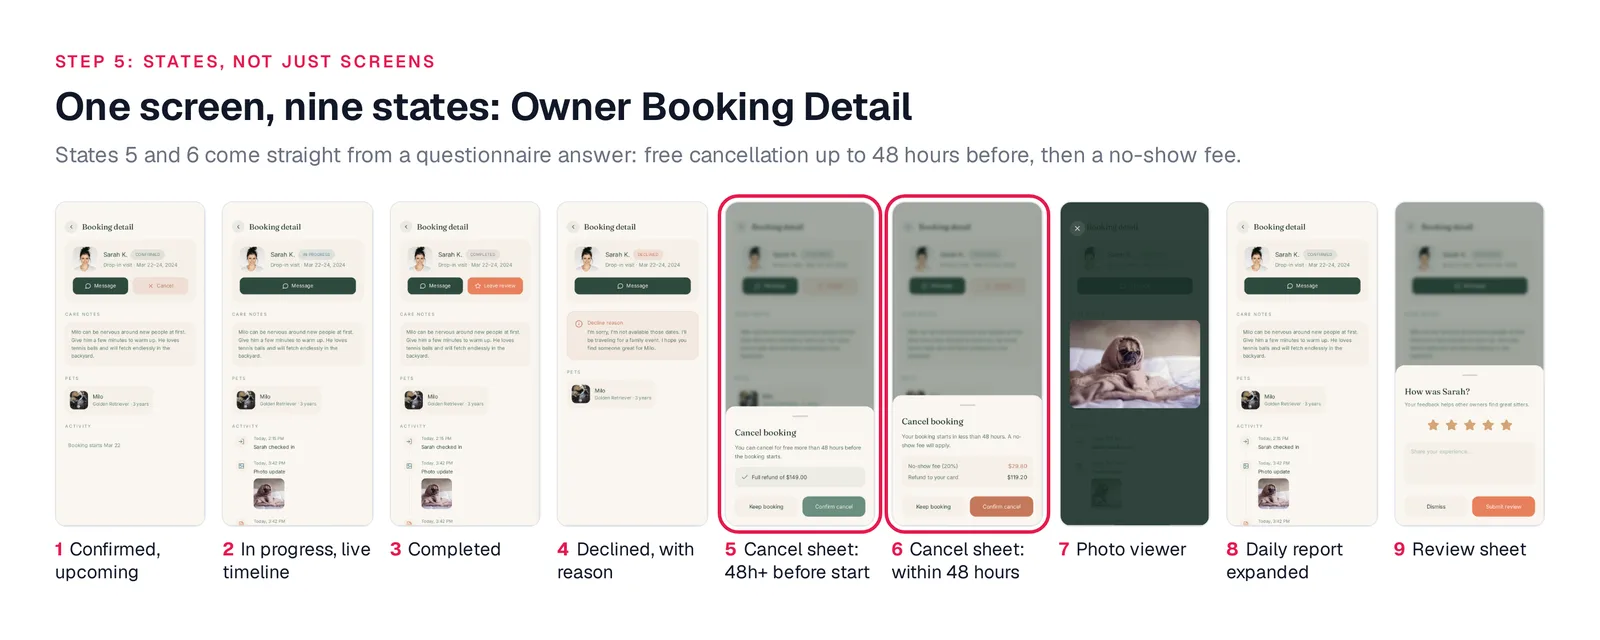
Caption: One screen, nine states. States 5 and 6 come from the cancellation answer in step 2.
6. Make cross-screen changes in one instruction
One chat edit created five distinct sitters with unique names, photos, ratings, review counts, rates and availability. It applied those identities consistently across Sitter Results, Owner Bookings, Messages and Saved Sitters.
The edit took 35 seconds and changed 13 states across 4 screens. The revision showed the changed-screen count and an edit summary, while creating a new version with undo available.
Group app-wide changes into one instruction. Afterward, open every screen named in the change summary and confirm that the shared content remains consistent.
See how to edit an app design by chatting.
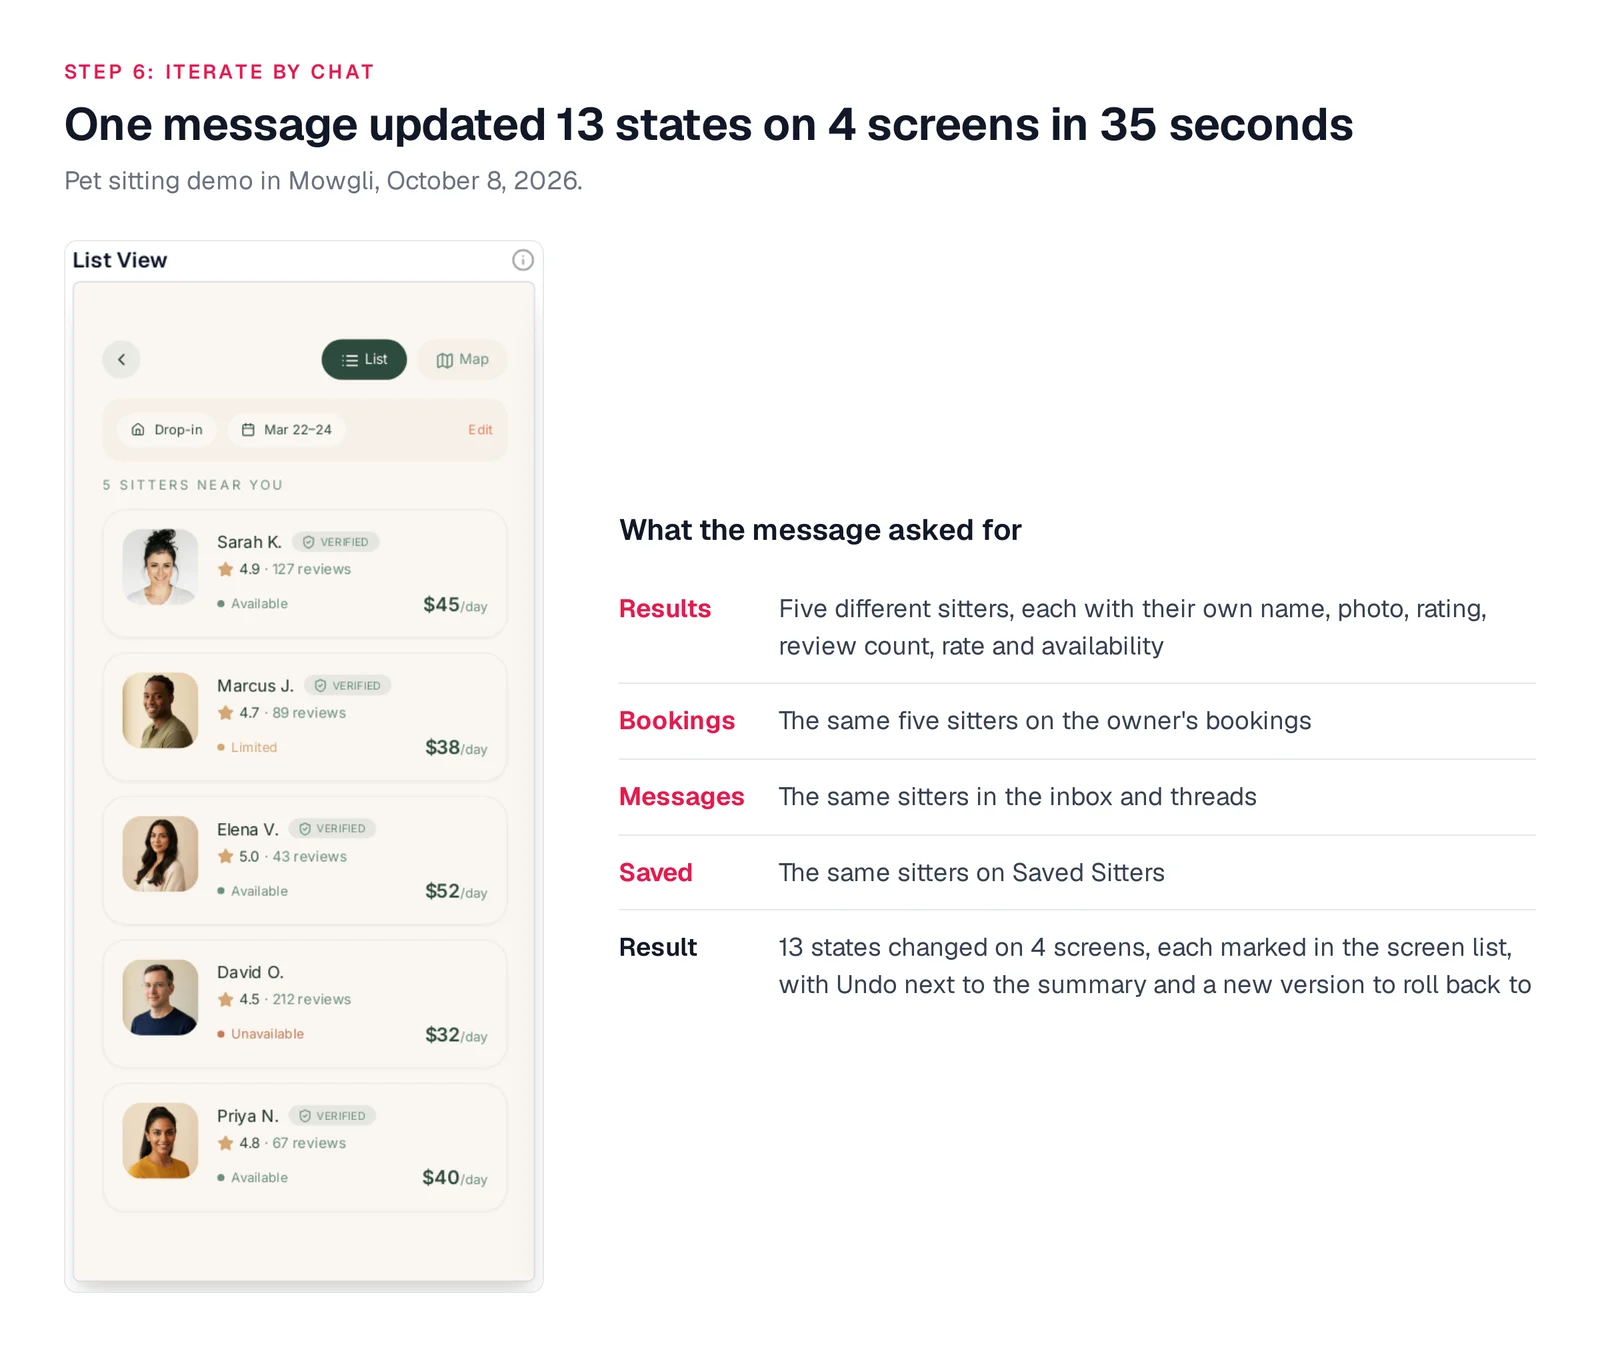
Caption: Step 6: one message, four screens. Every edit also creates a new version you can roll back.
7. Test every journey in the prototype
Prototype generation produced a coded, clickable app in 7 minutes. It included mock logins for both marketplace roles and working validation.
For example, searching without dates displayed "Please select a start date."
Walk every journey in the spec from start to finish. Repeat the test as both owner and sitter. Check lifecycle transitions, validation messages and empty states. Request corrections through prototype chat when a branch does not match the documented rule.
Learn more about prototyping or the complete PRD to prototype workflow.
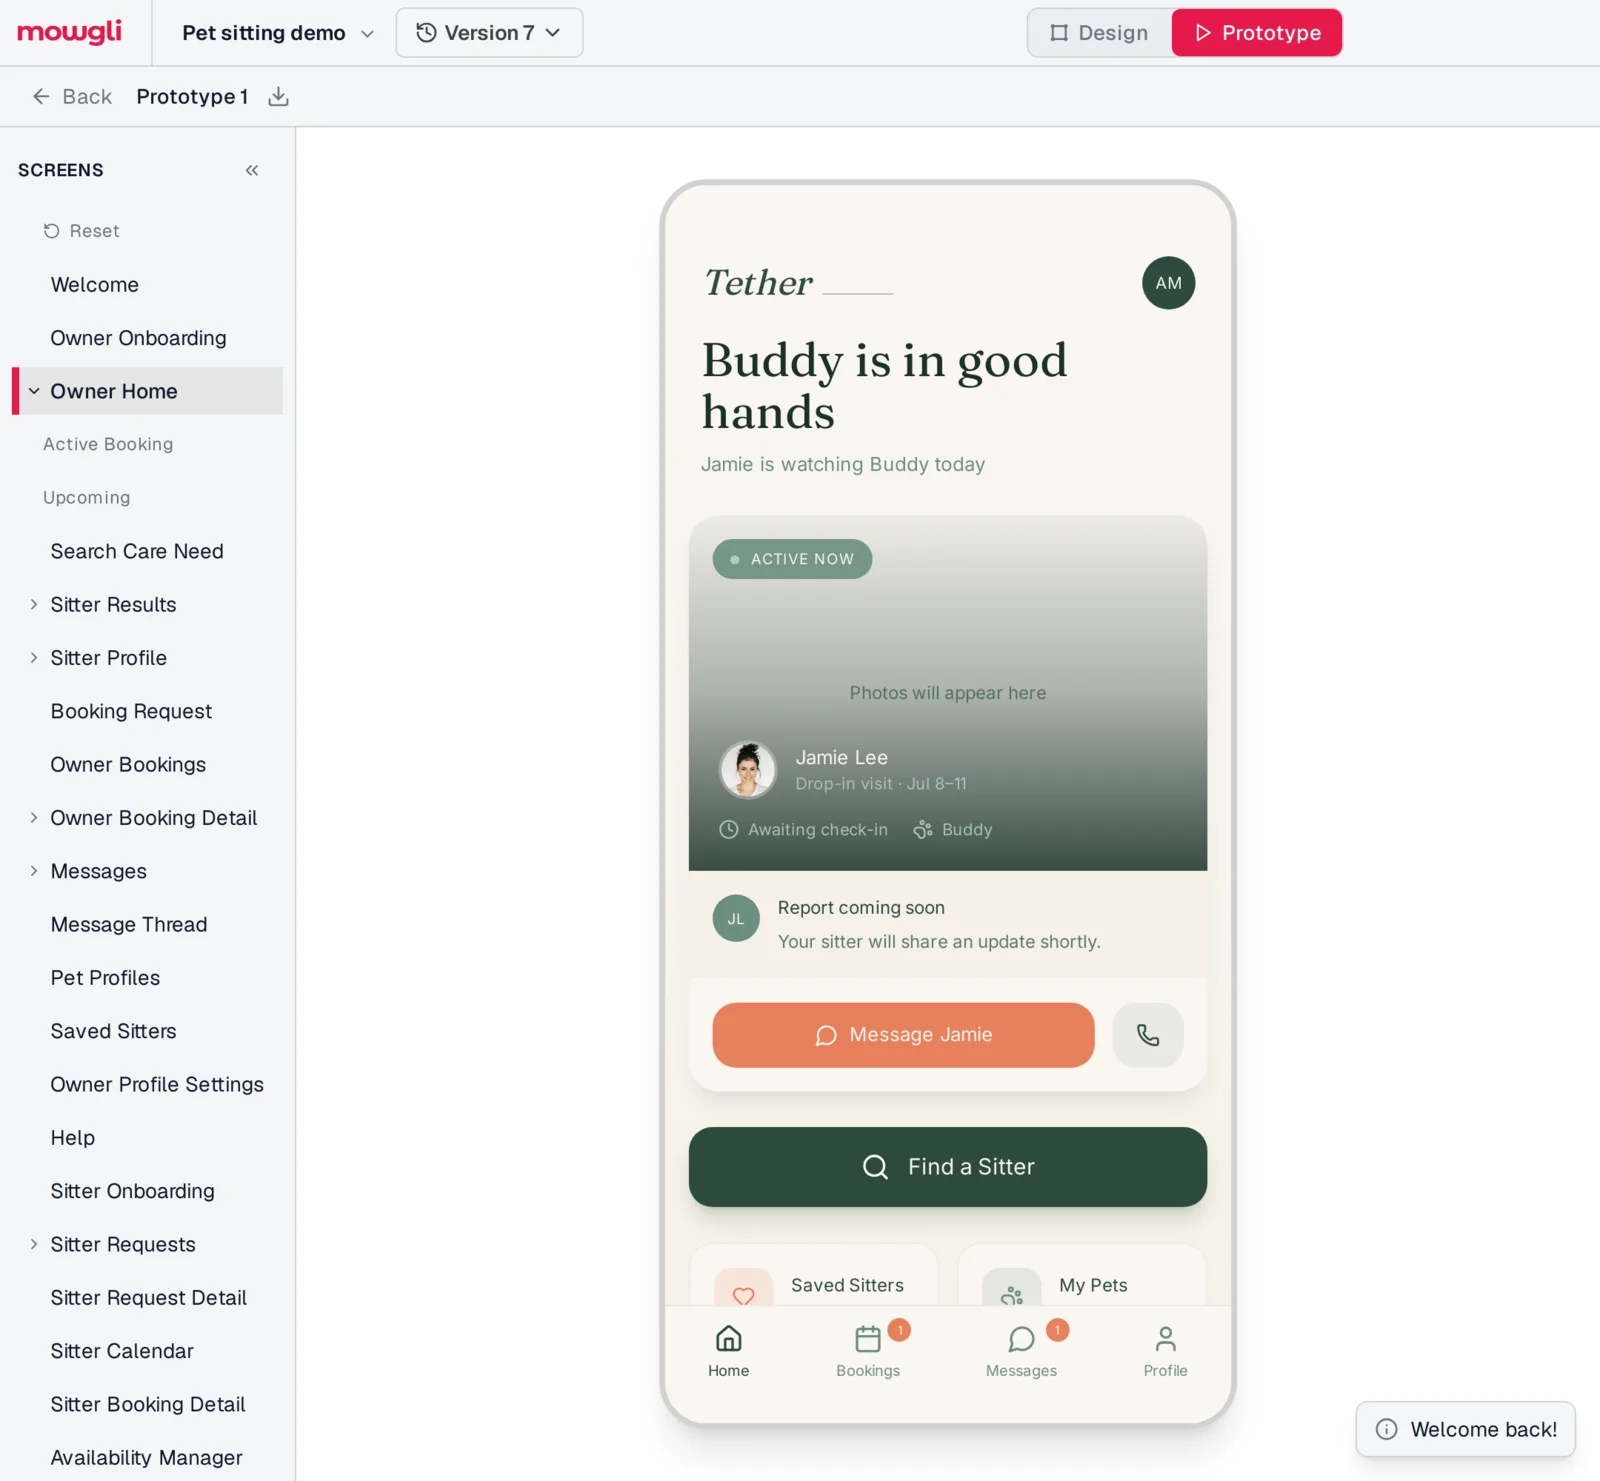
Caption: Step 7: signed in as the mock owner, the active booking card leads the home screen as the brief asked.
8. Export the design with its product context
Export options include an AI package for Claude Code, Codex, Cursor or another coding agent, a native Figma file, a standalone Vite + React + Tailwind prototype, PNG or JPG images, and a Mowgli package containing React + Tailwind code with the spec in PDF and Markdown.
Continuous synchronization is available through the agent skill, mowgli-cli, or the MCP server at https://app.mowgli.ai/mcp.
The coding agent can inspect SPEC.md for the pitch, journeys and data model, frontend.xml for screens and states, and one <ScreenId>.tsx file per screen.
A useful handoff includes product rules, journeys and states, not layouts alone. See design handoff to coding agents.
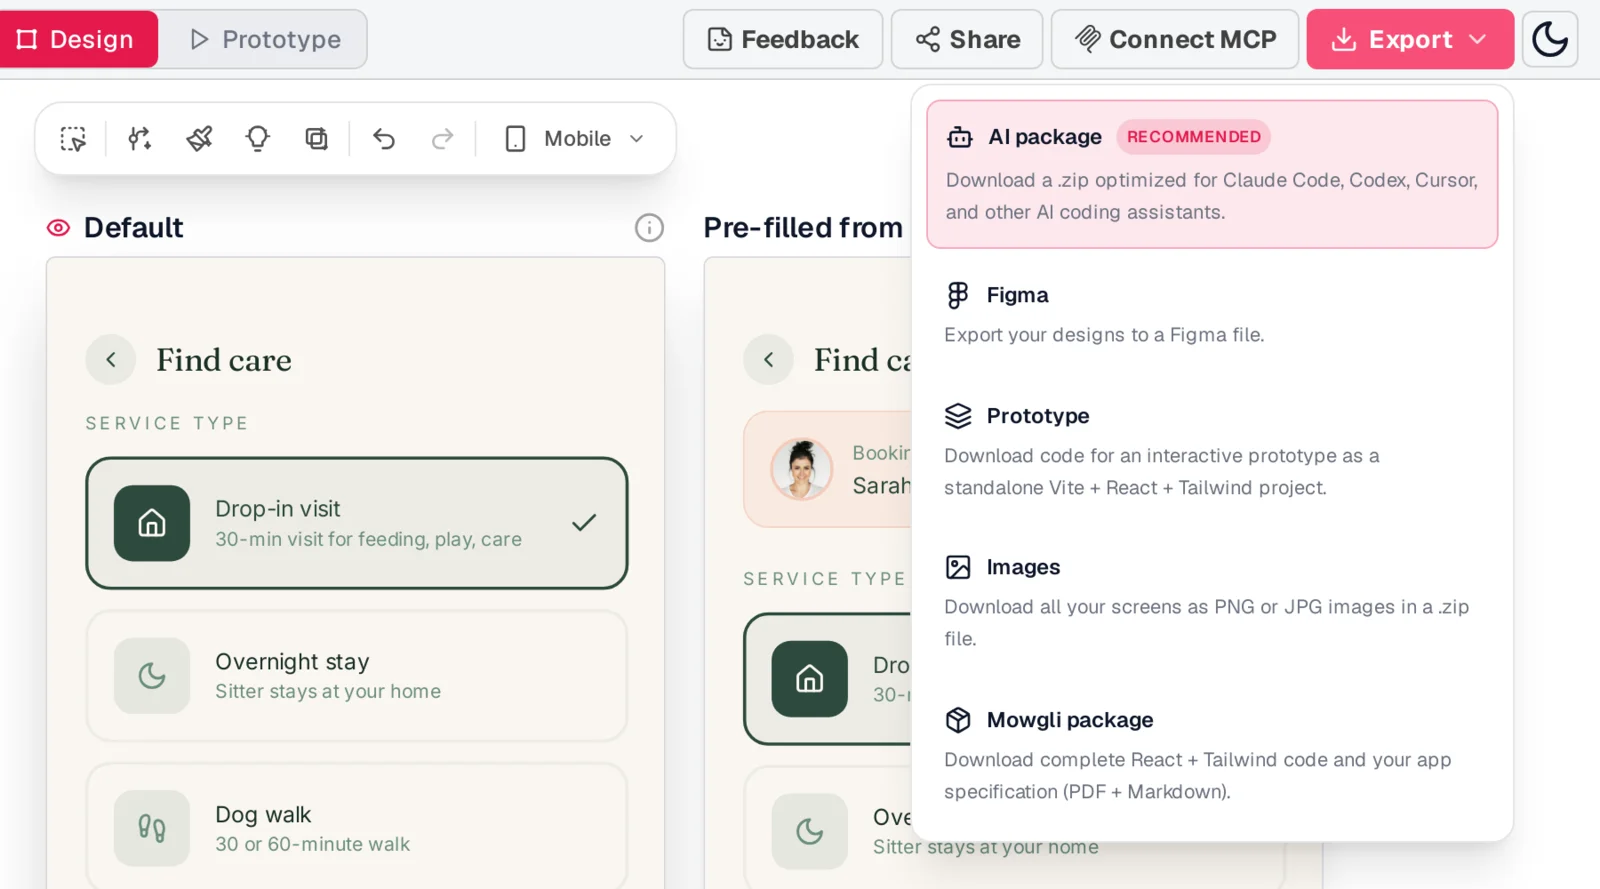
Caption: Step 8: export formats for designers, developers and coding agents.
Use this connection prompt:
I'd like to sync with a Mowgli project! Help me by either:
1. Installing the Mowgli skill with `npx skills add mowgli-ai/skills`.
2. Running `npx mowgli-cli --help` to learn how to use the Mowgli CLI.
3. Connecting the Mowgli MCP server at https://app.mowgli.ai/mcp.

Using the skill is most preferable, but if you don't have the capability, use the CLI directly. Using MCP is more token-inefficient, so use it as a fallback if options 1 and 2 don't work.
How long the full workflow took
The run was measured on October 8, 2026, excluding a break.
- Brief and 12 questions: 4 minutes 50 seconds.
- Spec and moodboard: 2 minutes 50 seconds.
- Theme selection and previews: 3 minutes 10 seconds.
- Generate 23 screens: about 20 minutes.
- Cross-screen chat edit: 35 seconds.
- Prototype: 7 minutes.
- Export: under a minute.
- Total: about 40 minutes.
- Hands-on portion: about 10 minutes.
The hands-on time covered describing, answering, reviewing, selecting and requesting the edit. The remaining time was unattended generation of the spec, moodboard, screens and prototype.
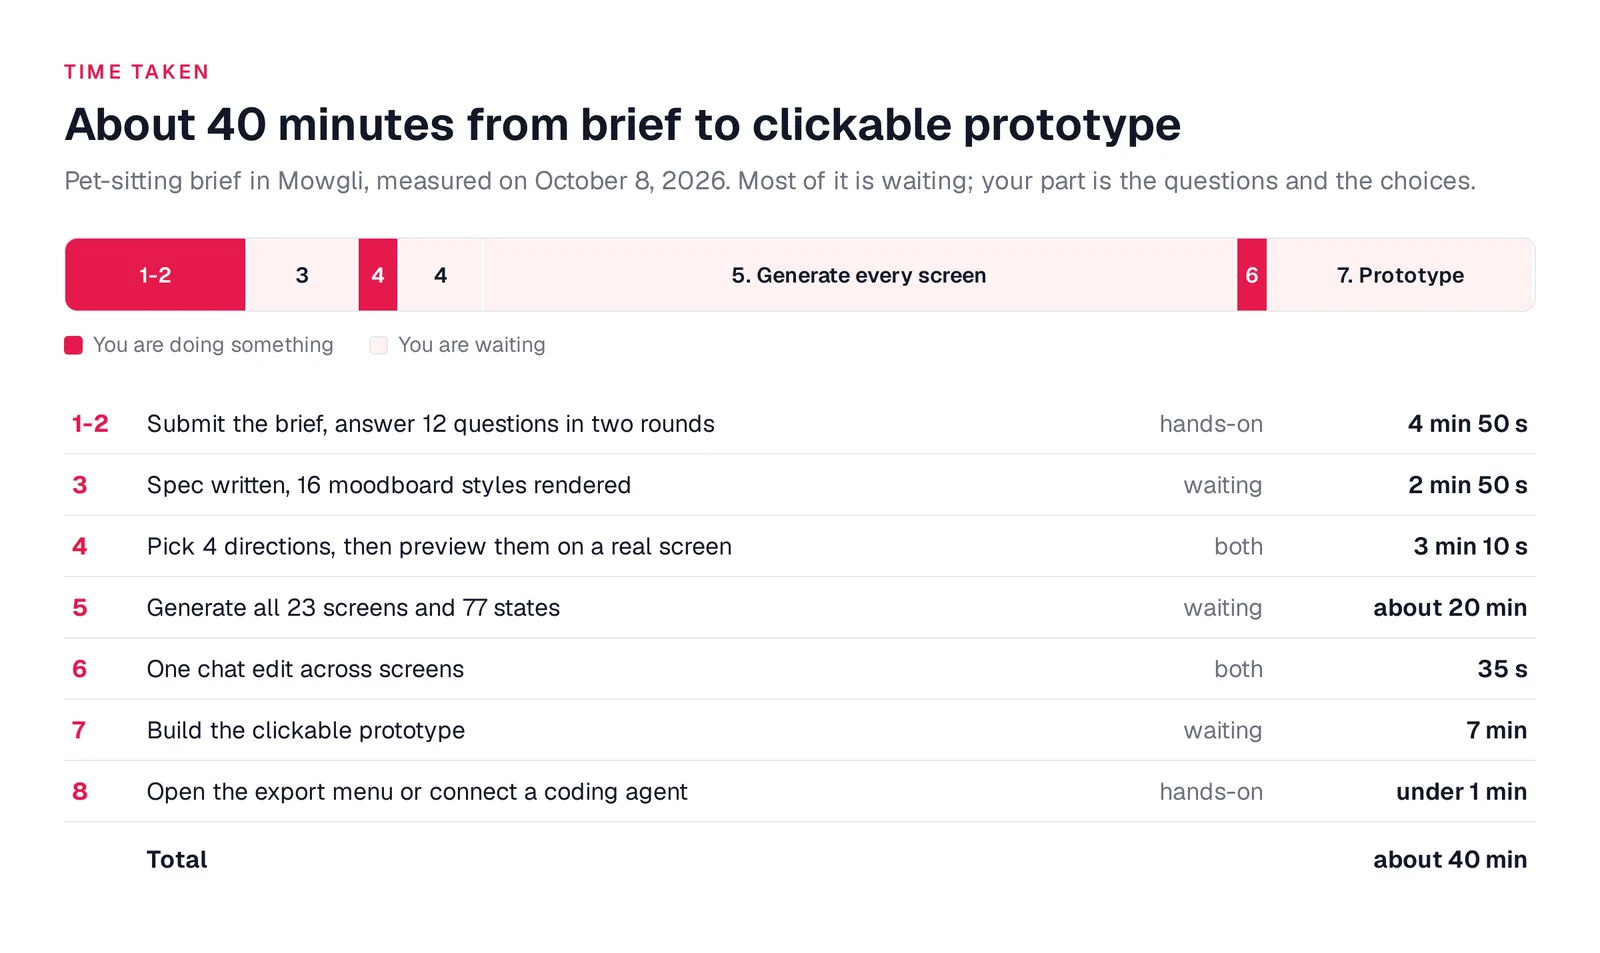
Caption: Times measured on October 8, 2026, excluding a break we took mid-run. Original graphic.
Which tool fits which multi-screen design job?
Choose by workflow rather than treating every generator as interchangeable. Prices are from each vendor's pricing page, October 2026.
| Tool | Screens from one prompt | How screens get connected | Export | Free plan / paid from |
|---|---|---|---|---|
| Mowgli | Every screen in the spec (23 + 77 states here) | Spec journeys, then a coded prototype | Figma, React + Tailwind, AI package, MCP | See pricing |
| Google Stitch | No fixed number published | "Stitch" screens into a prototype, click Play; can generate the next screen from a click | HTML/CSS, Figma, DESIGN.md | Daily credit limit, no public monthly numbers |
| Uizard Autodesigner | "Multi-screen" projects; free projects up to 5 screens | Prototype in a drag-and-drop editor | React/CSS developer handoff on Pro | Free: 3 AI generations/mo; Pro $12/mo billed annually |
| UX Pilot | Autoflow: "every screen in the UX journey"; free up to 13 screens/day | Flow with connected screens and branching | Figma and code on Pro | Free: 80 credits/day; Pro $19/mo billed annually |
| Flowstep | 1 by default, up to 6 if you ask | Preview links screens automatically | React + Tailwind, Figma paste, PNG/JPG (paid or trial) | Free: limited multi-screen; Starter from $15/mo |
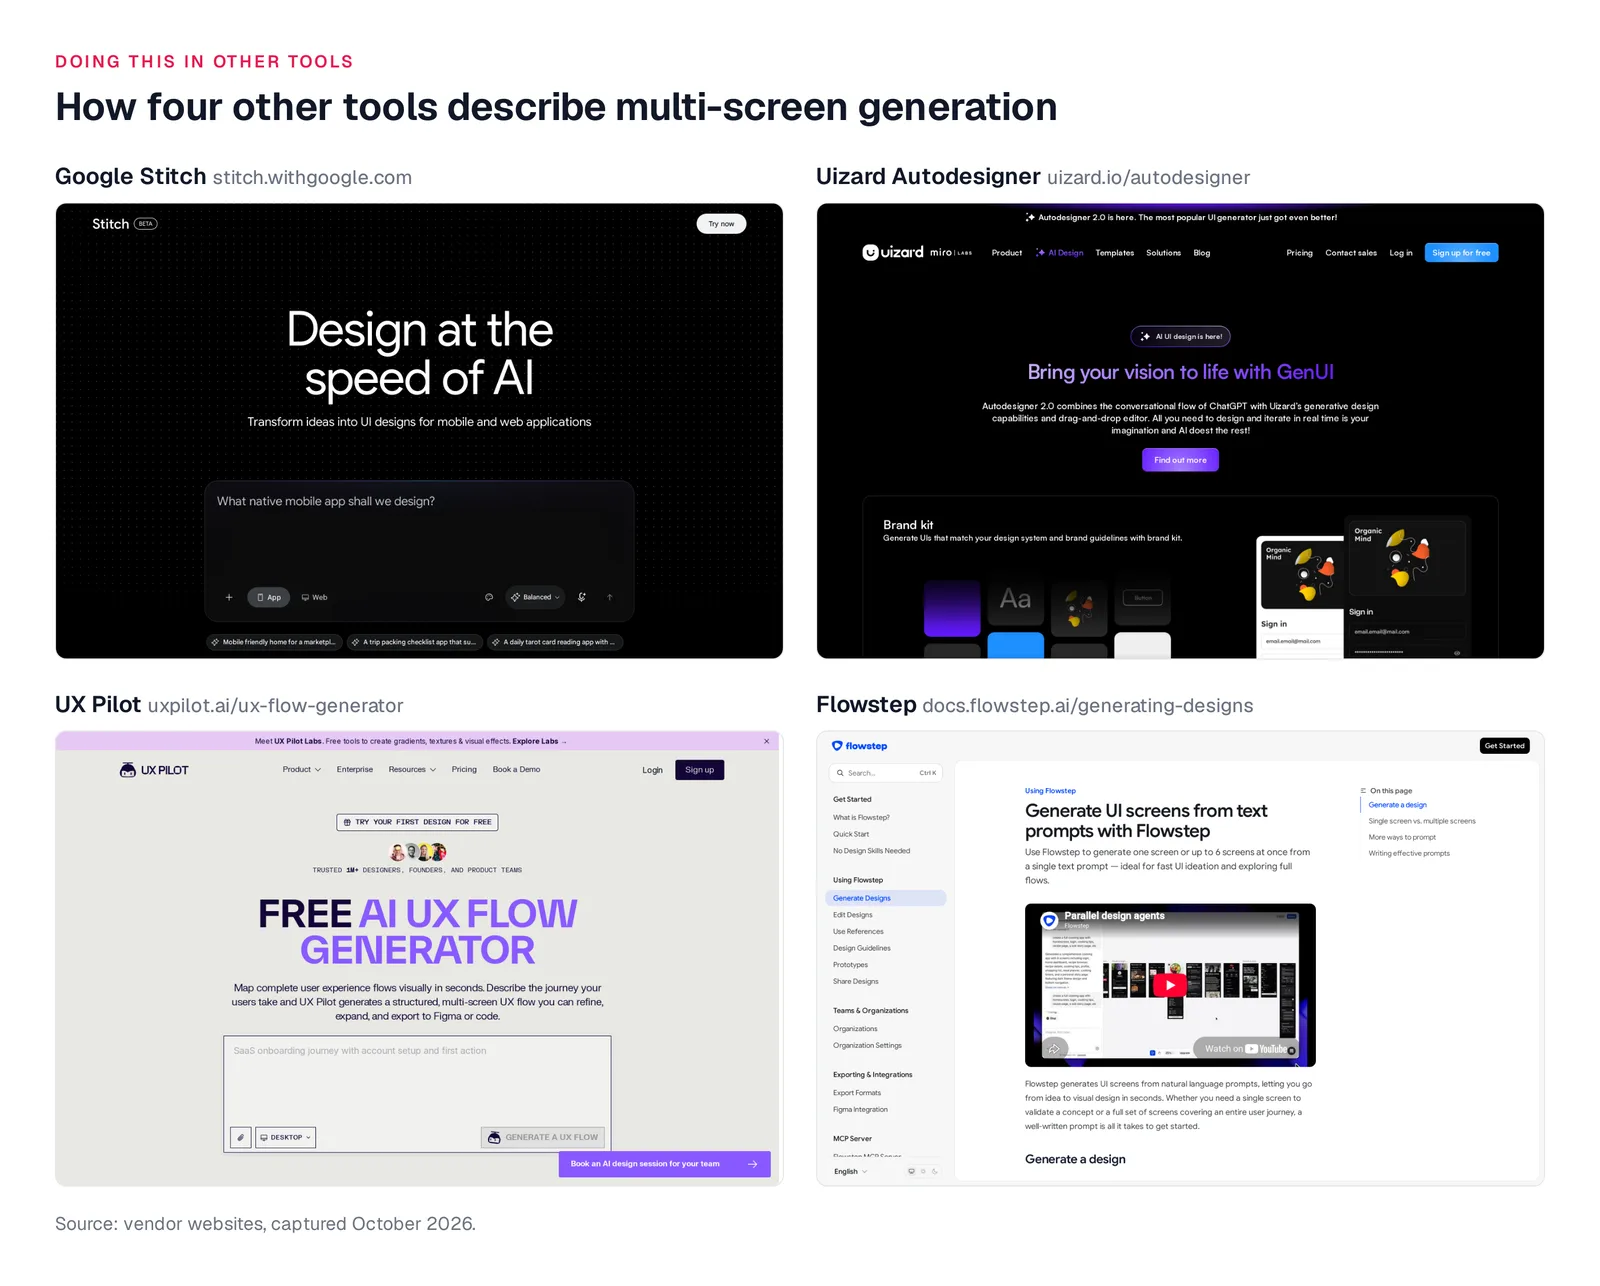
Caption: Source: Google, Uizard, UX Pilot and Flowstep websites, captured October 2026.
Mowgli fits a whole multi-role app generated from one synchronized spec, including 30 or more screens and states and a two-way workflow with Claude Code, Codex, Cursor or another coding agent. See design every screen of your app and Mowgli MCP.
Google Stitch fits a few free exploratory screens and iterative next-screen generation. Screens can be stitched into a prototype, and Play can generate logical next screens from clicks. That feature was introduced in March 2026. Keep DESIGN.md to maintain consistency across later screens. See keeping Stitch screens consistent.
Uizard fits multi-screen generation followed by manual editing in a drag-and-drop editor. It is part of Miro and describes Autodesigner as creating "multi-screen, editable prototypes in seconds using simple text." See Uizard vs Mowgli.
UX Pilot fits wireframes and connected UX flows intended for Figma. Autoflow can "generate every screen in the UX journey" with "connected screens, navigation paths, and logical branching." See UX Pilot vs Mowgli.
Flowstep fits IDE-led generation in small batches. It generates one screen by default or up to 6 from one prompt when requested. Its MCP server works with Cursor, Claude Code, Windsurf and Codex.
The practical verdict is direct: whole multi-screen, multi-role product in one planned run -> Mowgli. A few free exploratory screens -> Google Stitch. Hands-on visual editing after generation -> Uizard. Wireframe-first Figma workflow -> UX Pilot. IDE-based batches of up to 6 screens -> Flowstep.
For more options, read all AI app design tools compared.
Common mistakes that lead to incomplete app designs
"Login, home, profile, settings" is not a product description. It provides no journey, role behavior or rules. The pet-sitting brief named no screens and produced 23.
Do not omit secondary roles. A buyer-only description misses seller workflows. In this example, owners and sitters needed separate journeys, permissions and lifecycle views.
When generating in batches, establish a shared shell first and reuse it as the reference for later work. Otherwise, each batch lacks a common source for navigation and styling.
Name critical empty, error, loading and lifecycle states before generation. Verify each state against the final screen list with the states checklist.
Review the spec before approving full visual generation. This is the least expensive point to correct rules and scope.
Finally, test more than the default path. Walk every role, branch, validation case and status transition. For a smaller starting point, see designing a whole product from one sentence.
FAQ
Is there a tool where I can describe my app and it designs every screen?
Yes. Mowgli converts a description and questionnaire answers into a spec, then generates every screen in that spec. The demonstrated run turned a 125-word brief into 23 screens, 77 states and a clickable prototype in about 40 minutes. Google Stitch, Uizard, UX Pilot and Flowstep also generate multiple connected screens, with different per-prompt and plan limits.
How many screens can AI generate from one prompt?
The number depends on the tool. Mowgli generates every screen in its spec; this case study produced 23 screens and 77 states. Flowstep supports up to 6 screens from one prompt. UX Pilot's free plan supports up to 13 screens per day, while Uizard free projects support up to 5 screens. Google Stitch publishes no fixed per-prompt number.
How long does it take to generate a full app design with AI?
This case study took about 40 minutes for 23 screens, 77 states and a clickable prototype. About 10 minutes required hands-on input and review. The remaining time went to spec, moodboard, screen and prototype generation.
Can I generate a multi-screen app design for free?
Yes. Mowgli includes 300 starting credits, enough for a full wireframe app, questionnaire, PRD, Figma import, version history and coding-agent connection. Uizard includes 3 AI generations per month. UX Pilot provides up to 13 screens and 80 credits per day. Google Stitch has a daily credit limit without a public monthly number. Flowstep offers limited free multi-screen generation.
What should I include in an app description for AI?
Include the platform, audience, user's job, core objects, important fields, main flow, live-service or transaction state, every additional role, three tone words and what to avoid. Skip screen lists and hex codes. See designing a whole product from one sentence.
Can I turn an AI-generated app design into a prototype or code?
Yes. Mowgli exports a coded prototype, Figma, React + Tailwind and an AI package, with connections through its CLI, skill and MCP. Flowstep exports React + Tailwind, Figma paste and images. Google Stitch exports HTML/CSS, Figma and DESIGN.md. UX Pilot provides Figma and code export on Pro. Keep the spec and state definitions with the visual files during handoff.
Sources
- Google Stitch and Gemini 3
- Google Stitch AI UI design
- Google Stitch
- Uizard Autodesigner
- Uizard Autodesigner guide
- Uizard pricing
- UX Pilot
- UX Pilot UX flow generator
- UX Pilot plans
- Flowstep design generation
- Flowstep prototypes
- Flowstep export formats
- Flowstep pricing
- Mowgli pricing
- Mowgli MCP
- Mowgli agent skill