How to Turn an App Idea Into User Flows and a List of Screens
Define jobs and data, map each journey to screens and states, add system flows, then cut the complete screen inventory into an MVP.
Turn your app idea into a buildable screen list by defining the users and jobs, modeling the data, writing the main journeys, tagging every step with a screen, adding system flows, enumerating states, and cutting the result into an MVP.
The worked example below, Kitty, ends with 16 MVP screens and 51 states. You can follow the eight steps manually with a document or spreadsheet, then hand the inventory to a designer, an AI design tool, or a developer.
The eight-step answer
Use this sequence:
- Write the pitch and identify every role.
- Define the jobs and repeated core loop.
- Model entities, relationships, statuses, and derived values.
- Write numbered journeys with branches and errors.
- Tag each step with a screen and map navigation.
- Add required system screens.
- Enumerate every state for every screen.
- Keep core-loop and required screens in the MVP, and move the rest to later.
Each step produces an artifact that constrains the next one. This prevents a short product pitch from turning directly into disconnected mockups.
You can also use Mowgli to generate the product spec, journeys, data model, screen list, and states before designing every screen together. We make Mowgli.
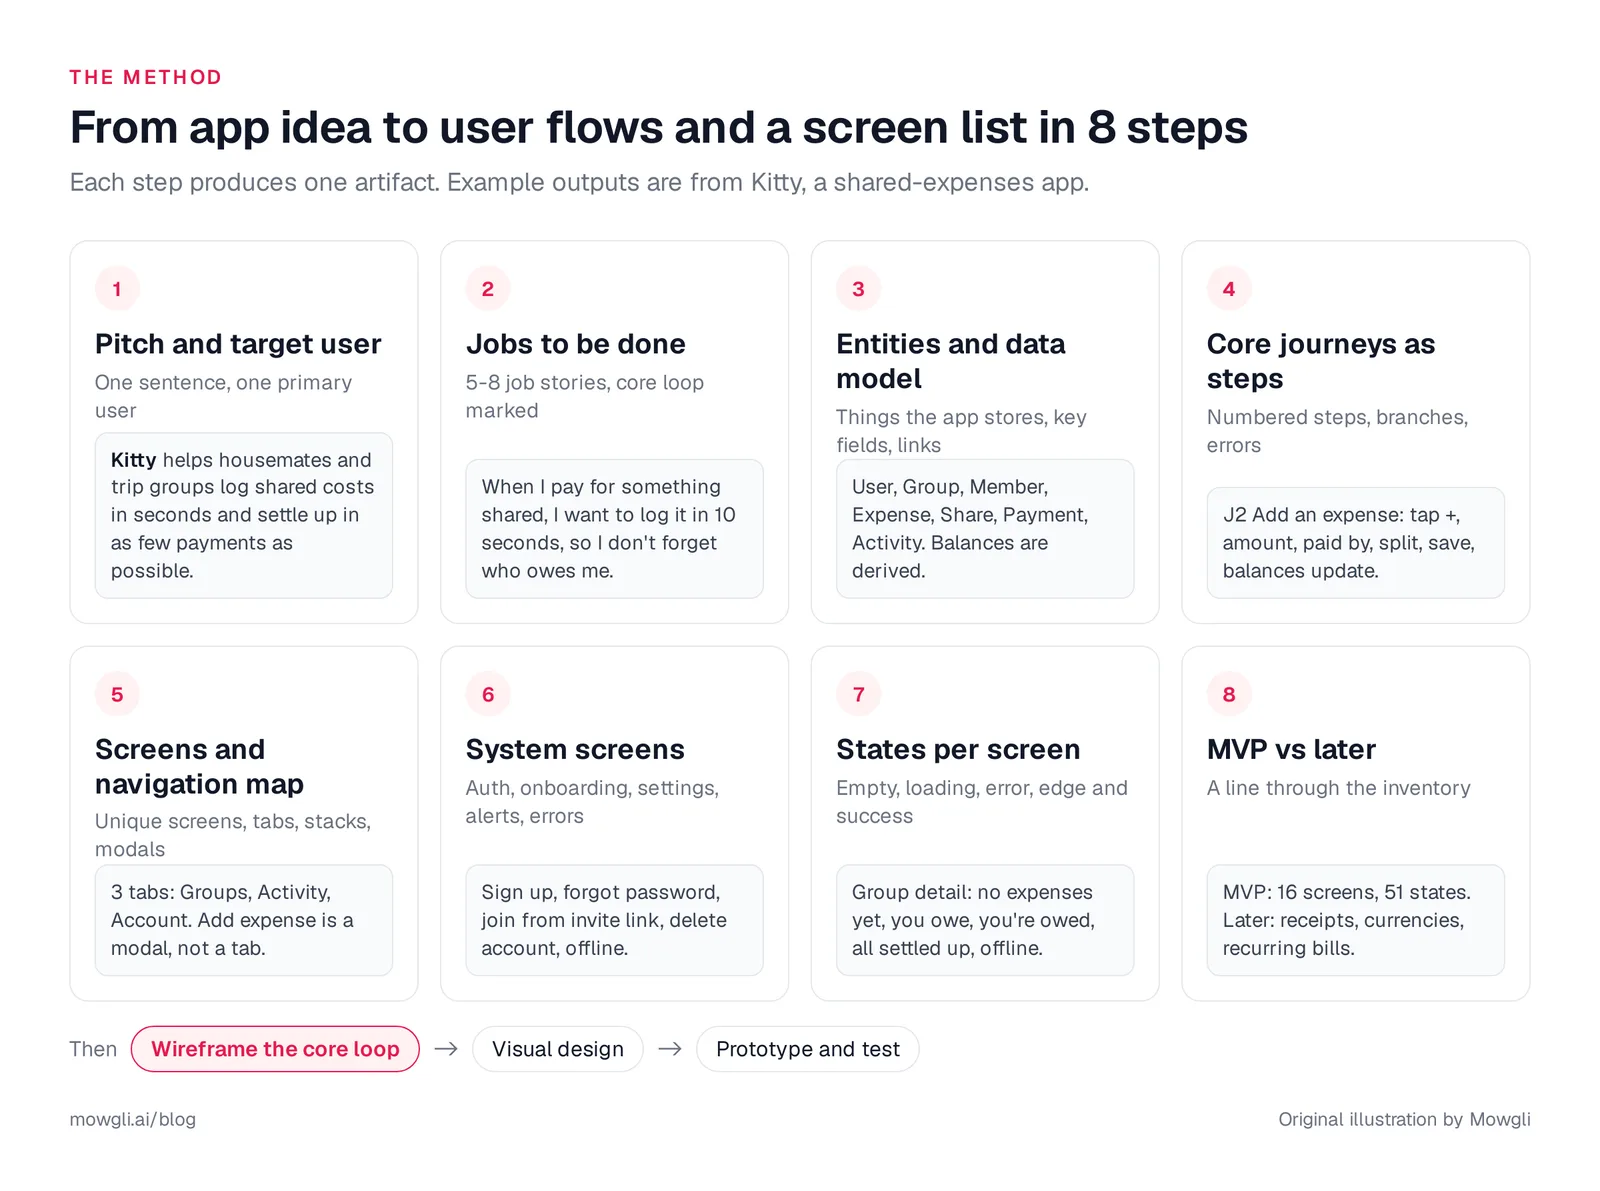
Caption: The eight steps and the artifact each one produces. Original illustration by Mowgli.
User flows, journeys and screen inventories
Nielsen Norman Group defines a user journey as the steps taken "to accomplish a high-level goal with a company or product, usually across channels and over time." A user flow is "the typical or ideal set of steps needed to accomplish a common task performed with a product."
This post uses "journey" for the written in-app steps required to complete one job. That is close to the NN/g user-flow definition.
A screen inventory is the deduplicated list of screens, modals, and sheets required by those journeys. Each entry records its purpose, related journeys, content, and states.
Your finished inventory should contain enough detail for a designer, design tool, or developer to proceed without inventing missing product rules.
1. Write the pitch and identify every user role
Start with a narrow promise and name everyone who interacts with it.
[App] helps [specific user] [do the job] when [situation],
instead of [what they do today].
Primary user: [who opens it most often]
Other roles: [who else uses it, and what they need from it]
Kitty helps housemates and trip groups record shared expenses quickly and reduce the number of settlement payments. The current alternative is a spreadsheet plus a group chat.
Its primary user is the person who usually pays first. A secondary role is the friend who mainly checks and pays their balance.
Different goals can require separate journeys or home screens. A buyer and seller need different starting points. An admin and member may see the same records but have different actions.
If your idea is still broad, start with designing from one sentence.
2. Turn the idea into jobs and a core loop
Alan Klement's job-story format is: "When [situation]... I want to [motivation]... so I can [expected outcome]."
List the jobs, then mark the one or two repeated weekly behaviors as the core loop. Kitty has seven:
- Core: record a shared purchase in about 10 seconds before it is forgotten.
- Core: see amounts owed and owing.
- Finish a trip or month with the fewest settling payments.
- Add a whole group, including people without accounts.
- Investigate and correct unexpected numbers.
- Later: automate recurring rent.
- Later: convert foreign-currency expenses.
The correction job matters. It creates edit, deletion, history, and error flows that a happy-path inventory usually misses.
3. List entities and sketch the data model
Translate the jobs into objects and rules. An entity commonly needs a list, detail, and create or edit view. A relationship creates a navigation path. A status field creates visible states. Derived values still belong in the content specification.
| Entity | Key fields | Relationships | What it means for screens |
|---|---|---|---|
| User | name, email, default currency | member of many groups | Account settings |
| Group | name, type (home, trip, other), currency | has members, expenses, payments | Groups list, group detail, create group |
| Member | user or placeholder name, status (invited, active, left) | belongs to a group | Invite sheet, "Are you Sam?" when joining, left-member state |
| Expense | description, amount, date, paid by, split method (equal, exact, percent, shares) | has one share per member | Add or edit expense, split editor, expense detail |
| Share | member, amount owed | belongs to an expense | Rows in the split editor |
| Payment | from, to, amount, date, method (cash, bank transfer) | belongs to a group | Settle up |
| Activity | actor, action, target, time | points at an expense or payment | Activity feed |
Kitty derives balances from expenses and payments instead of storing them. A headline such as "You owe $42.50" is still required content, so it belongs in the screen specification.
4. Write each core journey as numbered steps
Put one user action or system response on each line. State defaults because defaults determine the initial UI. Include preconditions, branches, errors, completion criteria, and deliberately deferred behavior.
Journey: [name]                     ID: J[n]
Actor: [role]                       Trigger: [what starts it]
Goal: [what "done" looks like for the user]
Preconditions: [what must already exist]

Steps (one user action or system response per line)
1. [action or response]                            -> [Screen]
2. ...
Branches
2a. If [condition]: [what happens]                 -> [Screen: state]
Errors
E1. [what fails]: [what the user sees and can do]  -> [Screen: state]
Done when: [observable end state]
Later: [steps you are deliberately leaving out]
Kitty needs six core journeys: create an account and group, add an expense, check balances, settle up, join through an invite, and correct a mistake.
Journey: Add a shared expense       ID: J2
Actor: any member                   Trigger: paid for something shared
Goal: everyone's balance reflects the cost
Preconditions: a group with at least one other member

1. Taps + on the group                                    -> Group detail
2. Enters amount and description; date defaults to today  -> Add expense
3. Paid by defaults to "you"; can pick another member     -> Add expense
4. Split defaults to "equally, everyone"                  -> Add expense
4a. If unequal: exact amounts, percentages or shares      -> Split editor
4b. If it doesn't add up: "$12.00 left to assign",
    Save disabled                                         -> Split editor: error
5. Saves; expense appears on top, balances update         -> Group detail
6. Other members see it in their feed                     -> Activity
E1. Offline: saved locally, marked "Waiting to sync"      -> Group detail: offline
E2. Save fails: input kept, Retry shown                   -> Add expense: save failed
Done when: every member's balance includes the expense
Later: receipt photo, foreign currency, itemized split
5. Derive the screen list and navigation map
Tag every journey step with its location, then deduplicate the tags. This produces the first screen inventory.
Create a separate screen when the user moves to a different object or collection, a focused editor would crowd its parent, or one screen serves unrelated jobs. Keep small field changes within the current screen.
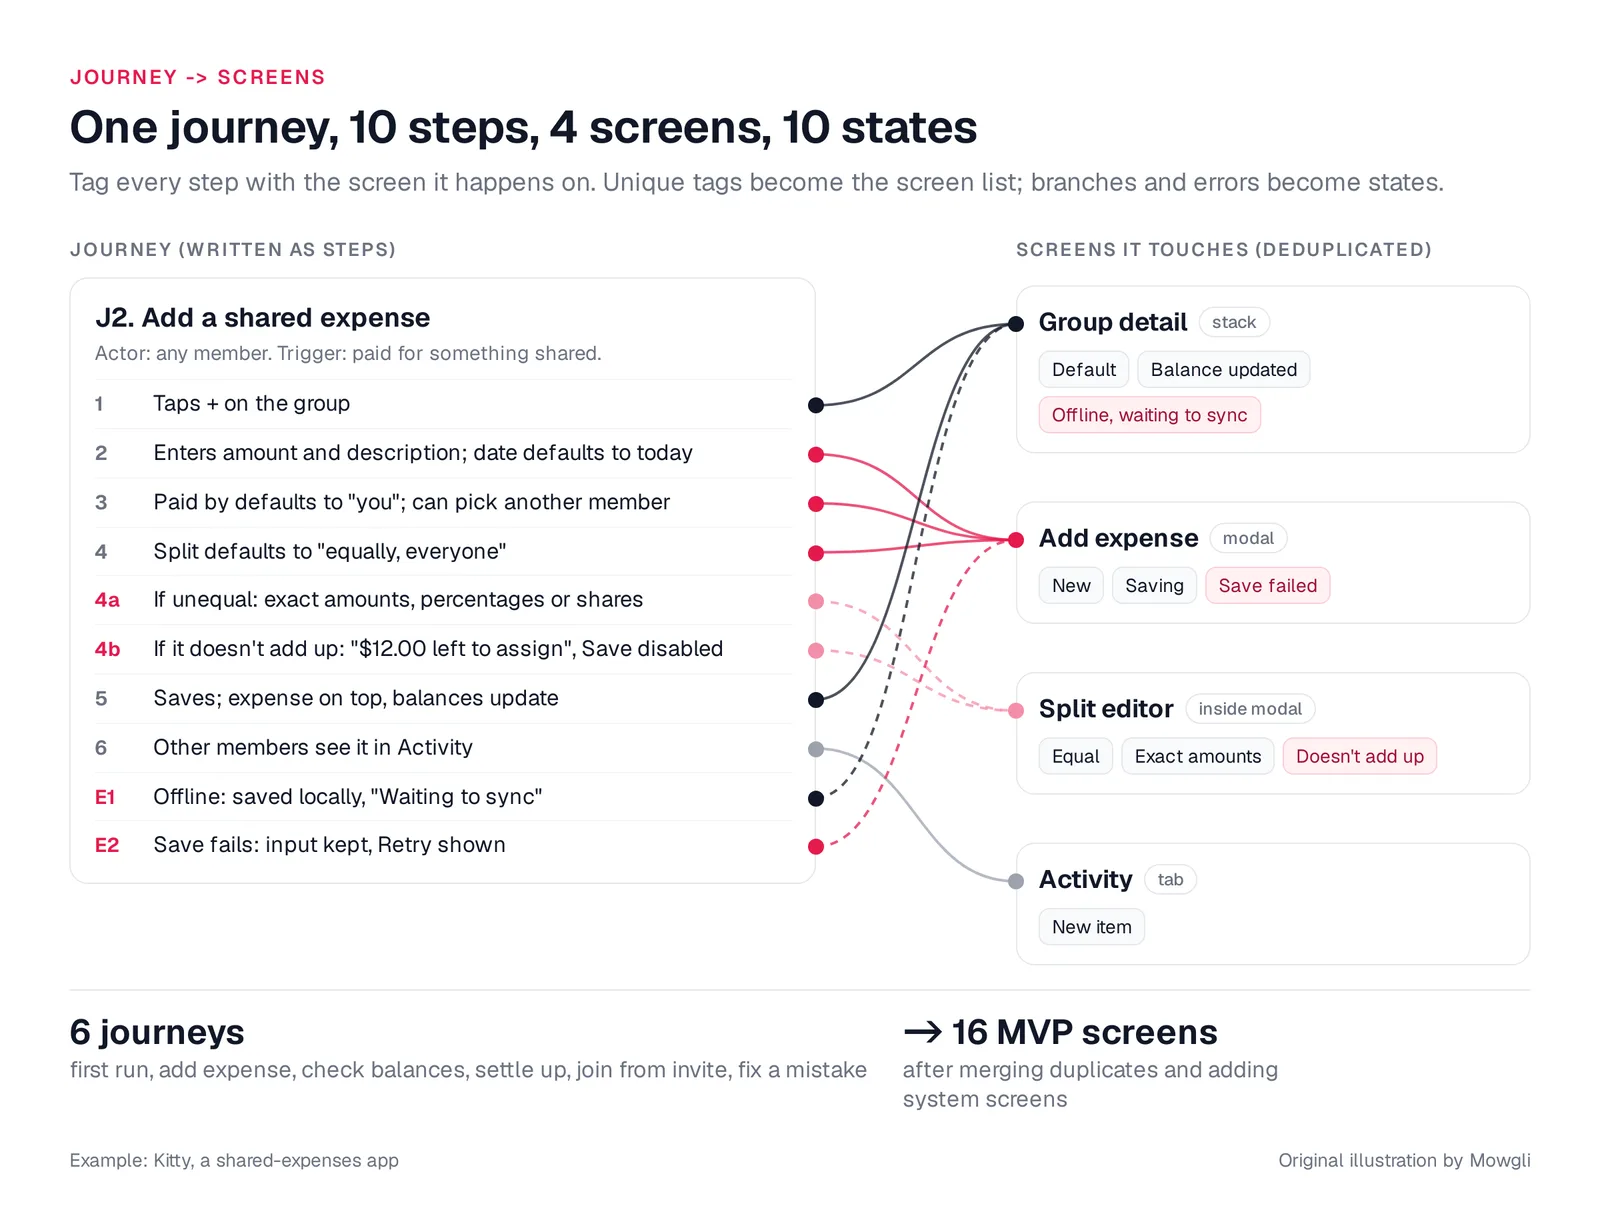
Caption: One journey, 10 steps, 4 screens, 10 states: branches and errors become states. Original illustration by Mowgli.
Assign each location a navigation type: tab, pushed screen, modal, or sheet. Apple says, "Use a tab bar to support navigation, not to provide actions." Android recommends a navigation bar for "three to five destinations of equal importance."
Kitty uses Groups, Activity, and Account as tabs. Adding an expense is an action that opens a modal.
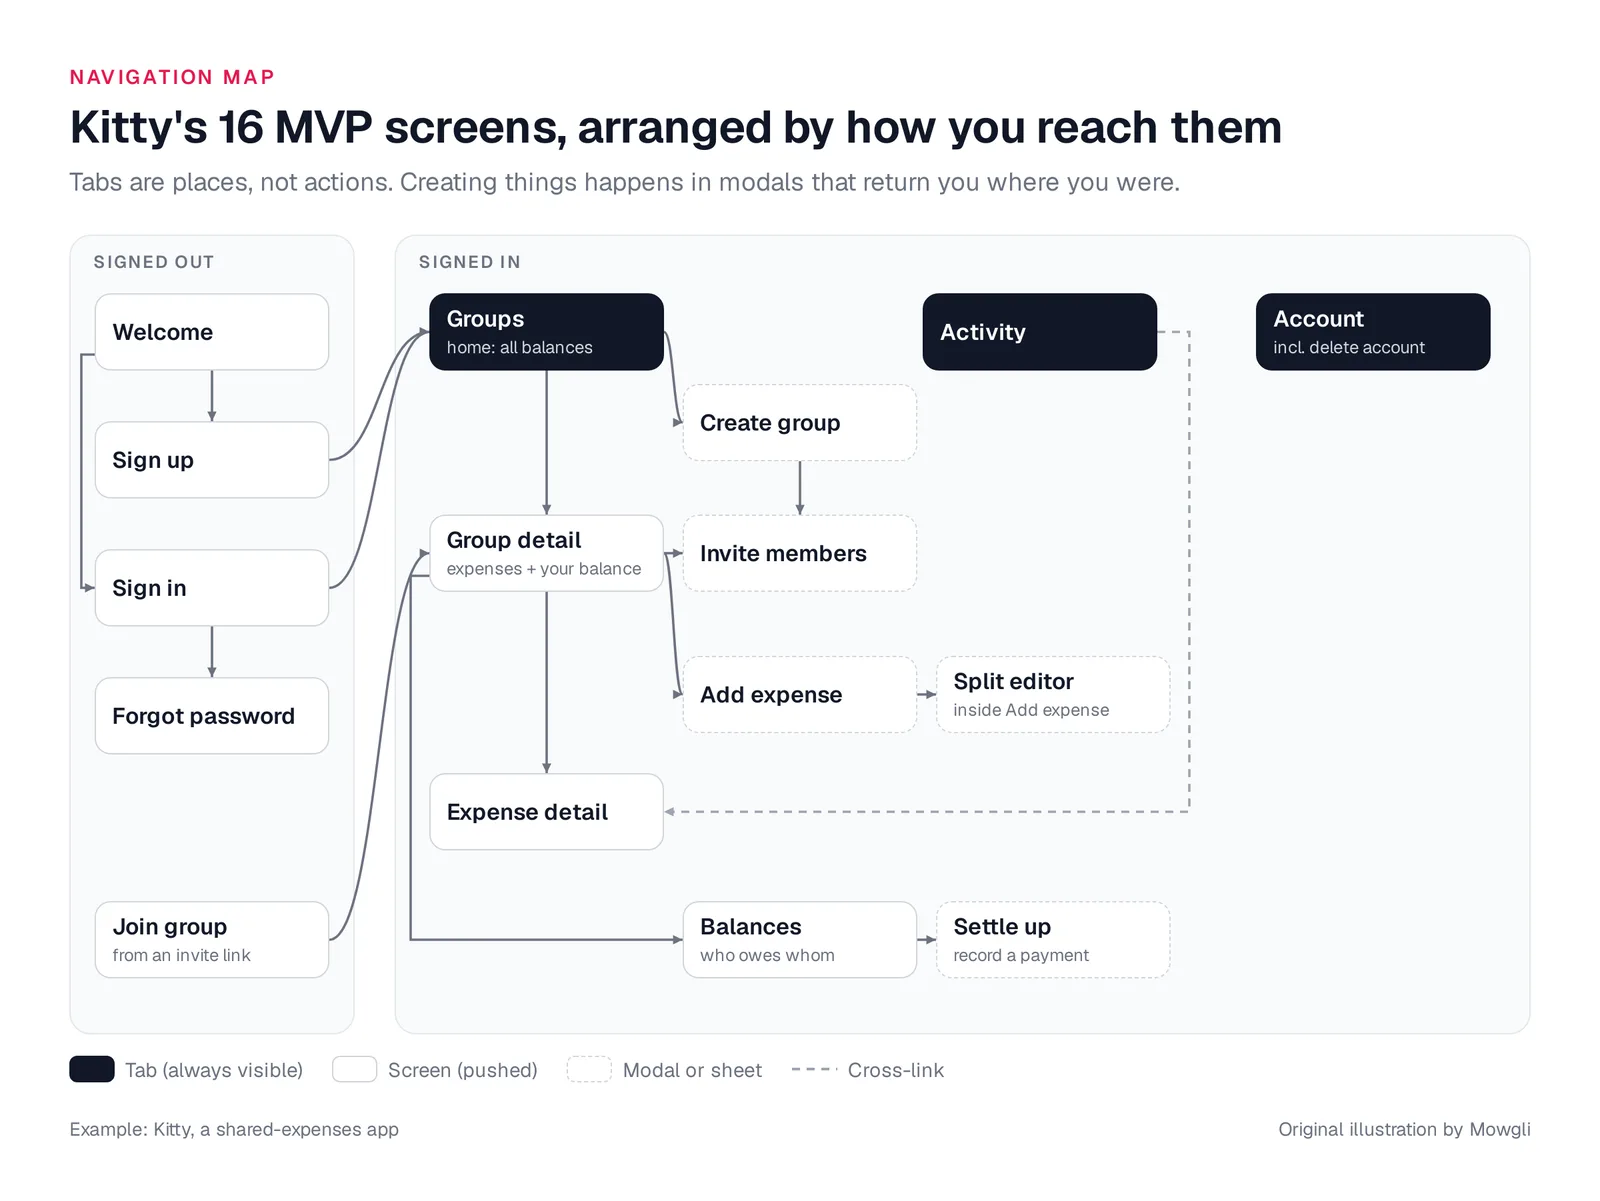
Caption: Kitty's 16 MVP screens arranged by how you reach them. Original illustration by Mowgli.
6. Add the system screens the pitch omitted
Product pitches rarely mention account recovery, permissions, deletion, or broken links. The build still needs them.
Add welcome, sign-up, sign-in, forgot-password, and email-verification screens when required. On iOS, third-party sign-in such as Google Sign-In generally requires an equivalent privacy-focused option.
Apple requires in-app account deletion. Google Play requires a web deletion link. Paid products may also need a paywall, plans, and purchase restoration.
End onboarding inside the core loop instead of ending with a feature tour. Kitty finishes onboarding at an empty group with an "Add the first expense" action. See onboarding flows.
Ask for permissions in context. Apple recommends requesting notification access "in a context that helps people understand why your app needs authorization." Kitty asks after the first group exists and includes a notifications-off state in settings.
Also cover valid, existing-member, and expired invite links, plus offline, failed-save, and not-found states. B2B products commonly add roles, invitations, billing, and an audit log. See every screen a B2B SaaS needs.
Six of Kitty's 16 MVP screens are system screens: Welcome, Sign up, Sign in, Forgot password, Join group, and Account.
7. Enumerate every screen state
Use four states as a baseline:
- Default with realistic data.
- Empty.
- Loading.
- Error.
Then add every journey branch, journey error, and entity status value.
Kitty's Group detail screen has seven states: no expenses, only the current user, user owes, user is owed, all settled, offline with a queued expense, and loading.
Track states as design scope, not implementation notes. The empty, error and loading states checklist covers ten state types and includes a screen x state table.
8. Cut the complete inventory into an MVP
Keep every screen touched by a core-loop journey, every required system screen, and every editor needed to finish the core job.
Move screens that serve only deferred jobs to "later." Record one reason for each cut. This follows the release-slicing logic in Jeff Patton's user-story mapping method.
Splitwise Pro lists receipt scanning, currency conversion, charts, itemization, and transaction import. Those categories align with features Kitty can defer while preserving its core loop.
Copyable screen-inventory template
| # | Screen | Type (tab / pushed / modal) | Purpose (job) | Journeys | Key content | States | MVP or later |
|---|--------|-----------------------------|---------------|----------|-------------|--------|--------------|
| 1 |        |                             |               |          |             | default, empty, loading, error, ... |  |
Kitty's finished inventory
| # | Screen | Type | Purpose | Journeys | States | MVP |
|---|---|---|---|---|---|---|
| 1 | Welcome | screen | Route new vs returning users | J1 | default | MVP |
| 2 | Sign up | screen | Create an account | J1, J5 | default, email already used, field errors | MVP |
| 3 | Sign in | screen | Get back in | - | default, wrong email or password | MVP |
| 4 | Forgot password | screen | Reset access | - | enter email, link sent | MVP |
| 5 | Groups | tab | Every balance at a glance | J1, J3 | no groups yet, mixed balances, all settled, loading, offline | MVP |
| 6 | Create group | modal | Start a home or trip group | J1 | default, name missing | MVP |
| 7 | Invite members | modal | Add people, with or without the app | J1 | default, link copied, placeholder added | MVP |
| 8 | Group detail | screen | Expenses and where you stand | J2, J3, J4, J6 | no expenses yet, only you, you owe, you're owed, all settled up, offline (queued), loading | MVP |
| 9 | Add or edit expense | modal | Log a cost | J2, J6 | new, editing, saving, save failed | MVP |
| 10 | Split editor | modal | Split unequally | J2 | equal, exact amounts, doesn't add up, member excluded | MVP |
| 11 | Expense detail | screen | Who paid what; fix mistakes | J6 | default, edited (history), delete confirmation, deleted by someone else | MVP |
| 12 | Balances | screen | Who owes whom in this group | J3, J4 | some debts, everyone square | MVP |
| 13 | Settle up | modal | Record a payment | J4 | suggested amount, partial payment, recorded | MVP |
| 14 | Activity | tab | What changed since you last looked | J2, J6 | empty, unread items, loading | MVP |
| 15 | Join group | screen | Accept an invite link | J5 | valid invite, already a member, link expired | MVP |
| 16 | Account | tab | Profile, currency, notifications | - | default, notifications off, delete account confirmation | MVP |
| - | Receipt scan, currency conversion, recurring bills, spending charts, search, export | - | Jobs 6 and 7, nice-to-haves | - | - | Later |
The result is 16 screens and 51 states. A habit tracker example has 12 screens and 46 states. Thefrontkit estimates that most early-stage SaaS MVPs need 18 to 25 screens to feel complete.
The useful number is not the top-level screen count alone. Count every designed state.
Map the delta for a new feature
For an existing product, map only the feature delta instead of repeating the entire exercise.
Identify entry points, new journey steps, changed screens, new screens, states added to existing screens, data-model changes, collisions with current rules, and explicit exclusions.
Feature: [name]
Job story: When [situation], I want to [motivation], so I can [outcome].
Entry points: [existing screens where it starts]
Journeys: [new steps, including edit, stop and undo paths]
New screens: [list]
Changed screens: [screen: what changes]
New states on existing screens: [screen: state]
Data model changes: [new entities, fields, status values]
Collisions with existing rules: [edge cases]
Out of scope: [what this release does not do]
For Kitty, recurring bills can run monthly, weekly, yearly, or fortnightly. The feature adds one screen but changes five existing screens.
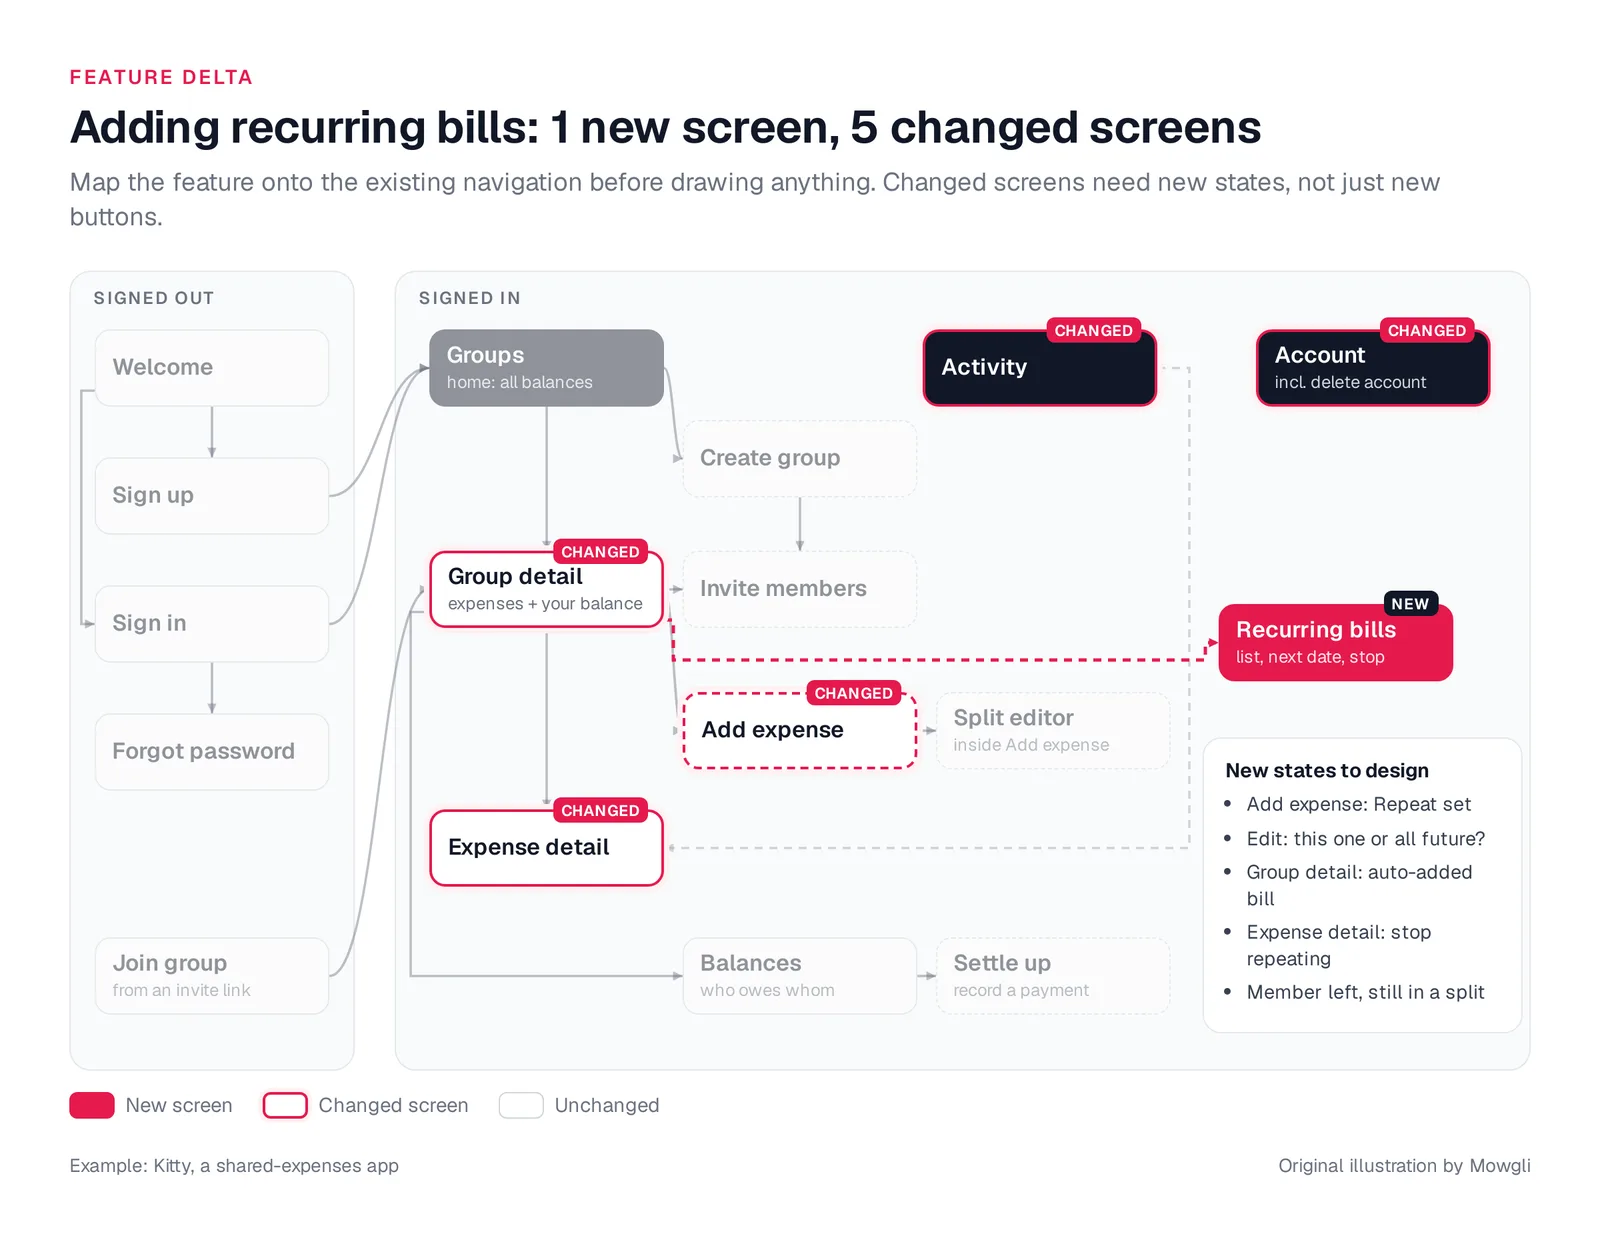
Caption: Recurring bills adds one screen but changes five, and the new states live on the changed ones. Original illustration by Mowgli.
| Screen | New or changed | What changes |
|---|---|---|
| Add or edit expense | Changed | "Repeat" row (never, weekly, every 2 weeks, monthly, yearly); editing a repeating bill asks "this one or all future?" |
| Recurring bills | New | All repeating bills in the group, next date, stop |
| Group detail | Changed | Auto-added bills are labeled as such |
| Expense detail | Changed | "Repeats monthly, next on Nov 1", Stop repeating with confirmation |
| Activity | Changed | "Rent was added automatically" items |
| Account | Changed | Notification toggle for automatic bills |
Check collisions before drawing screens. What happens when a departed member remains in the rent split? When rent changes for a particular month? When a rule for the 31st reaches February?
The data model gains a recurring rule with frequency, start date, next date, and status. Each generated expense links to that rule.
Use Mowgli to design the full app from the spec
"Mowgli turns a product idea into a full multi-screen app design: it writes the spec first, then designs every screen."
You can describe an idea, import a Figma file, or import an existing codebase through the agent skill or MCP server. A guided scope questionnaire produces a synchronized product spec with journeys, constraints, and a data model.
You then explore 16+ moodboard styles, choose a direction, and generate 30+ screens and states on an infinite canvas. You can edit in chat with reference images and version history, create a click-through prototype, and export to Figma, React + Tailwind, or an AI-ready package.
| Step | What Mowgli produces |
|---|---|
| 1-2. Pitch, user, jobs | A guided questionnaire about scope and rules, then an Overview in the spec |
| 3. Entities | A Data Model section with fields and relationships |
| 4. Journeys | User Journeys as numbered steps, with validation rules and branches |
| 5. Screens and navigation | A screen list and a Frontend section with navigation and shared patterns |
| 6. System screens | Included in the screen list: auth, password reset, invitations |
| 7. States | Listed under each screen, then designed |
| 8. MVP cut | Ask for changes in chat; the spec and screens update together |
For a new feature, import the existing design or codebase and describe the change in chat. Updated journeys remain synchronized with the new and changed screens and states.
The MCP server, CLI, and agent skill let Claude Code, Cursor, and Codex read every screen, its states, and the product spec, then push code changes back into the design.
Mowgli designs and prototypes; to host and ship, you hand off to a builder or coding agent (Claude Code, Codex, Cursor, Lovable).
Free to start (300 credits); credit packs from $12; plans from $15/mo. Start with AI app screens or PRD to designs.
Other ways to map flows and screens
Use paper, a document, or a spreadsheet for the first inventory. Use a diagram tool when the team needs a visible, shareable flow. Steps 6 through 8 still require manual product decisions in diagram tools.
Prices are from each vendor's pricing page, October 2026.
| Tool | Best for | What you get | Pricing |
|---|---|---|---|
| Paper, a doc or a spreadsheet | The first pass | The templates above | Free |
| ChatGPT or Claude | Drafting jobs, journeys and the inventory from your pitch | Text you edit; both can also create FigJam diagrams via Figma's integrations | Not compared here |
| FigJam | Flow diagrams next to your Figma files | Whiteboard flows; FigJam AI generates templates from a prompt | Free Starter plan; Collab seat from $3/mo |
| Whimsical | Fast AI flowcharts and wireflows | Flowchart from a text prompt | Free (50 board objects/month); Pro $10/editor/mo billed annually |
| Miro | Mapping flows in a team workshop | User flow templates, AI flowchart generator | Free (3 editable boards); Starter $8/member/mo billed yearly |
| Mermaid | Flows that live in your repo | Text flowcharts that GitHub renders in Markdown | Free (open source) |
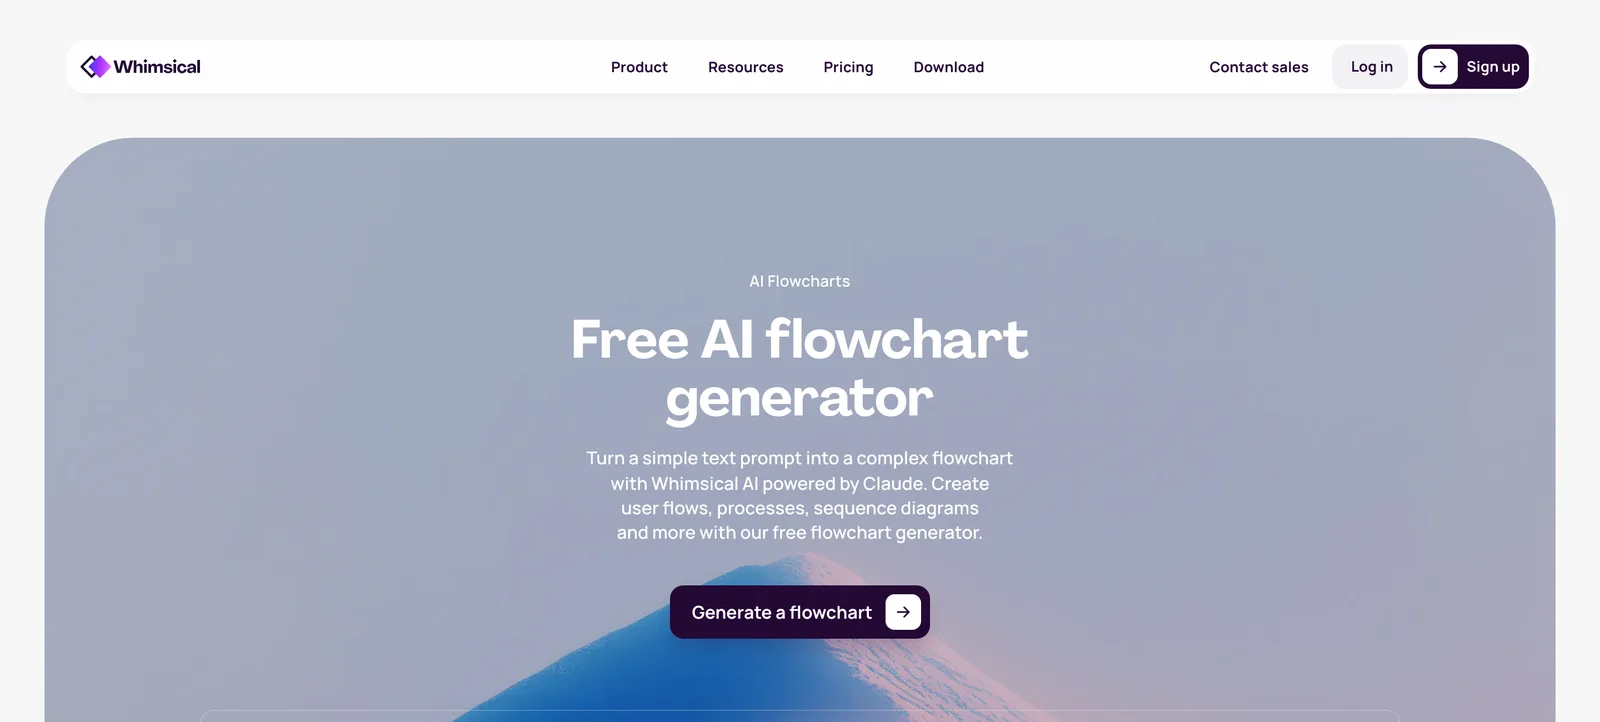
Caption: Whimsical's AI flowchart generator. Source: Whimsical website, captured October 2026.
Prompt for ChatGPT or Claude
I'm planning an app. Pitch: [one sentence]. Primary user: [who].
Work through these steps and stop after each one for my corrections:
1. List 5-8 job stories ("When ..., I want to ..., so I can ..."). Mark the 2 core-loop jobs.
2. List entities with key fields, relationships and status values. Mark derived values.
3. Write the core journeys as numbered steps, one user action or system response per line,
   with branches (4a, 4b), errors (E1, E2) and a "done when" line.
4. Tag every step with the screen it happens on. Output a screen inventory table:
   screen, type (tab / pushed / modal), purpose, journeys, key content, states.
5. Add system screens: auth, password reset, onboarding, notification permission,
   invite links, settings, account deletion, offline and error.
6. For every screen, list states: default, empty, loading, error, plus domain states.
7. Propose an MVP cut and a "later" list, with one line of reasoning per cut.
Keep the flow in a repository with Mermaid
GitHub renders Mermaid diagrams in Markdown. Avoid lowercase end as a node label because it breaks the flowchart. Use End or Done.
flowchart TD
  A[Group detail] -->|tap +| B[Add expense]
  B --> C{Split equally?}
  C -->|yes| D[Save]
  C -->|no| E[Split editor]
  E --> F{Adds up to total?}
  F -->|no: amount left to assign| E
  F -->|yes| D
  D --> G[Group detail: balance updated]
  D -.->|offline| H[Group detail: waiting to sync]
Verdict and next step
The best universal method is to build the inventory manually from jobs, data, journeys, system requirements, and states.
Use paper, a document, or a spreadsheet for the first pass. Use FigJam, Whimsical, or Miro for collaborative visual mapping. Use Mermaid for repository-native diagrams. Use ChatGPT or Claude for editable text drafts.
Choose Mowgli when you want the complete multi-screen product design and prototype from a synchronized spec, including every screen and state, with two-way handoff to Claude Code, Codex, Cursor or another coding agent.
Once the inventory is approved, turn it into wireframes with the PRD to wireframes guide, then prepare implementation using the design handoff guide.
FAQ
What screens does my app need?
Your app needs the deduplicated screen tags attached to every core-journey step, plus required system screens. Add auth, password reset, onboarding, settings, account deletion, invite landings, offline behavior, and errors. Record empty, loading, failure, and domain variants as states.
How many screens does an MVP app need?
An MVP needs enough screens to complete its core journeys and mandatory system flows. Kitty needs 16 screens and 51 states. The habit tracker example needs 12 screens and 46 states, while thefrontkit estimates 18 to 25 screens for most early-stage SaaS MVPs.
What belongs in a screen inventory template?
A screen inventory should include the screen number, name, navigation type, purpose, related journeys, key content, complete state list, and MVP or later classification.
How do I map user flows and screens for a new feature?
Map the delta from existing entry points. Include create, edit, stop, and undo paths, then record new screens, changed screens, new states, data-model changes, rule collisions, and explicit exclusions.
Is there an AI tool that turns an app idea into user flows and screens?
Yes. Mowgli creates a synchronized spec with journeys, a data model, screens, and states, then designs the complete multi-screen app. ChatGPT or Claude can draft the text artifacts. FigJam, Whimsical, and Miro can generate flow diagrams.
Should I create user flows or wireframes first?
Create user flows first. Derive the screen inventory and states before drawing core-loop wireframes. Continue with PRD to wireframes and the design handoff guide.
Sources
- User Journeys vs. User Flows, Nielsen Norman Group
- Using Job Stories to Design Features, Intercom
- Know Your Customers' Jobs to Be Done, Harvard Business Review
- User Story Mapping, Jeff Patton
- Tab Bars, Apple Human Interface Guidelines
- App Review Guidelines, Apple
- Asking Permission to Use Notifications, Apple
- Navigation Bar, Android Developers
- Google Play Account Deletion Requirements
- Splitwise App Store Listing
- Splitwise Pro
- SaaS MVP Screen Calculator, thefrontkit
- FigJam AI
- Figma Pricing
- Claude and FigJam Integration, Figma
- ChatGPT and FigJam Integration, Figma
- Whimsical AI Flowchart Generator
- Whimsical Pricing
- Miro User Flow Templates
- Miro Pricing
- Mermaid Flowchart Syntax
- Creating Diagrams on GitHub
- Mowgli
- Mowgli App
- Mowgli MCP
- Mowgli Agent Skills