How Do I Get Designs Into Cursor So It Builds Correctly?
Use screenshots for one screen, Design Mode for a running app, Figma MCP for Figma files, or Mowgli for a complete multi-screen design and spec.
Choose the most structured design source you already have. Give Cursor a screenshot for one screen, use Design Mode to polish a running app, connect Figma MCP for an existing Figma file, or use Mowgli when you need a complete product design with every screen and state. In every case, add a persistent UI rule and require browser screenshots before calling the work complete.
Quick answer: choose the method based on what you have
The correct handoff depends on what already exists:
- Screenshot or mockup: attach it to Agent chat with a UI rule.
- Running app that is close: use Cursor Design Mode.
- Figma file and suitable seat: use Figma MCP, with Code Connect where available.
- Idea, PRD or incomplete Figma file: design every screen and state in Mowgli, then connect Cursor.
- Complete exported design: commit its React + Tailwind reference code and spec.
Every route needs a .cursor/rules/*.mdc rule or AGENTS.md file that defines tokens, components, required states and visual checks. Cursor should compare browser screenshots against the design before completion.
We make Mowgli.
| What you have | Best method | What Cursor receives | What Cursor still guesses | Cost |
|---|---|---|---|---|
| Nothing yet, such as an idea or PRD | Design first in a tool that serves Cursor | Screens, states and spec from Mowgli, or HTML and images from Stitch | Little, if every state was designed | See pricing below; Stitch is free with a daily limit |
| A screenshot or mockup | Paste it into Agent chat with a UI rule | Pixels | Tokens, spacing, states and behavior | Included in Cursor; Hobby is free |
| A running app that is close | Design Mode in Cursor's browser | The clicked element, its code and a screenshot | Screens you have not built | Included in Cursor |
| A Figma file | Figma MCP, plus Code Connect if available | React + Tailwind reference, variables and screenshots | States the designer did not draw | Dev seat from $12/mo for 200 calls a day |
| A full design with every state | Design-source MCP or exported code | Code per screen, every state and the spec | Mapping to your components | See Mowgli pricing below |
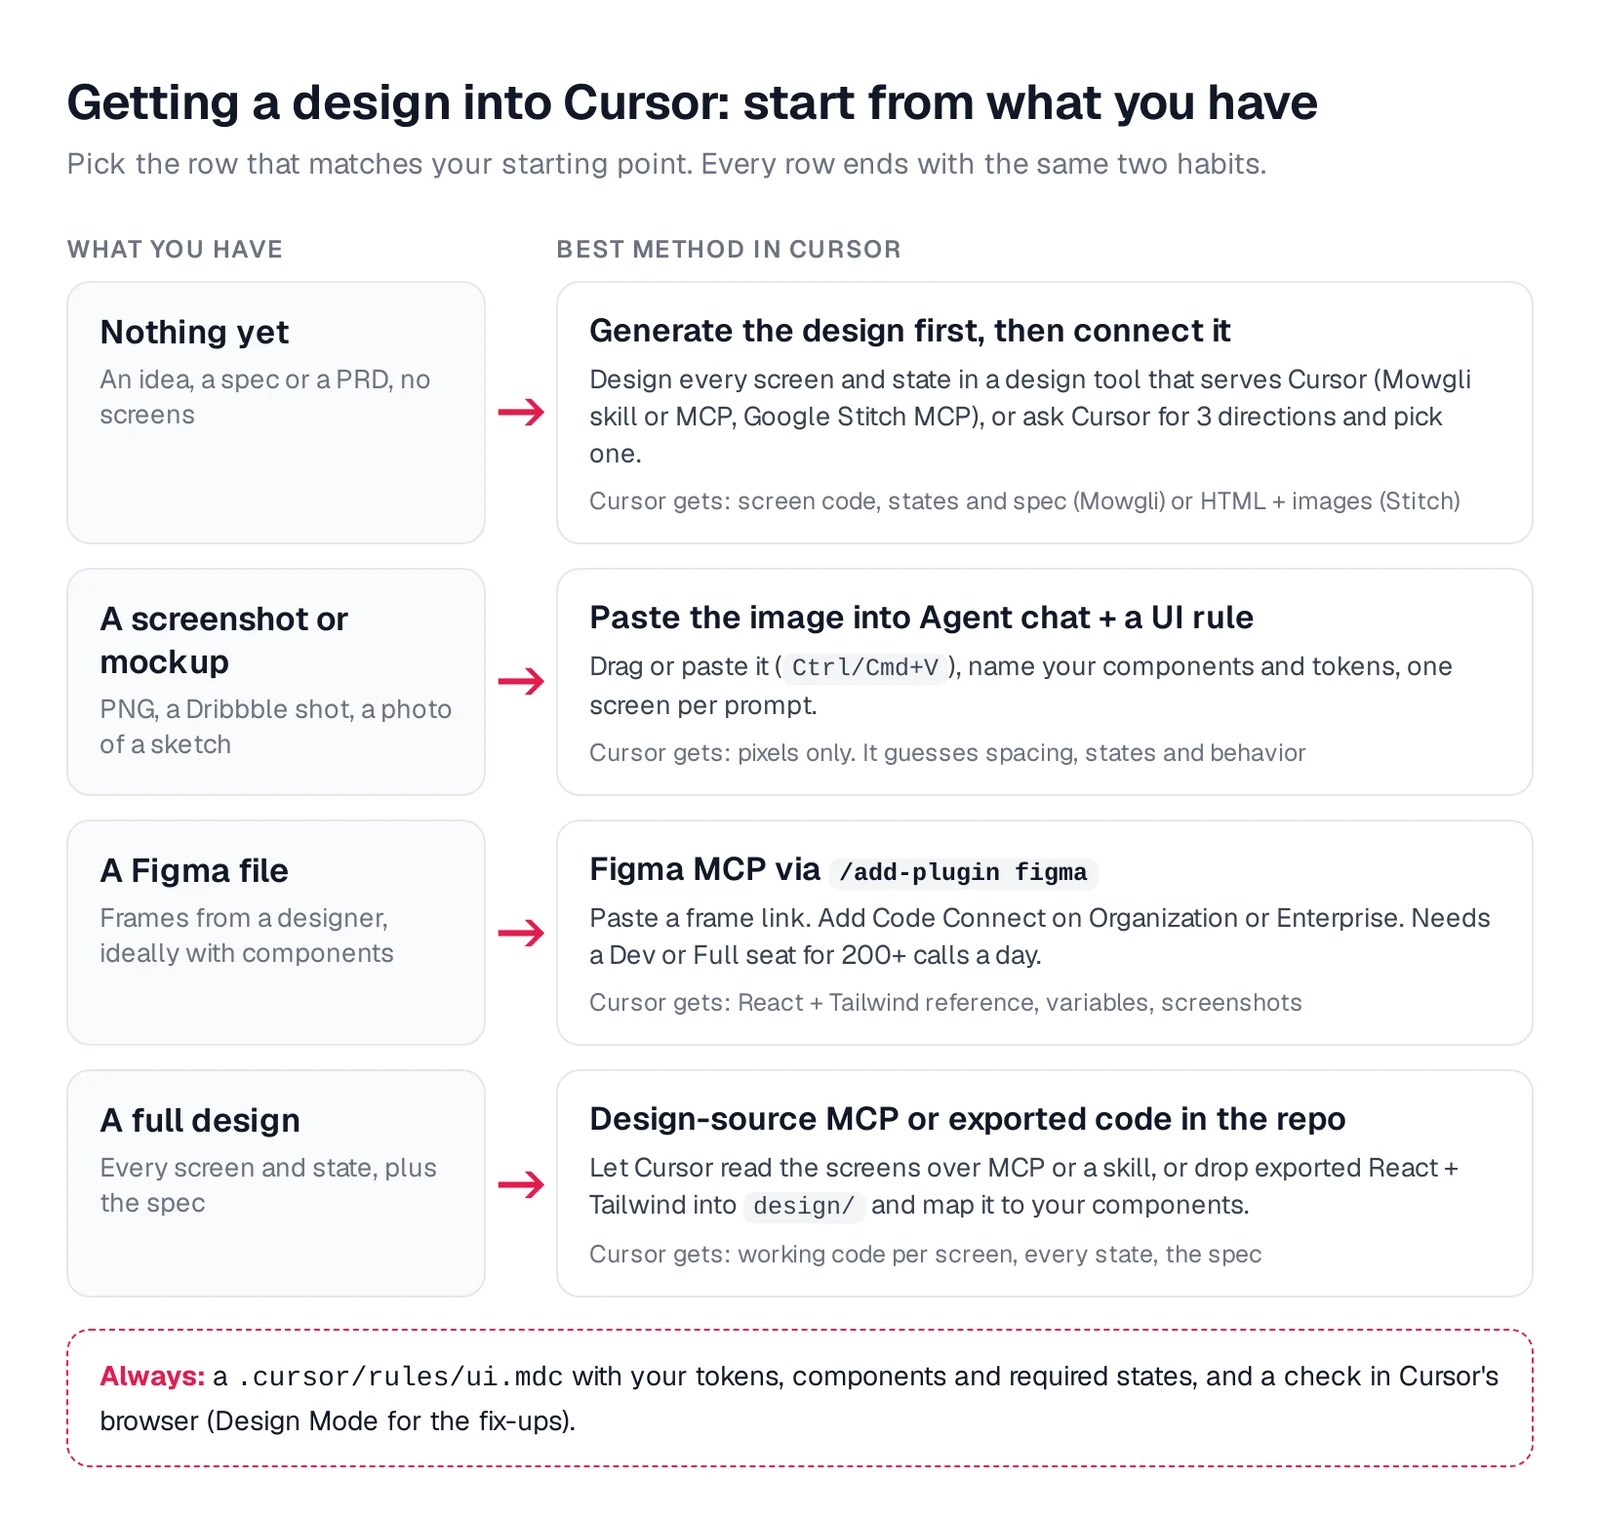
Caption: Start from what you have. Every path ends with a UI rule and a check in Cursor's browser.
Why Cursor diverges from the intended design
Cursor can only implement the context it receives. A screenshot does not define tokens, responsive behavior or unseen states. A Figma frame cannot describe flows the designer never drew. A style file defines visual rules, but not complete layouts or interactions.
Figma describes MCP as a source of design context, while the coding assistant creates the implementation. That distinction matters: giving Cursor a design does not remove implementation decisions.
The practical principle is simple: the more structure your source contains, the fewer UI decisions Cursor must make. This is also why AI-built apps often look the same: missing product and design decisions get replaced by familiar defaults.
Method 1: Paste a screenshot into Cursor Agent chat
Cursor Agent accepts an image dragged into chat or pasted with Cmd/Ctrl+V. This works best for one screen, a visual reference or a clone.
A screenshot supplies pixels, not design logic. Add named tokens, existing component paths, the exact route, exact copy and all required states. Keep each prompt scoped to one screen and its states.
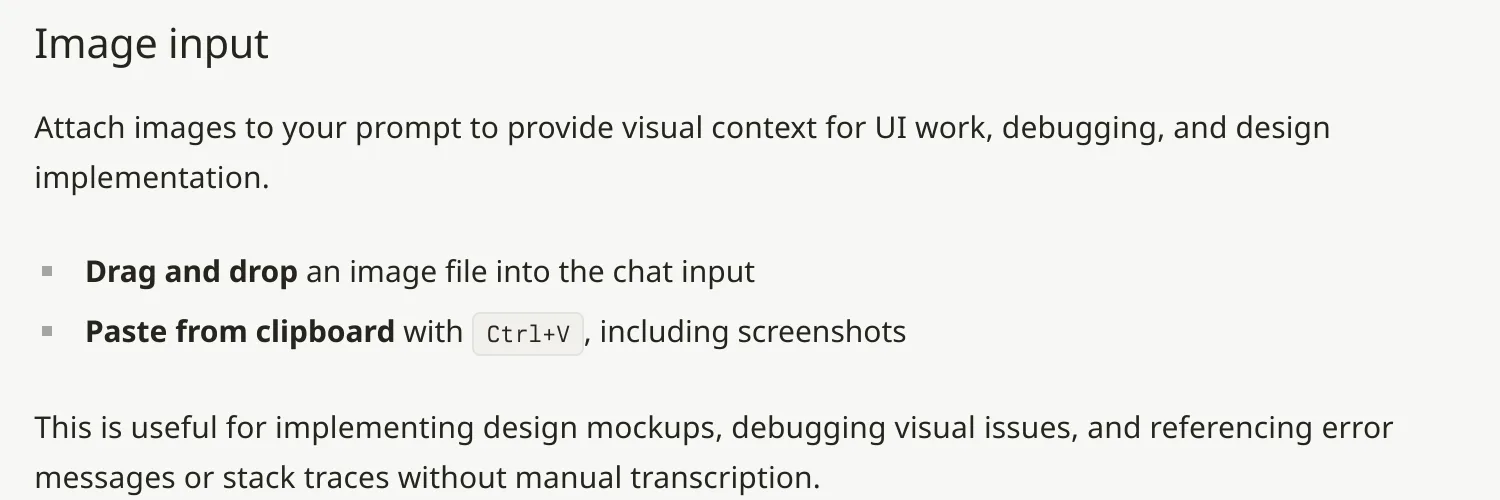
Caption: Image input in Cursor's Agent chat. Source: Cursor website, captured October 2026.
Implement the attached screenshot as the /billing page.
- Layout and copy: match the screenshot exactly. Don't add sections.
- Styling: use only tokens from src/styles/tokens.css and components
  from src/components/ui. Map any color you see to the nearest token.
- States: the screenshot shows the default state only. Also build
  loading (skeleton matching this layout), empty (no invoices, one
  primary action) and error (message + retry). Ask before inventing
  anything else.
- Plan first, list the components you'll reuse, then build.
Attach separate images for empty and error states when you have them. Use the empty, error and loading states checklist to prevent a polished default screen from hiding unfinished product states.
Method 2: Use Design Mode for a running app
Cursor shipped its visual editor with Cursor 2.2 in December 2025. Cursor 3.7 added multi-select and voice on June 5, 2026.
Open the browser in the Agents Window and toggle Design Mode with Cmd/Ctrl+Shift+D. You can click an element, select several elements, draw on the page, select an area with Shift+drag or describe a change by voice.
The agent receives the xpath, component, attributes, computed styles, props from the fiber tree and a screenshot. That makes Design Mode useful for precise adjustments to code that already renders.
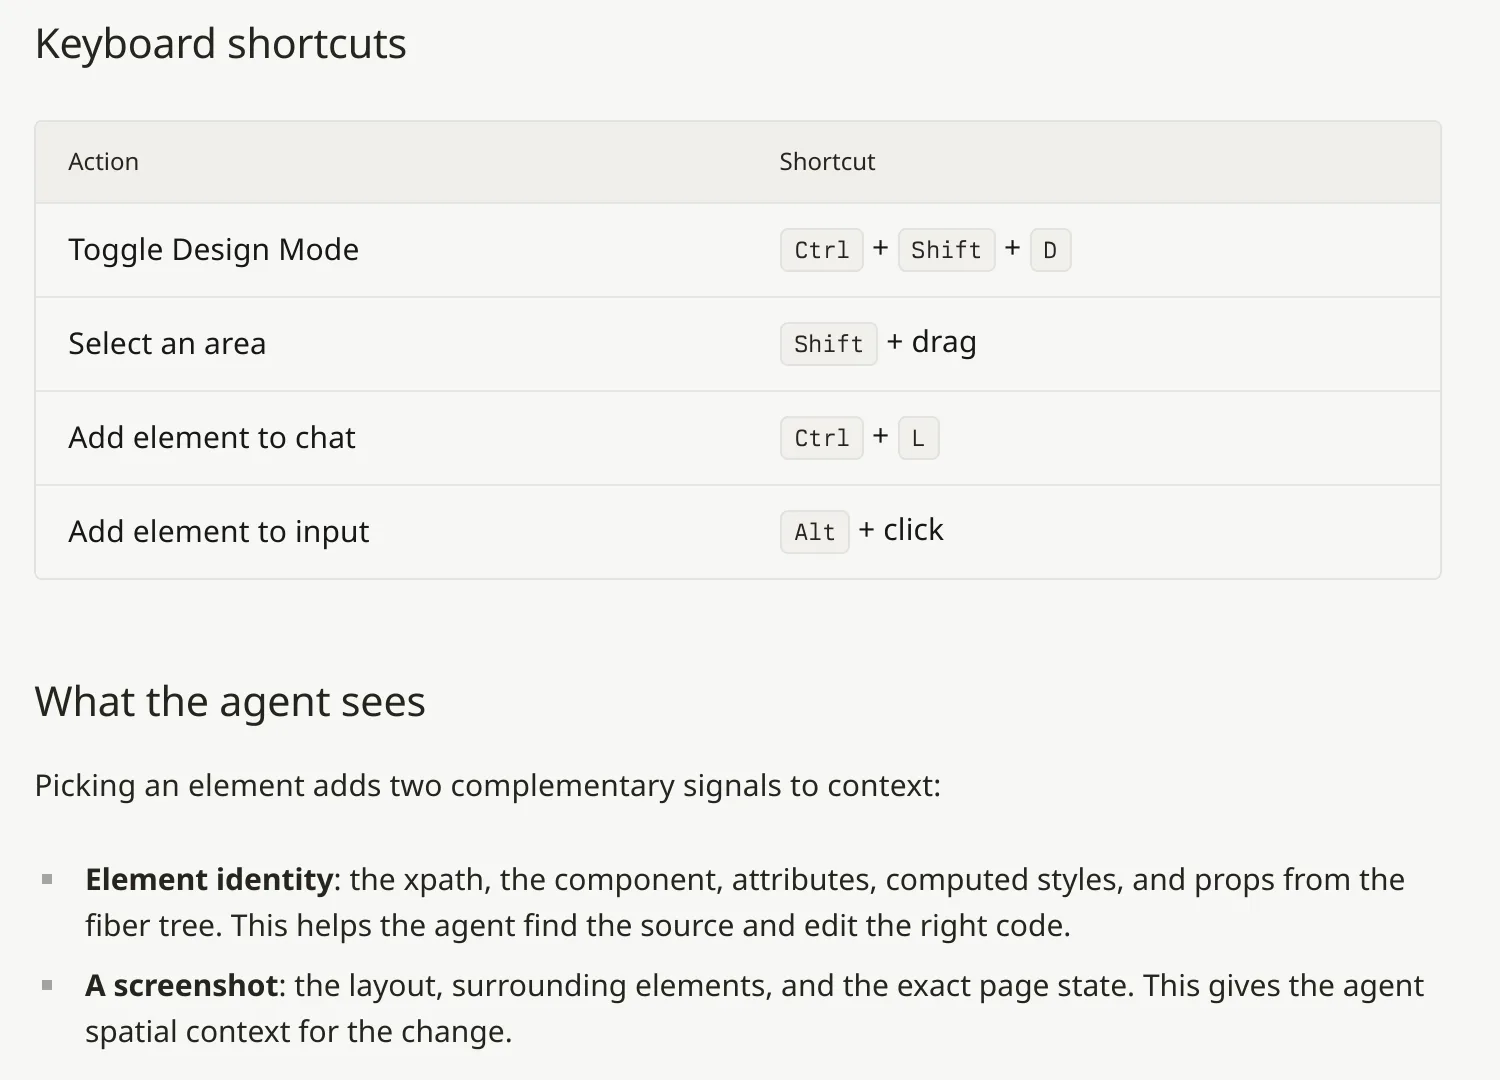
Caption: Design Mode shortcuts and what the agent receives. Source: Cursor website, captured October 2026.
Cursor suggests this browser comparison prompt: "@browser Compare current UI against this design screenshot and adjust spacing, colors, and typography to match".
Figma MCP supplies design context before implementation. Design Mode adjusts an implementation that already exists. Use it to polish a reachable screen or state, not to define screens that have not been built.
Method 3: Add a persistent UI rule in .cursor/rules
Project rules live in .cursor/rules/ and must use the .mdc extension. Plain .md files in that directory are ignored.
Set alwaysApply: true for every chat, use globs for matching files, or provide a description and let the agent decide when the rule applies. Keep rules under 500 lines. Referenced files such as @tokens.css are not automatically inlined, so duplicate essential values in the rule itself. You can create one with /create-rule. Cursor also supports nested AGENTS.md files.
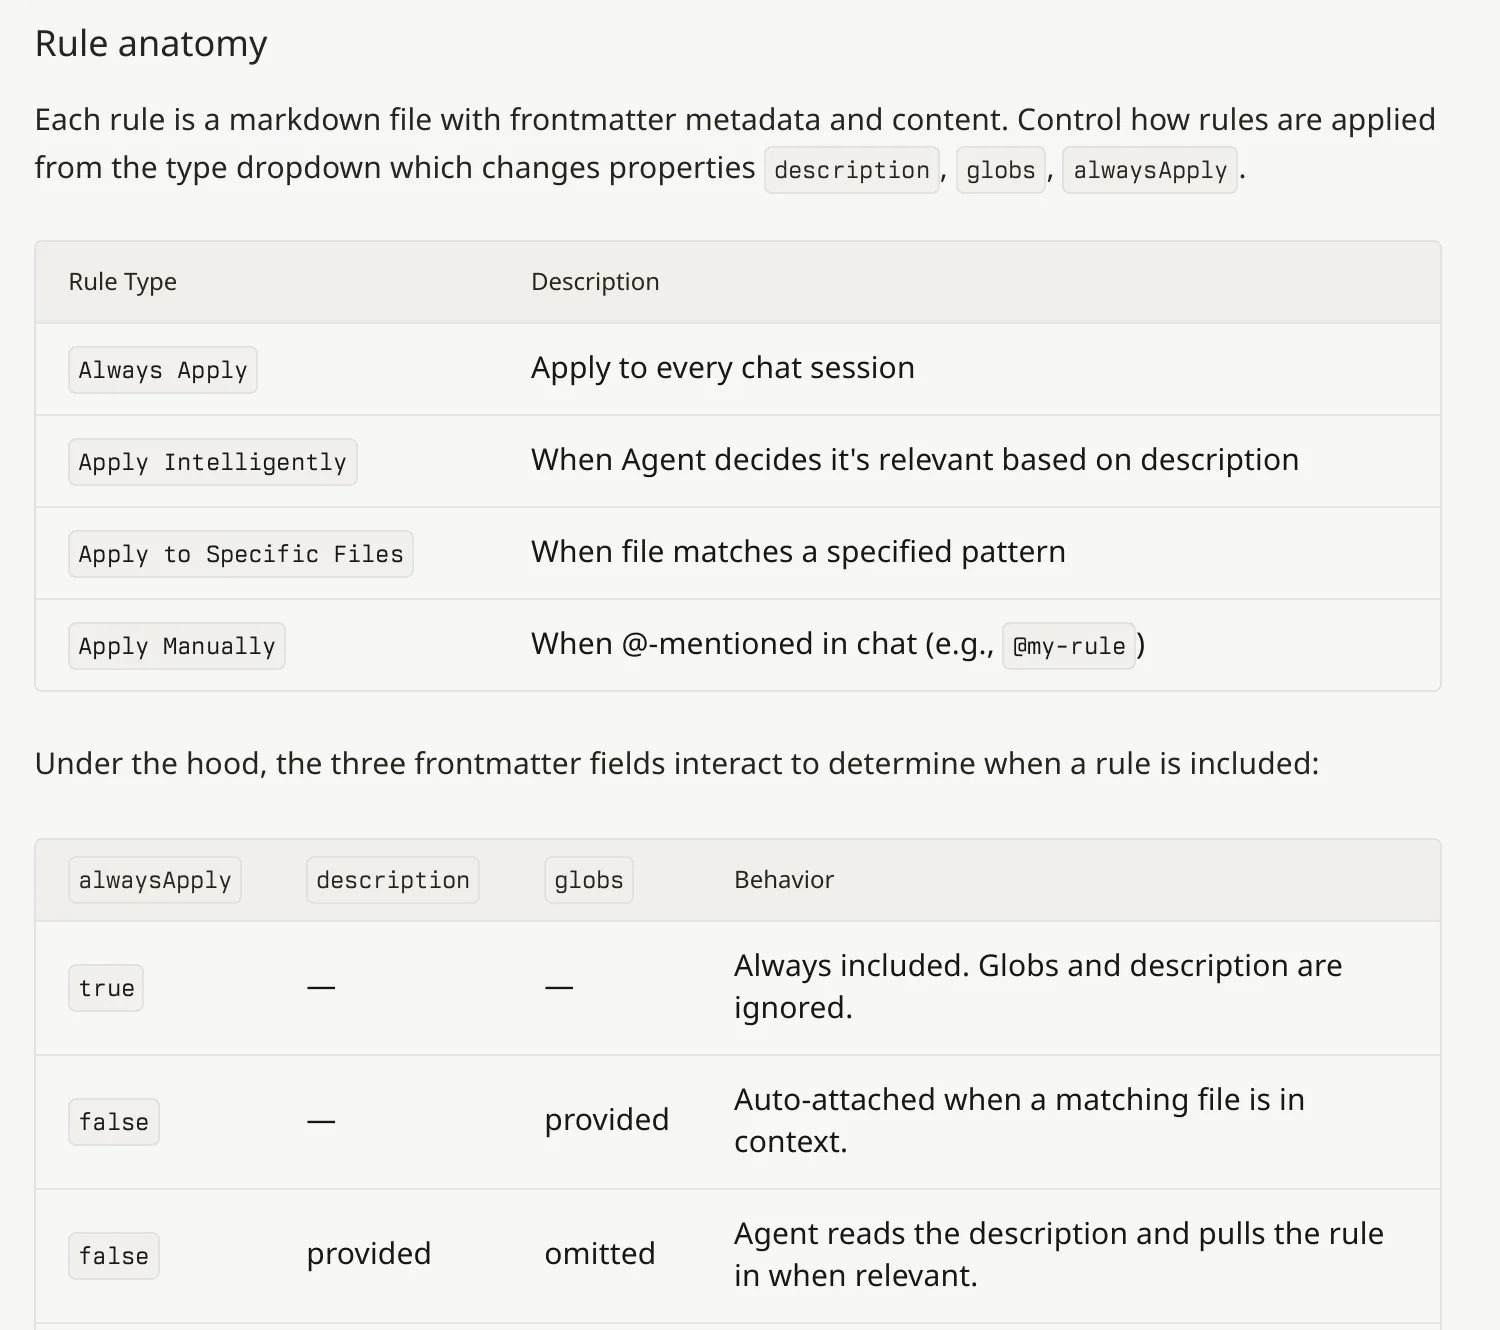
Caption: How Cursor decides when a rule loads. Source: Cursor website, captured October 2026.
---
globs: src/components/**/*.tsx, src/app/**/*.tsx, src/styles/**/*.css
alwaysApply: false
---
# UI implementation rules

## Source of truth
- Visual design: the files in design/ (exported screens) or the Figma
  frame / Mowgli screen named in the prompt. Treat them as strict for
  layout, spacing, typography and copy. Do not add sections they don't have.
- Tokens: src/styles/tokens.css. Read it before styling anything.

## Tokens (always apply, even without reading the file)
- Colors: CSS variables only. --bg #F7F7F5, --surface #FFFFFF,
  --ink #1F2937, --muted #6B7280, --accent #0F766E, --danger #B42318
- Type: "Instrument Sans" headings, "Inter" body. Scale 13/15/18/24/32.
- Spacing: 4px grid. Radius: 8px inputs, 12px cards. One shadow token.
- Never paste raw hex or px values from design code. Map them to tokens.

## Components
- Reuse src/components/ui/* (shadcn/ui) first. Compose new components
  from them. If a design needs a component we don't have, stop and ask.

## Every screen implements
- default, loading (skeleton matching the final layout), empty (what to
  do next + one primary action), error (what happened + retry)
- validation state on every form; confirm step on destructive actions

## Done means
- Open the page in Cursor's browser at 390px and 1440px, screenshot every
  state, list differences from the design, fix them. Max 3 rounds.
Cursor's web-development guidance says to "ask the human how they want to proceed when there are missing components and designs".
A DESIGN.md file can carry tokens and style rules through Google Stitch import and export. Reference it from your Cursor rule, but duplicate must-have values in the rule body. It describes style; it does not define complete screens and states. See DESIGN.md isn't enough and the Claude Code UI design workflow for related handoff patterns.
Method 4: Connect Figma MCP to Cursor
Figma MCP is the direct route when you already have a maintained Figma file. Install the recommended Cursor plugin in Agent chat:
/add-plugin figma
The plugin includes MCP configuration, design-implementation skills, Code Connect, design-system rules and asset-handling rules.
For manual remote configuration, add:
{
  "mcpServers": {
    "figma": { "url": "https://mcp.figma.com/mcp" }
  }
}
The desktop alternative is http://127.0.0.1:3845/mcp, enabled through Figma Dev Mode.
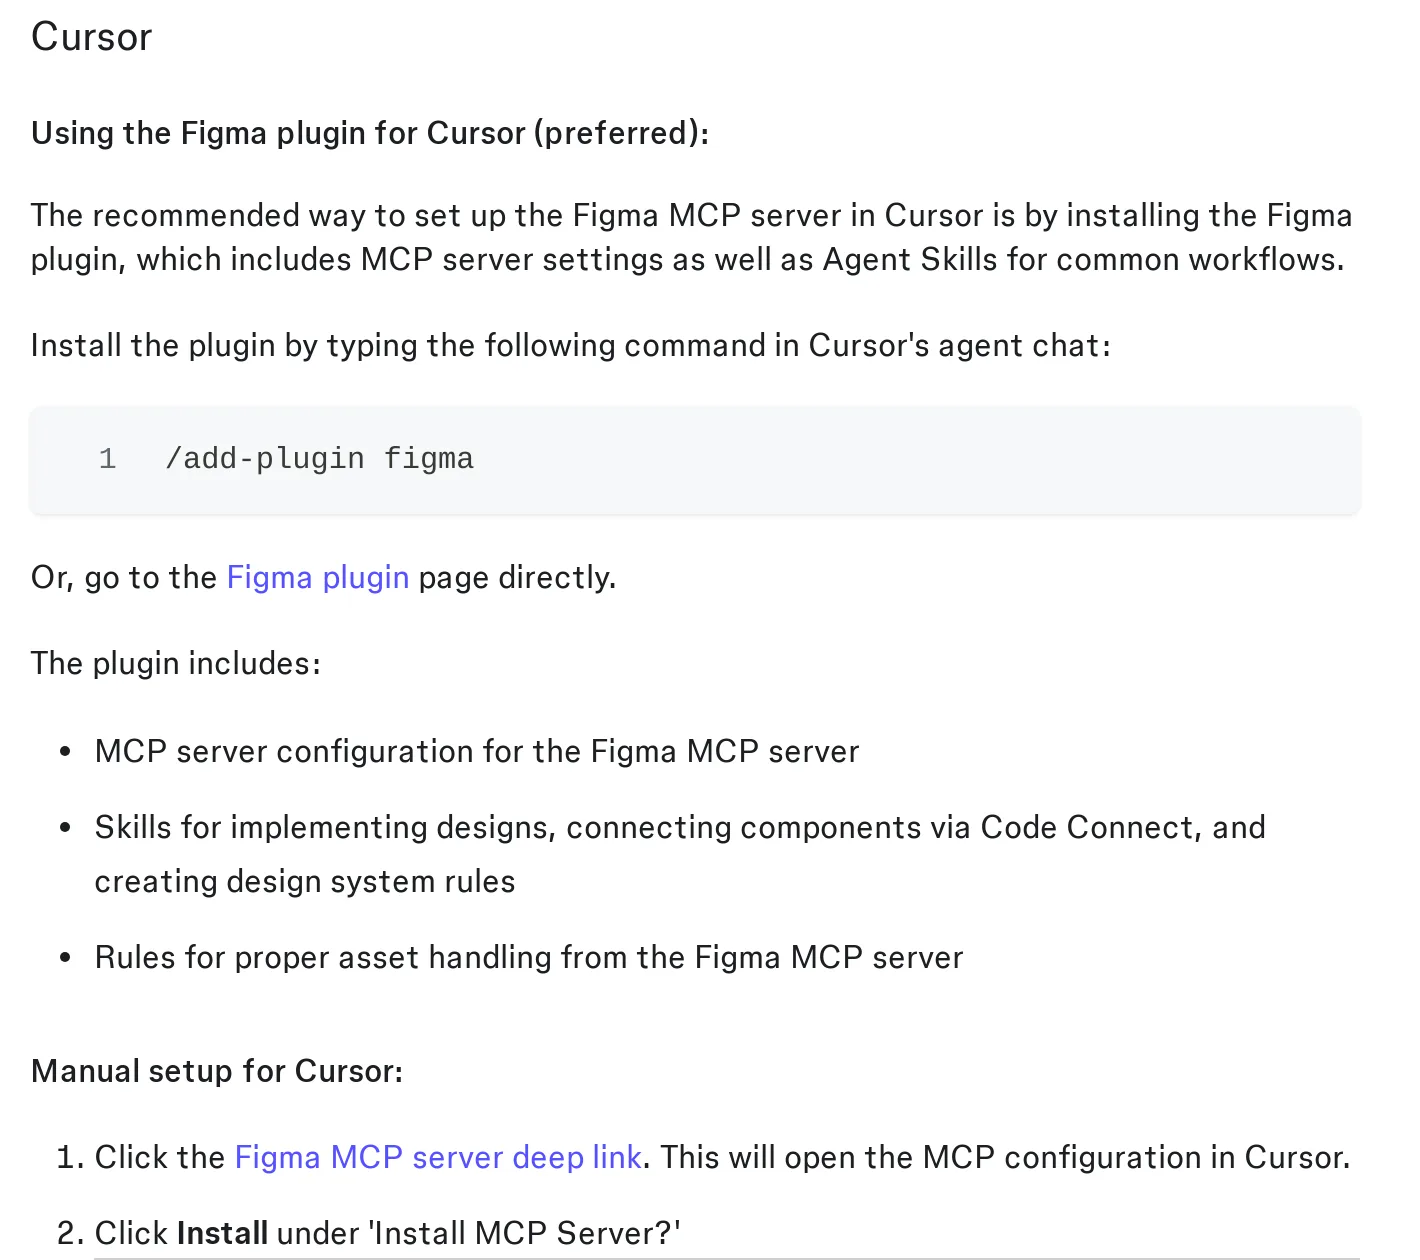
Caption: Figma's Cursor setup. Source: Figma website, captured October 2026.
Copy a frame link and ask Cursor to use get_design_context, get_variable_defs and get_screenshot. Design context returns React + Tailwind by default. For a large screen, select a specific section instead of sending the entire frame.
Implement this Figma frame: [frame link]
Use get_design_context, get_variable_defs and get_screenshot.
Treat the Figma output as a reference, not final code: rebuild it with
components from src/components/ui and tokens from src/styles/tokens.css.
Map every Figma variable to an existing token and list any with no match.
Then screenshot the page in the browser, compare it with the Figma
screenshot, list the differences and fix them.
The create_design_system_rules tool can draft rules for your stack. Save them in .cursor/rules/ with an .mdc extension.
Code Connect maps Figma components to production components. Figma calls it "the #1 way to get consistent component reuse in code. Without it, the model is guessing". It requires a Dev or Full seat on Organization or Enterprise.
| Seat | Starter | Professional | Organization | Enterprise |
|---|---|---|---|---|
| View, Collab | 20 calls/month | 20 calls/month | 20 calls/month | 20 calls/month |
| Dev, Full | 20 calls/month | 200/day, 10/min | 200/day, 15/min | 600/day, 20/min |
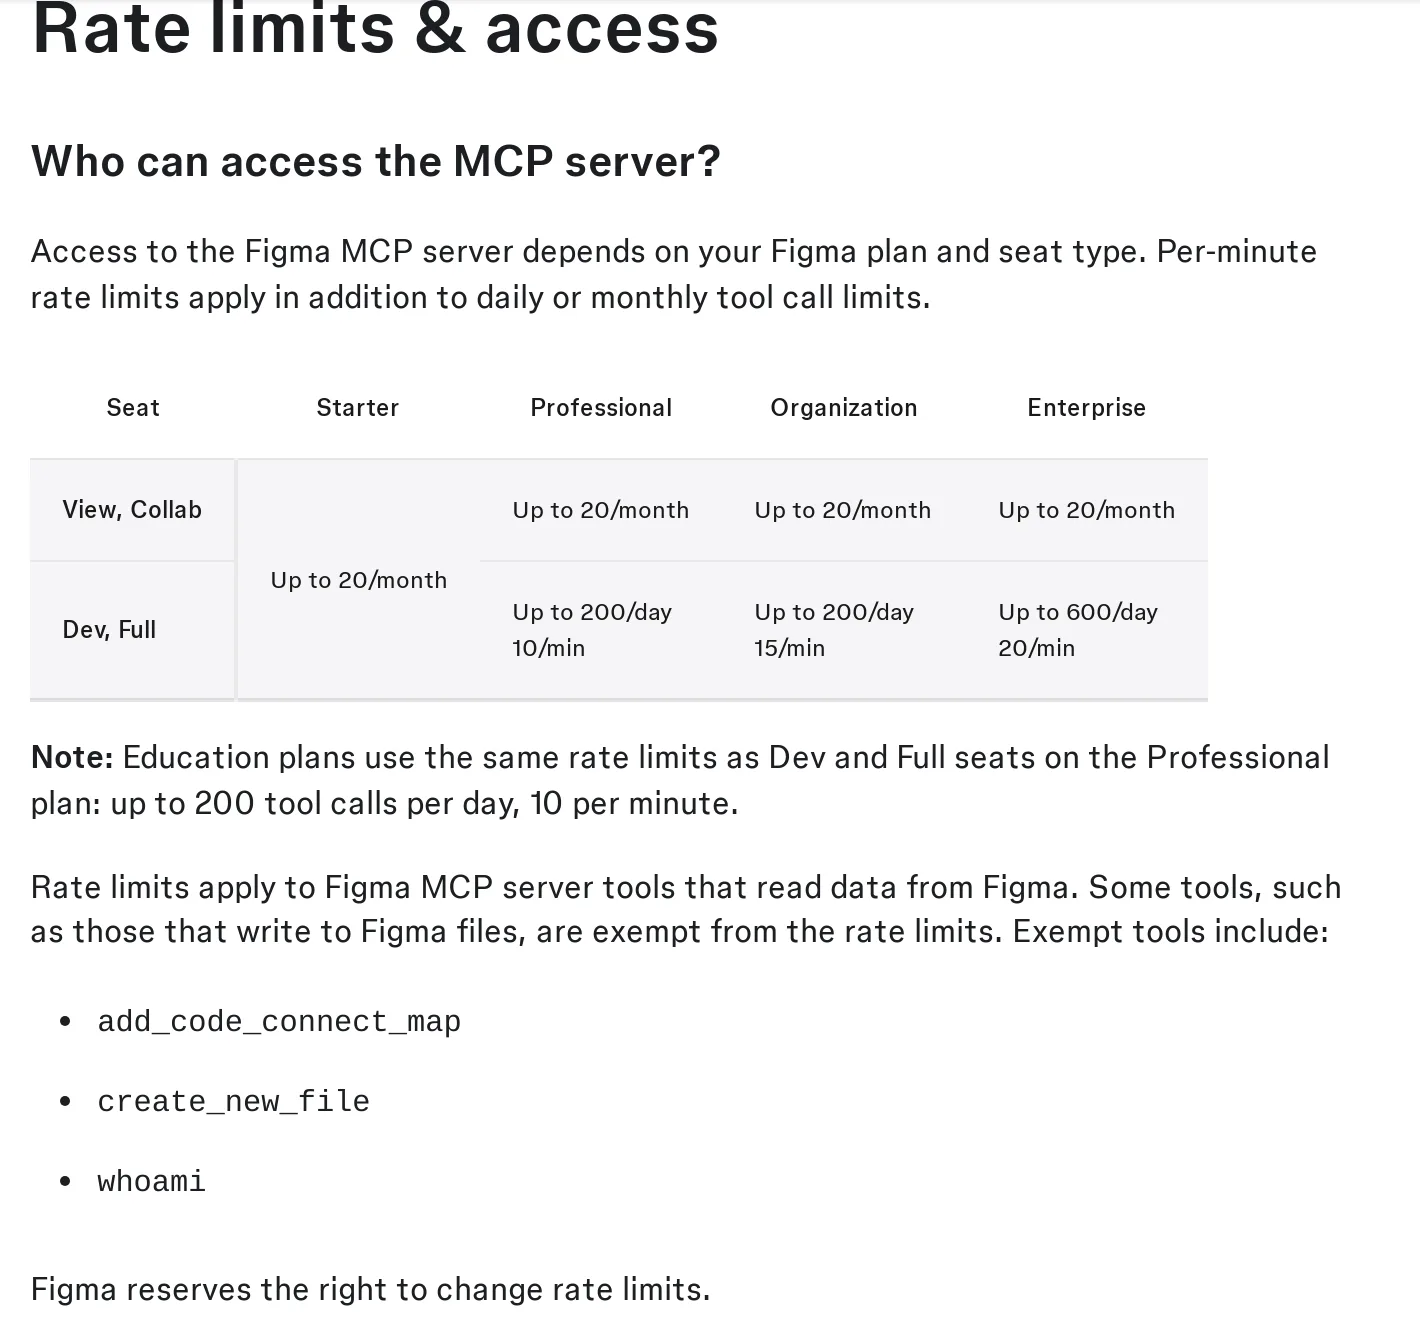
Caption: Figma MCP limits by plan and seat. Source: Figma website, captured October 2026.
A Professional Dev seat costs $12/mo billed annually. An Organization Dev seat costs $25/mo billed annually. Cursor still receives only the screens and states present in the file.
Alternatives when Figma is unavailable or incomplete
A workflow using three Figma tools consumes roughly three calls per frame. At 20 calls per month, that is approximately six frames.
Prices are from each vendor's pricing page, October 2026.
| Option | Needs Figma? | Designs screens? | What Cursor gets | Price |
|---|---|---|---|---|
| Screenshot plus UI rule | No | No | Pixels plus your rules | Included in Cursor |
| Framelink MCP for Figma | Yes, a file and access token | No | Trimmed layout and style data | Free, open source |
| Google Stitch MCP | No | Yes, one screen at a time | HTML with Tailwind, plus an image | Free, daily credit limit |
| v0 from a screenshot | No; Figma import is paid | Yes, as code | React with shadcn/ui to copy in | Free credits; Plus $30/user/mo |
| Mowgli | No; Figma import is optional | Yes, every screen and state | React + Tailwind per screen, states and spec | See pricing below |
Framelink uses the Figma REST API and remains subject to REST rate limits by seat. It can reduce MCP context, but it does not remove the need for a Figma file.
Google Stitch exposes https://stitch.googleapis.com/mcp. Configure it in .cursor/mcp.json with an X-Goog-Api-Key header. It returns individual screens as HTML for conversion. See Stitch multi-screen consistency.
v0 can reproduce layout, colors and components from a screenshot, with shadcn/ui as its default.
For an incomplete Figma product, import it into Mowgli, preserve its visual direction, add the missing screens and states, then connect the completed project to Cursor. Figma import is included on Mowgli's free plan. See finish your Figma or compare more MCP servers for UI design.
Method 5: Design the complete app in Mowgli, then connect Cursor
Mowgli fits when the product starts as an idea or PRD, an existing Figma file needs completion, an existing codebase needs a coordinated redesign, or the requirement covers every screen and state.
Mowgli turns a product idea into a full multi-screen app design: it writes the spec first, then designs every screen.
It accepts a product idea, Figma file or existing codebase through its agent skill or MCP. The process includes a guided questionnaire, a PRD/spec with user journeys, product constraints and data model, 16+ moodboard styles, style steering and every screen and state, including 30+ screens and states. You work on an infinite canvas, iterate through chat and version history, and create an interactive prototype.
Cursor can read SPEC.md, frontend.xml and one <ScreenId>.tsx file per screen. The output uses React + Tailwind, lucide-react icons and a single state prop for switching states.
Mowgli has an MCP server, CLI and agent skill, so Claude Code, Cursor and Codex can read every screen, its states and the product spec, and push code changes back into the design.
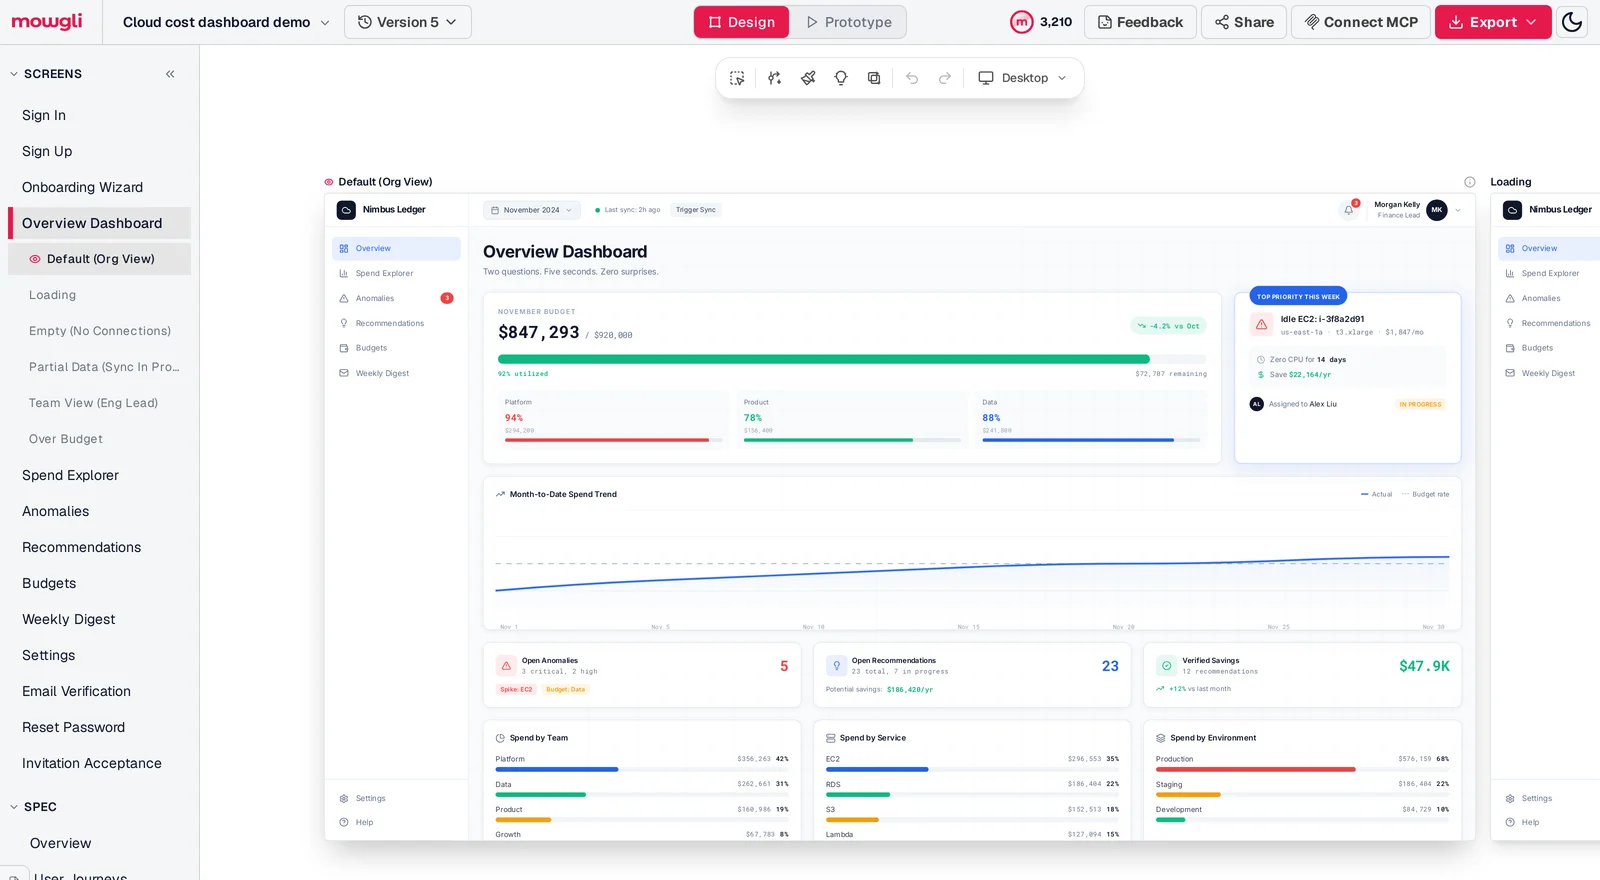
Caption: One screen, six states on the Mowgli canvas (cloud cost dashboard demo, captured October 2026).
To connect Cursor, open a Mowgli project, select Connect MCP, choose Cursor, then paste the generated prompt into Agent chat. You can install the skill with npx skills add mowgli-ai/skills and check the CLI with npx mowgli-cli --help. The account link requires browser approval.
For a Cursor-specific manual install, run npx skills add mowgli-ai/skills -a cursor. This installs the skill into .agents/skills/. The manual MCP server is https://app.mowgli.ai/mcp; add "mowgli": { "url": "https://app.mowgli.ai/mcp" } to .cursor/mcp.json.
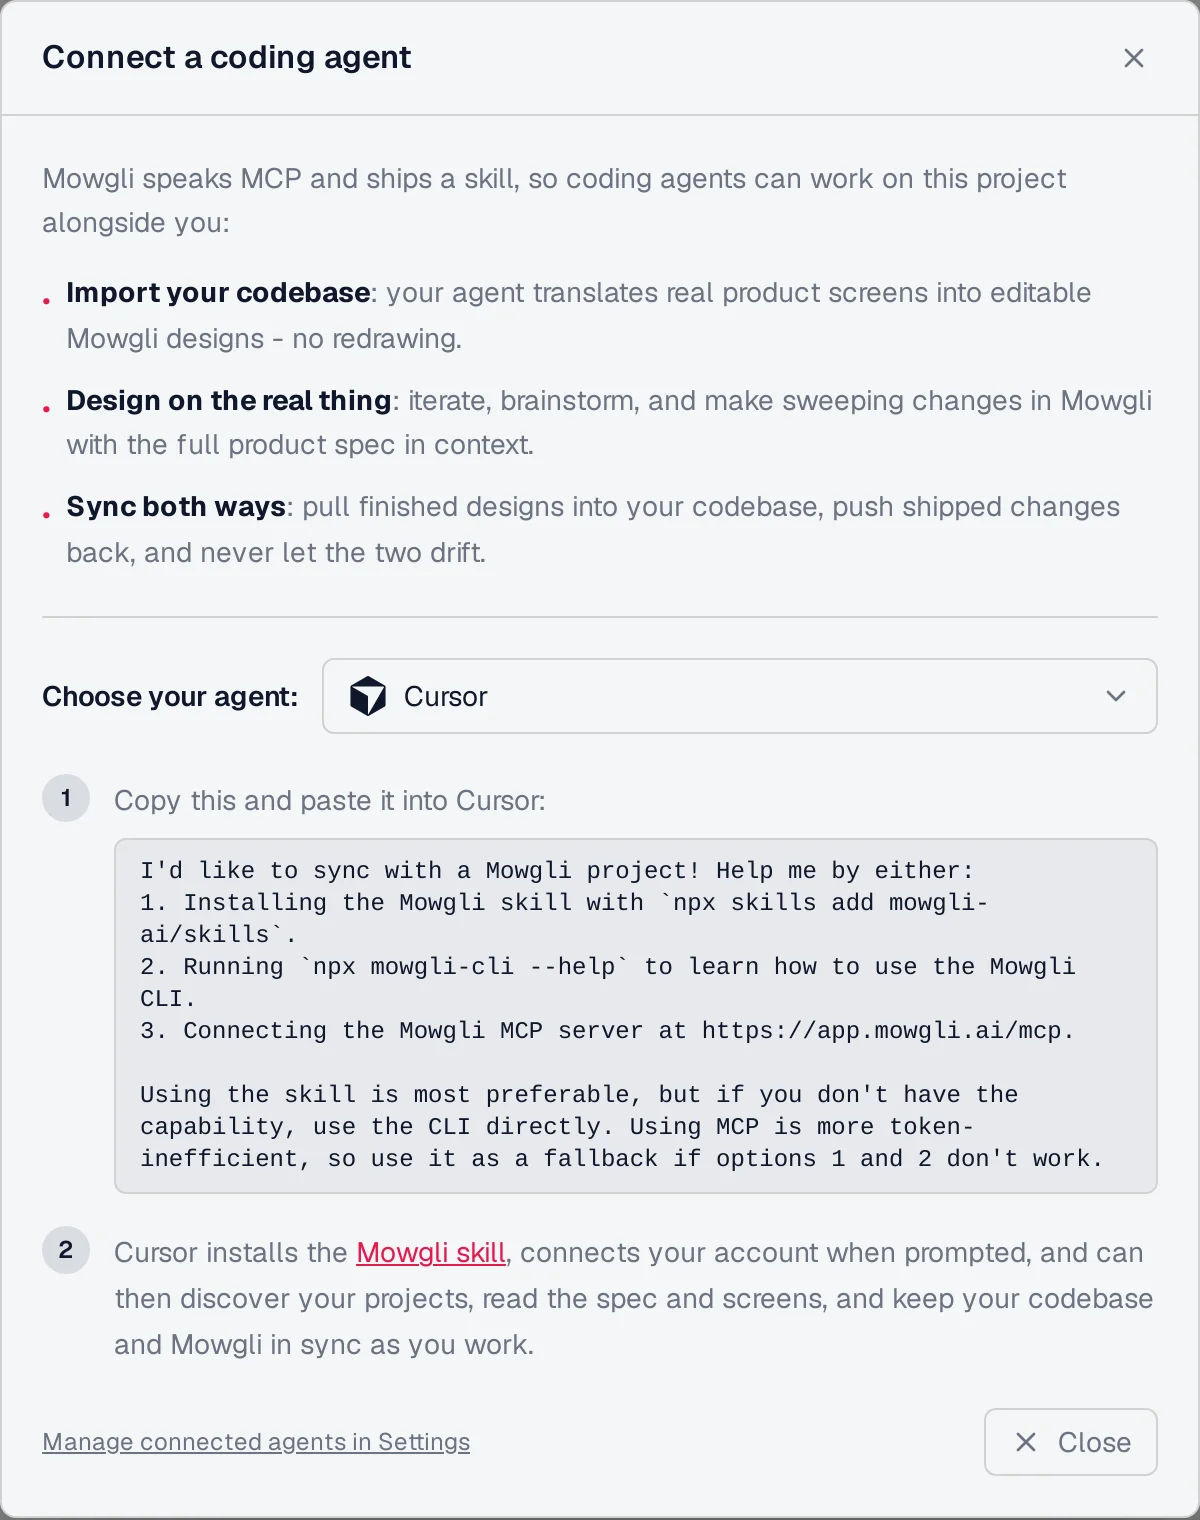
Caption: Mowgli's Connect a coding agent dialog with Cursor selected (captured October 2026).
Read the Mowgli project "[name]": SPEC.md, frontend.xml, and the
OverviewDashboard screen with all of its states. Implement it at
/dashboard using our components and tokens (see .cursor/rules/ui.mdc),
not the raw Tailwind classes. Wire each Mowgli state to the data
condition that triggers it (loading while fetching, empty with no
connections, error on a failed sync). Screenshot each state in the
browser, compare with the Mowgli screen and fix the differences.
When done, record the commit hash in the Mowgli version.
Read more about Mowgli MCP, the agent skill, the Cursor handoff and design handoff to coding agents.
Mowgli designs and prototypes; to host and ship, you hand off to a builder or coding agent (Claude Code, Codex, Cursor, Lovable).
Free to start (300 credits); credit packs from $12; plans from $15/mo. Connecting a coding agent is included on the free plan.
Method 6: Commit exported React + Tailwind as a reference
Use an exported package for a one-time handoff when you do not need a live design connection. Export the screens and product spec, commit them to design/, and treat them as visual and structural references. Rebuild them with the application's tokens and components.
Mowgli can export an AI package for Claude Code, Codex, Cursor and other AI coding assistants, a Prototype as a Vite + React + Tailwind project, or a Mowgli package containing code plus the spec in PDF and Markdown. Figma MCP output and v0 are other React sources.
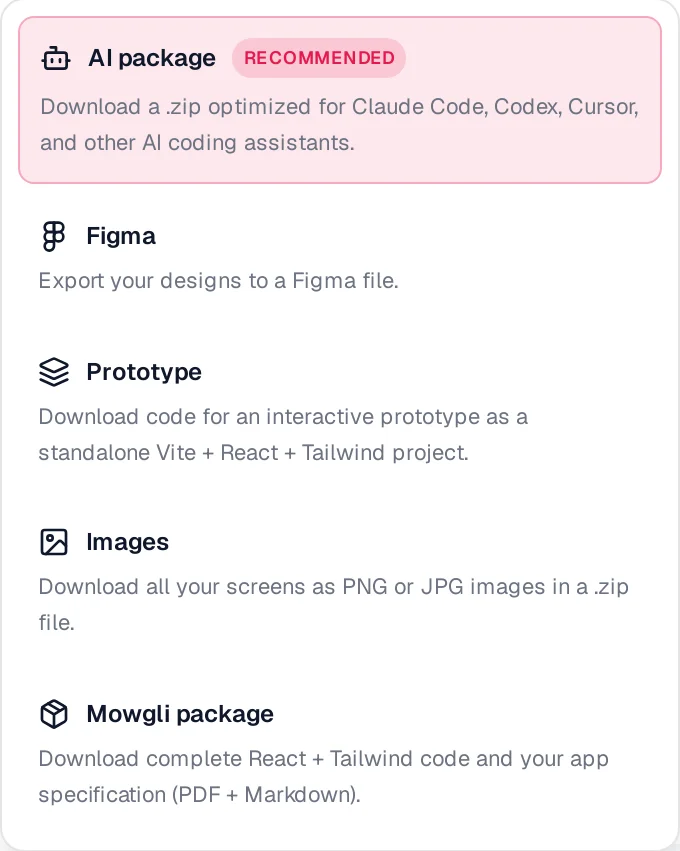
Caption: Mowgli's Export menu, opened without exporting (captured October 2026).
The folder design/ contains exported screen designs (React + Tailwind)
and SPEC.md. They are a STRICT visual reference, not code to import.
1. Read SPEC.md and list every screen and state in design/.
2. Propose a route per screen and the components from src/components/ui
   you'll reuse. Wait for my OK.
3. Build one screen at a time with our components and tokens; never
   import from design/, map its styles to our tokens.
4. Implement every state the design file documents.
An export is a snapshot, so later code changes can diverge from it. Use a live Mowgli connection when the design must follow the code. See AI design tools that export React + Tailwind and export to code.
Common mistakes that make Cursor invent the UI
A .md file inside .cursor/rules/ is ignored. Use .mdc or AGENTS.md.
Do not request the whole application in one prompt. Implement one screen and its states at a time.
A happy-path-only source leaves Cursor to invent loading, empty, error and validation behavior. Define them with a screen x state matrix.
Map design components to existing components before implementation. Use Code Connect when the Figma plan and seat permit it.
Require existing CSS variables and ask Cursor to list design variables without a match.
Finally, screenshot every state at 390px and 1440px. Compare each screenshot against the source and fix the differences before completion.
Verdict: the best Cursor design handoff by job
For one reference screen, use a screenshot plus an .mdc UI rule.
For an existing implementation that needs polish, use Design Mode.
For a complete, maintained Figma source, use Figma MCP and add Code Connect when the seat and plan permit it.
For an idea, PRD, incomplete product or whole-app redesign, use Mowgli to define every screen and state, maintain the product spec and work in both directions with Cursor.
For a one-time offline handoff, commit exported React + Tailwind with SPEC.md.
Whatever route you choose, finish with browser screenshots, state-by-state comparison and correction.
FAQ
How do I get designs into Cursor AI?
Use the most structured source available: a screenshot, running app, Figma frame, Mowgli project or exported React + Tailwind. Add a .cursor/rules/*.mdc rule for tokens, components, states and verification, then implement one screen and its states at a time.
How do I connect Figma MCP to Cursor?
Enter /add-plugin figma in Cursor Agent chat. Alternatively, add https://mcp.figma.com/mcp to mcp.json, select Connect and approve access. For the desktop server, use http://127.0.0.1:3845/mcp with Dev Mode enabled.
Is Figma MCP free to use with Cursor?
Yes, but free access is limited. Starter and View or Collab seats receive 20 calls per month. Dev and Full seats receive 200 per day on Professional and Organization, or 600 per day on Enterprise.
What is Cursor Design Mode?
Cursor Design Mode is a visual editor for an already-running interface. Selecting an element supplies its identity, component data, computed styles, props and a screenshot. Toggle it with Cmd/Ctrl+Shift+D.
How do I make Cursor follow a design system?
Put enforceable rules in .cursor/rules/*.mdc or AGENTS.md. Include required tokens, component paths, states and screenshot checks. Do not depend only on external file references; include essential values in the rule body.
How do I design an app for Cursor without Figma?
Use a screenshot plus a UI rule for one screen, Google Stitch for individual screens returned as HTML, or Mowgli for a product spec plus every screen and state as React + Tailwind. Mowgli connects to Cursor through its skill or MCP.
Sources
- Cursor prompting and image input
- Cursor Design Mode documentation
- Cursor browser tools
- Cursor rules documentation
- Cursor MCP documentation
- Cursor skills documentation
- Cursor browser visual editor announcement
- Cursor Design Mode improvements
- Cursor web-development guidance
- Cursor pricing
- Figma MCP remote server installation
- Figma MCP local server installation
- Figma MCP tools and prompts
- Figma guidance for large frames
- Figma MCP access and rate limits
- Figma MCP versus coding agents
- Figma Code Connect
- Figma file structure for MCP
- Figma REST API rate limits
- Figma pricing
- Google Stitch
- Google Stitch MCP setup
- Google Stitch DESIGN.md
- Framelink MCP for Figma
- v0 screenshot documentation
- v0 pricing
- Vercel Labs skills
- Mowgli skills
- Mowgli MCP server