How to Use Codex for Frontend Design: 2026 Workflow Guide
Use Codex for frontend design with AGENTS.md rules, visual targets, browser checks, and Figma or Mowgli as the design source.
To use Codex for frontend design, give it explicit design rules, a visual target for every important state, and a browser-based verification loop. Put the rules in AGENTS.md, implement one screen at a time, and compare screenshots at fixed mobile and desktop widths. Screenshots work well for individual screens. For a larger product, connect a structured source such as Figma or Mowgli so Codex can read the full set of screens, states, and product context.
The short answer: a five-step Codex frontend workflow
The repeatable workflow is:
- Define tokens, prohibited patterns, required states, and completion criteria in AGENTS.md.
- Supply one visual target for every important state and viewport.
- Let Codex inspect the result with Playwright or the ChatGPT desktop app's built-in browser.
- Connect a structured design source when screenshots no longer carry enough context.
- Plan, build, compare, review, and commit one screen at a time.
OpenAI's frontend workflow follows the same core pattern: provide screenshot references, implement the interface, and use Playwright to compare the result.
Use Mowgli when a whole app needs designing or when design and code must stay synchronized. It designs every screen and state, then exposes the product spec and React + Tailwind screens to Codex. We make Mowgli.
The commands and configurations below reflect documentation from October 2026. The MCP setup was run with Codex CLI 0.158.0.
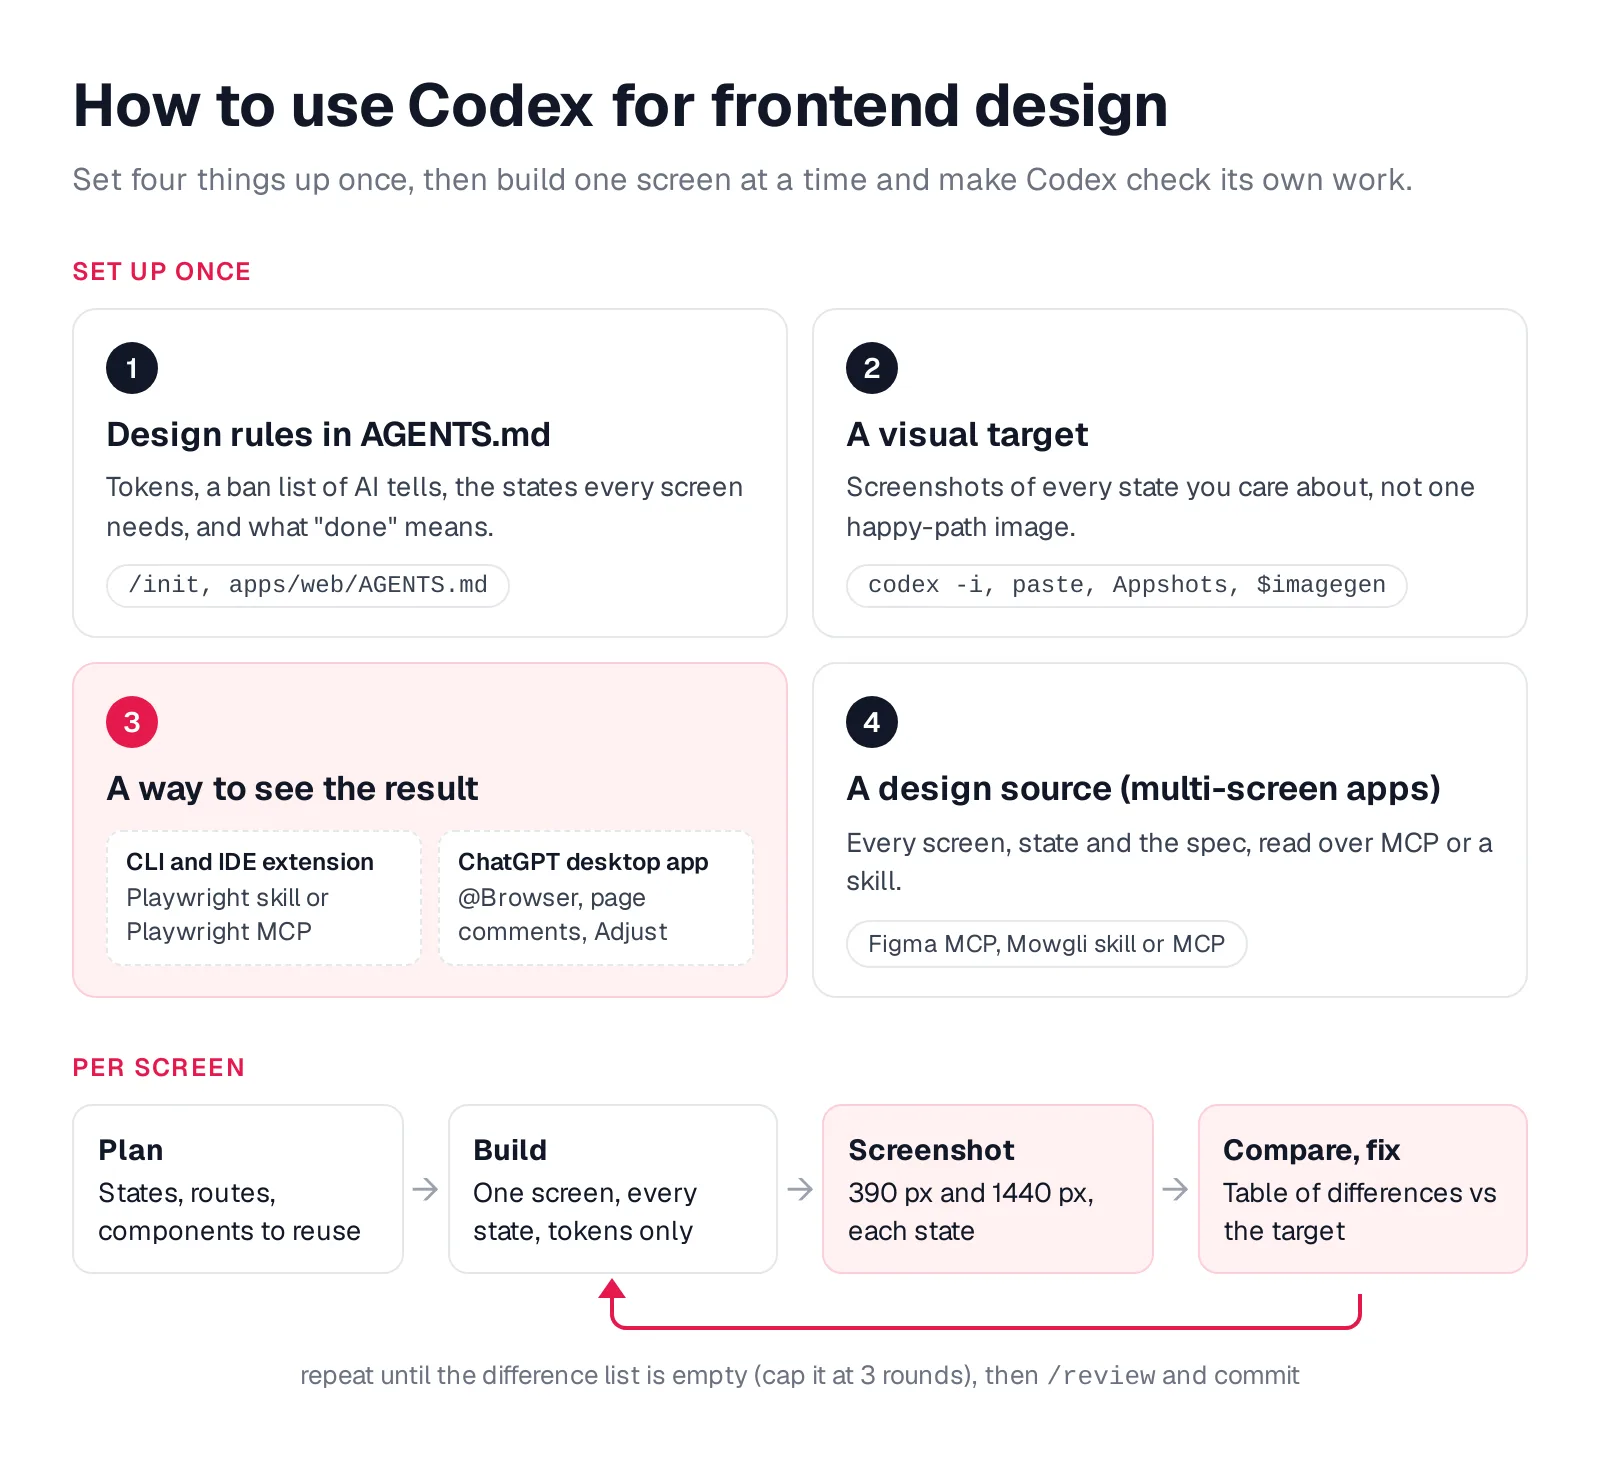
Caption: The workflow at a glance. Steps 1-4 are set up once; the loop runs for every screen.
| Step | What you give Codex | Codex feature | What it prevents |
|---|---|---|---|
| 1. Rules | Tokens, ban list, required states, definition of done | AGENTS.md, /init | Generic defaults, drift |
| 2. Target | One image per state and viewport | codex -i, Appshots, $imagegen | Invented layouts |
| 3. Check | A browser Codex can drive | Playwright; @Browser in the desktop app | Unchecked "done" |
| 4. Design source | Every screen, state and the spec | MCP server or skill (Figma, Mowgli) | Screens that don't match |
| 5. Loop | One screen per prompt | Plan, build, screenshot, /review | Unreviewable diffs |
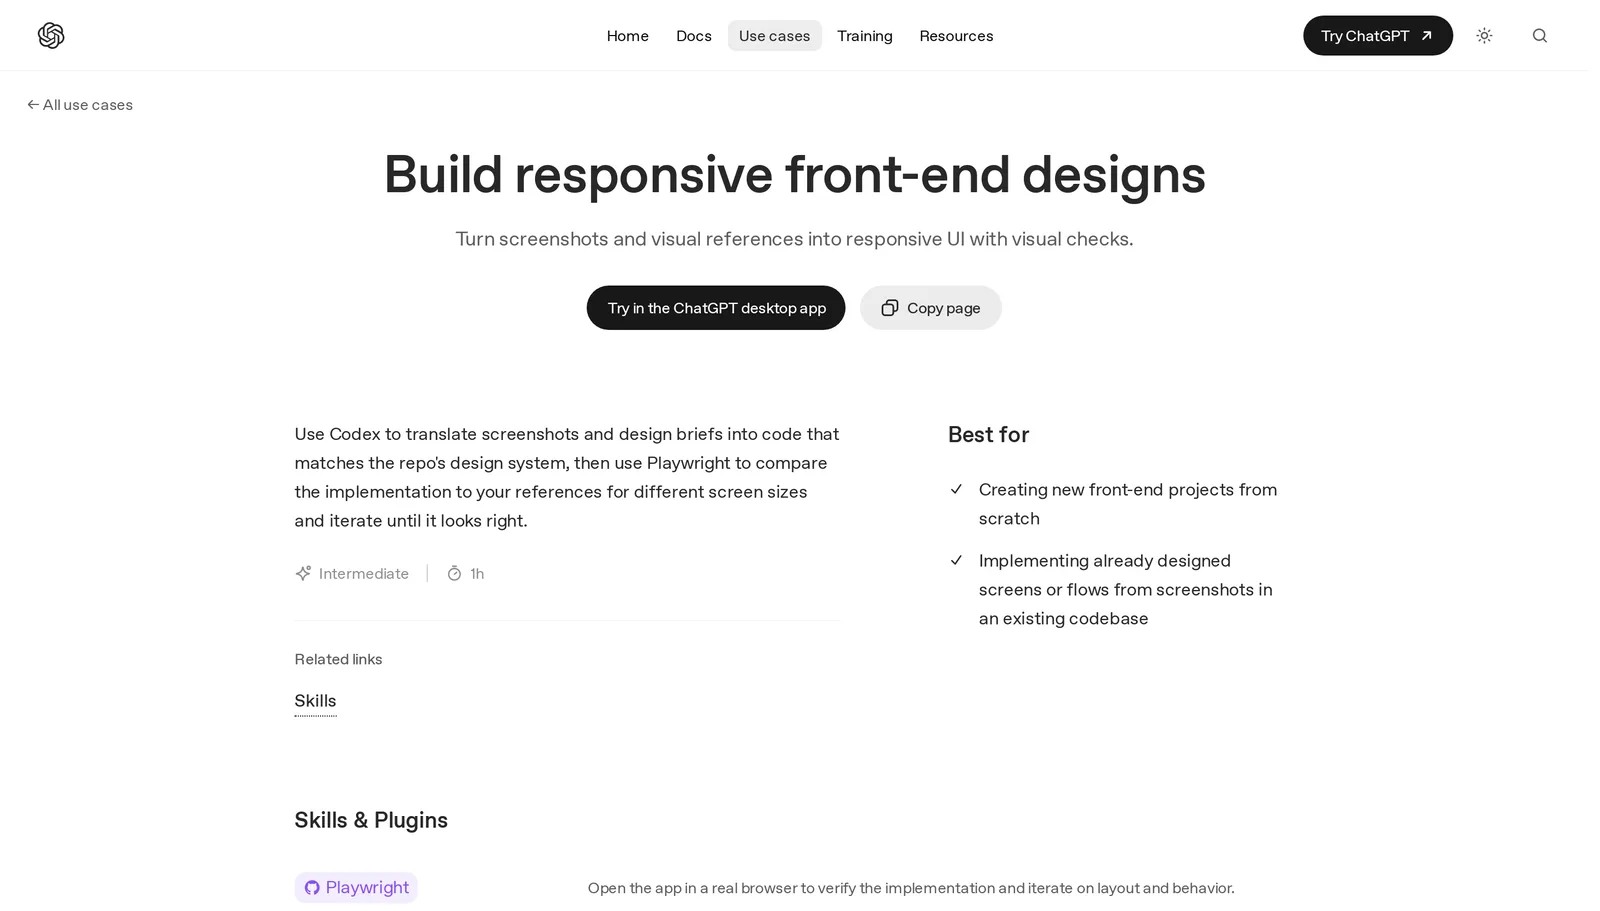
Caption: OpenAI's official Codex use case for frontend work. Source: learn.chatgpt.com, captured October 2026.
Choose the right Codex surface
Codex is available through the CLI, IDE extension, ChatGPT desktop app on macOS, Windows, and Linux, and Codex Cloud for parallel cloud tasks.
The CLI, IDE extension, and desktop app support AGENTS.md and share MCP configuration from ~/.codex/config.toml. Their image and browser workflows differ.
| Frontend feature | Codex CLI | IDE extension | ChatGPT desktop app (Codex) |
|---|---|---|---|
| AGENTS.md rules | Yes | Yes | Yes |
| Image inputs | -i / --image, paste, drag into terminal | Shift + drag, paste | Shift + drag, Appshots |
| MCP servers (shared config) | Yes | Yes | Yes |
Skills ($name) | Yes | Yes | Yes |
| Plugins (Build Web Apps, Figma) | Yes (/plugins) | No | Yes (Plugins tab) |
| Built-in browser with page comments | No | No | Yes (@Browser) |
Codex is included in every ChatGPT plan from Free to Enterprise. Plus costs $20/month and lists Codex on the web, in the CLI, and in the IDE extension.
Choose the desktop app when you want direct page comments and visual adjustments. Choose the CLI or IDE when the work should remain close to your repository. Use Cloud when parallel tasks suit the work.
Step 1 - Define the frontend rules in AGENTS.md
Codex reads AGENTS.md before starting work. Run /init to scaffold one, then replace general guidance with concrete frontend constraints.
Include design-source precedence, tokens, typography, spacing, reusable components, prohibited patterns, required states, accessibility rules, responsive requirements, and an exact definition of done.
Codex first reads ~/.codex/AGENTS.md. It then reads AGENTS.md files from the repository root through the folder where you started it. Later files override earlier files. Files beneath the starting folder are not loaded, so start a monorepo frontend session with codex --cd apps/web.
The combined files are capped at 32 KiB by default through project_doc_max_bytes.
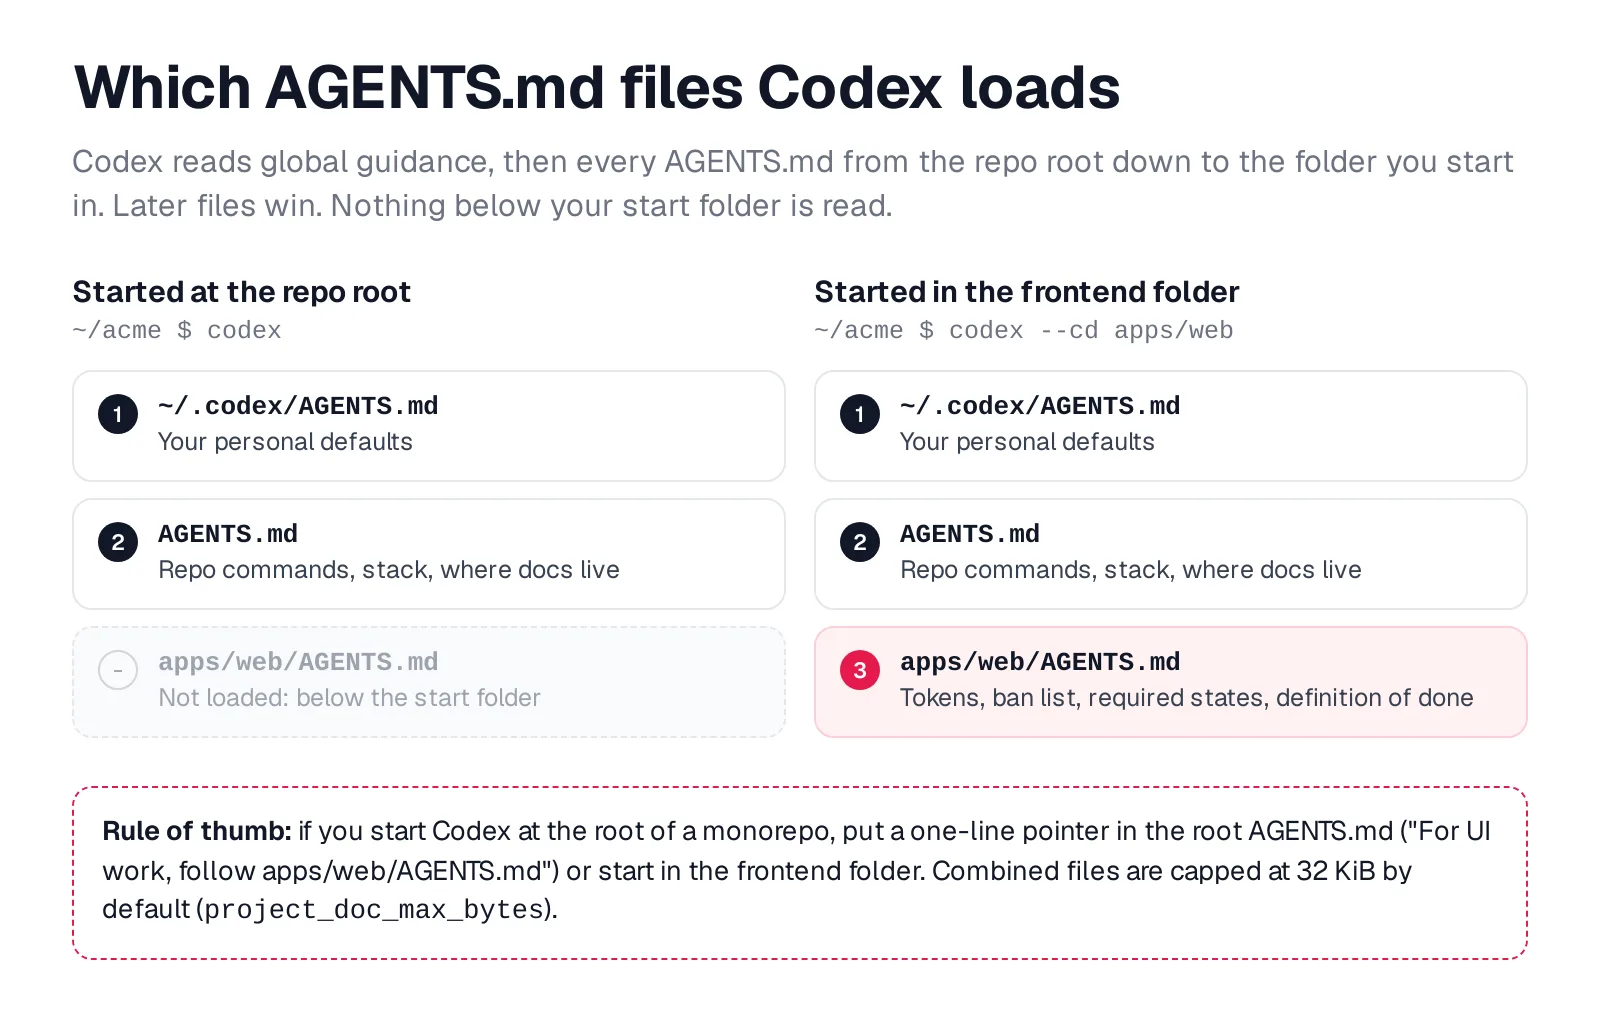
Caption: The nested frontend rules only load when Codex starts in that folder. Based on OpenAI's AGENTS.md discovery rules.
A focused apps/web/AGENTS.md can look like this:
## Frontend design rules

Source of truth, in this order: the design named in the task (Mowgli
screen, Figma frame or attached screenshot), then src/styles/tokens.css,
then components in src/components/ui. If the design needs a value that
has no token, stop and tell me which token is missing.

### Tokens
- Colors: CSS variables only (--bg, --surface, --ink, --muted,
  --accent, --accent-soft, --danger). No raw hex and no Tailwind
  palette classes like bg-blue-500 in components.
- Type: "Instrument Serif" for page titles only, "Public Sans" for UI,
  tabular numbers in tables. Scale 12/14/16/20/24/32. Letter spacing 0.
- Spacing: 4px grid. Radius: 6px controls, 8px max for cards.
- Icons: lucide-react only; icon-only buttons get a tooltip.

### Don't
- Purple or indigo gradients, gradient text, orbs or bokeh blobs
- One-hue palettes (all slate, all beige)
- Cards inside cards; page sections styled as floating cards
- Eyebrow pills above headings; marketing copy inside product screens
- Text that explains the UI ("Click here to filter your results")
- New UI dependencies (icon packs, component kits) without asking

### Every screen ships with
- default, loading (skeleton in the final layout), empty (one next
  action), error (what happened + retry), plus any state the design lists
- ?state=<id> in dev builds to render each state directly
- Visible focus, 44px touch targets, no overflow at 390px or 1440px

### Done means
- Each state screenshotted at 390x844 and 1440x900 and compared with the
  target; remaining differences listed, or "none"
- npm run lint and npm run typecheck pass
You may start the dev server, run Playwright and rerun lint and typecheck
without asking; they don't touch anything outside this folder.

### Docs (read only when relevant)
- docs/design/tokens.md when adding or changing a token
- docs/design/states.md when a screen needs a new state
Point to those rules from the root:
## UI work
The frontend lives in apps/web. For any UI task, follow apps/web/AGENTS.md
(starting Codex with `codex --cd apps/web` loads it automatically).
Link supporting documentation by situation, pre-authorize safe verification commands, and define completion before implementation. A ban list matters because common defaults are one reason AI-built apps look the same. OpenAI's frontend instructions similarly prohibit cards inside cards, gradient orbs, negative letter spacing, and one-hue palettes.
OpenAI's March 2026 GPT-5.4 article recommended $skill-installer frontend-skill. That skill was removed from openai/skills on April 23, 2026. Its successor is the OpenAI Curated Build Web Apps plugin, installed through /plugins or the desktop app's Plugins tab. Its frontend-app-builder covers Image Gen concepts, token extraction, implementation, and browser or Playwright checks. If you already have an authoritative design, say so explicitly.
Step 2 - Supply a visual target for every state
Do not stop at the default desktop screen. Capture desktop and mobile, hover or selected states, loading, empty, and relevant error states.
In the CLI, use codex -i target.png or --image a.png,b.png. You can also paste or drag images into the CLI composer. In the IDE extension and desktop app, paste or Shift + drag. Appshots uses both Command keys on macOS and both Alt keys on Windows.
If no design exists, $imagegen can create a mockup with gpt-image-2. Its included limits are 3 to 5 times faster on average.
Then give Codex a bounded implementation request:
Implement the Billing settings screen (src/routes/settings/billing.tsx).
Image 1: desktop default. Image 2: mobile default. Image 3: empty state
(no payment method). Image 4: error state (card declined).
Treat the images as the visual target, not as code: use our tokens and
components, never the hex values you see.
Not shown in the images: hover and focus states, the plan-change confirm
dialog, inline validation on the card form.
First list the states, the components you will reuse and any missing
tokens. Wait for my OK before writing code.
Use an empty, error, and loading states checklist or a screen x state matrix before implementation. This makes missing states visible while changes are still cheap.
Step 3 - Give Codex a visual-check loop
In the ChatGPT desktop app, start the development server, open the route in the built-in browser, and reference it with @Browser. Annotate lets you comment on an element or region. Adjust previews font, spacing, and color changes. The CLI and IDE extension do not include this browser.
GPT-6 Astra improves visual judgment when comparing a page with a screenshot.
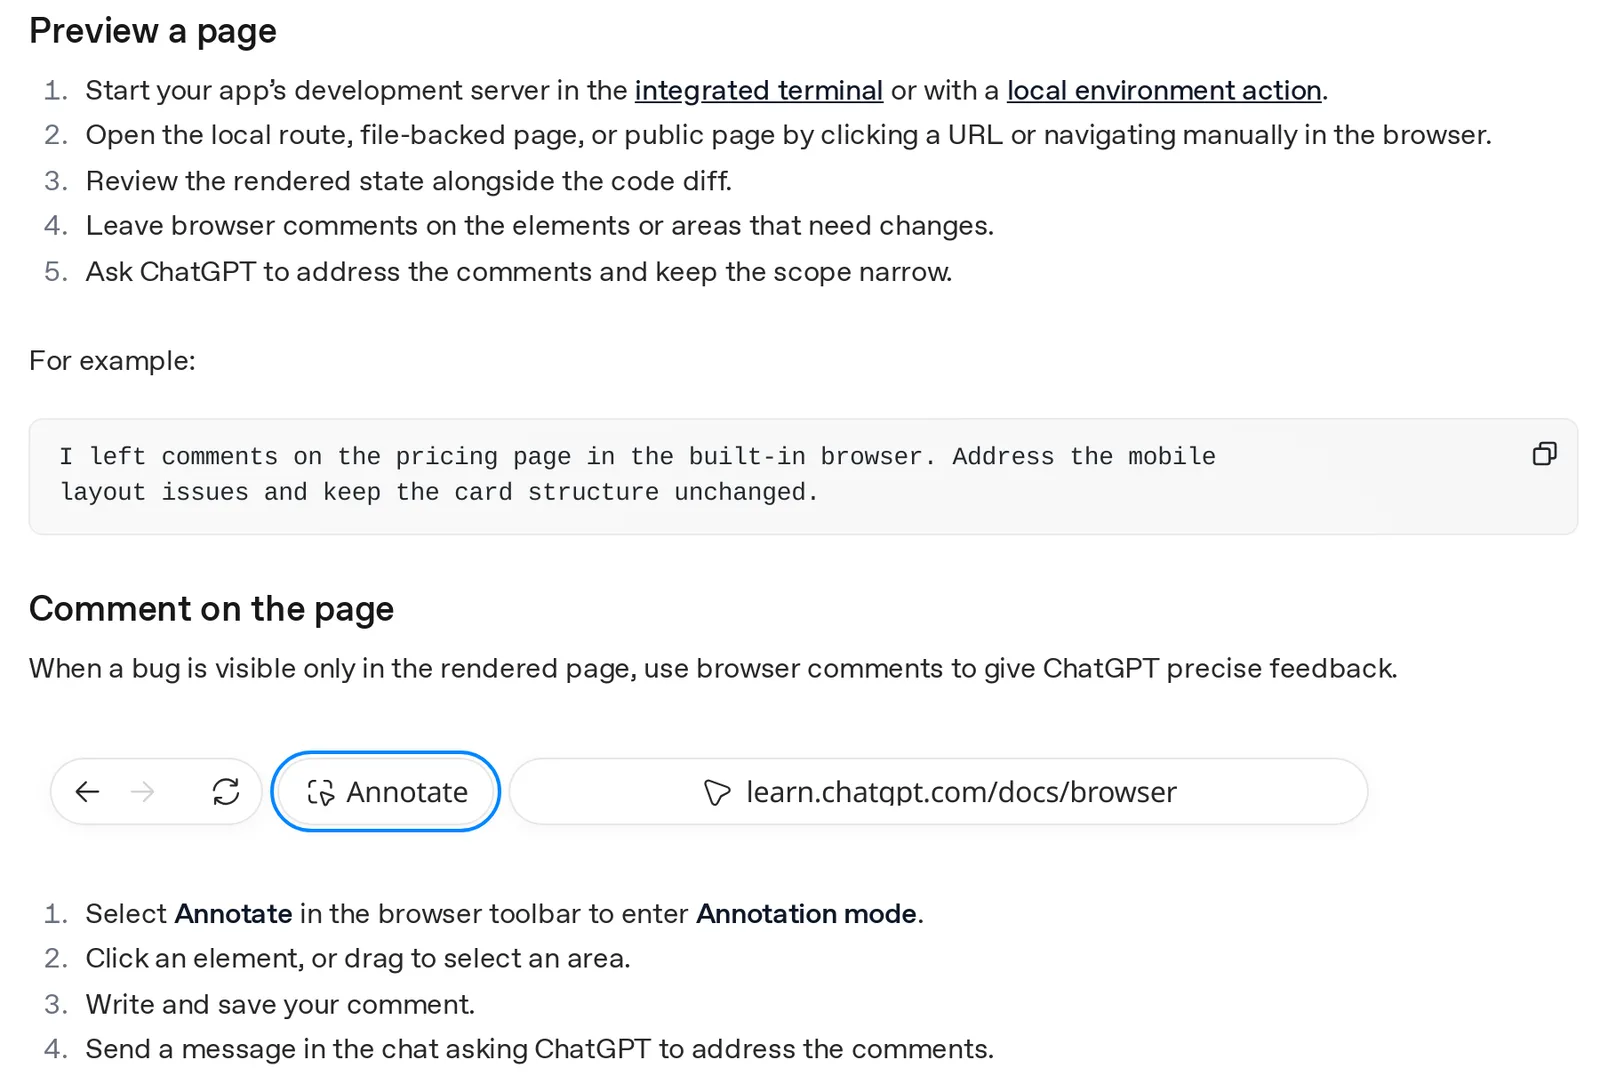
Caption: Page comments in the desktop app's built-in browser. Source: learn.chatgpt.com, captured October 2026.
For the CLI or IDE, add Playwright MCP:
codex mcp add playwright -- npx @playwright/mcp@latest
The equivalent shared configuration is:
[mcp_servers.playwright]
command = "npx"
args = ["@playwright/mcp@latest"]
Another option is $skill-installer playwright-interactive. It requires js_repl = true under [features] and currently requires --sandbox danger-full-access. That removes Codex file and network boundaries, so use a disposable checkout.
Microsoft recommends Playwright CLI with skills for coding agents and describes it as more token-efficient.
Keep the correction loop finite:
Start the dev server if it isn't running. With Playwright, open
/settings/billing?state=<id> for every state at 390x844 and 1440x900.
Compare each screenshot with its target image. Output a table:
state, viewport, element, expected, actual, fix. Fix the differences
with tokens and existing components only, then screenshot again.
Stop when the table is empty or after 3 rounds, then show me the final
screenshots next to the targets and list anything you could not match.
If the implementation drifts, use the recovery prompt: "This doesn't look right. Make sure to implement something that matches closely the reference."
Step 4 - Build one screen at a time
Build tokens, the layout shell, navigation, and shared components first. Verify the shell at both target widths. Then implement screens in user-journey order, with one screen and all its states per prompt.
Ask Codex to plan before editing. Approve the plan, build, run the screenshot loop, and use /review. The desktop app also provides /plan. Commit each screen separately so reviews and reversions stay focused.
Use codex --worktree when parallel sessions need separate Git worktrees. If the design source supports synchronization, push approved code-side screen changes back into it.
Next screen: [Screen name]. Target: [images, Figma node or Mowgli
screen]. States: [list]. Reuse whatever the shell and earlier screens
already define; don't add tokens or components without asking.
Plan, wait for my OK, build, then run the screenshot loop from
AGENTS.md. You're done when every state matches at 390 and 1440 or
you've listed what couldn't match.
Step 5 - Connect a design source for multi-screen products
A product with 15 screens and four states needs 60 images. Those images still do not explain what triggers each state, and a rules file does not contain the full product flow. This is why DESIGN.md is not enough.
Figma is the best fit when designers already work there. Connect its MCP server with:
codex mcp add figma --url https://mcp.figma.com/mcp
You can also use OpenAI's Figma plugin. The official sequence is to run get_design_context on the exact node, then get_screenshot. Treat returned React + Tailwind as a structural reference, not the final code style.
Figma limits Starter and View or Collab seats to 20 tool calls per month. Dev and Full seats on Professional and Organization allow up to 200 per day. Enterprise allows up to 600 per day.
Mowgli is the best fit when the app is not designed yet or when design and implementation must remain synchronized. It is an AI design tool that designs every screen of your app.
A short questionnaire becomes a product spec covering user journeys, product constraints, and the data model. A moodboard provides 16+ styles and style steering. The resulting infinite canvas contains 30+ screens and states plus an interactive click-through prototype.
Each screen is a React + Tailwind component with a single state prop. Codex can read SPEC.md, frontend.xml, and one <ScreenId>.tsx file per screen. You can push an existing codebase into the design tool and pull designs back into code through its MCP server, CLI, or agent skill. It works with Claude Code, Codex, Cursor or another coding agent.
Mowgli designs and prototypes; to host and ship, you hand off to a builder or coding agent (Claude Code, Codex, Cursor, Lovable).
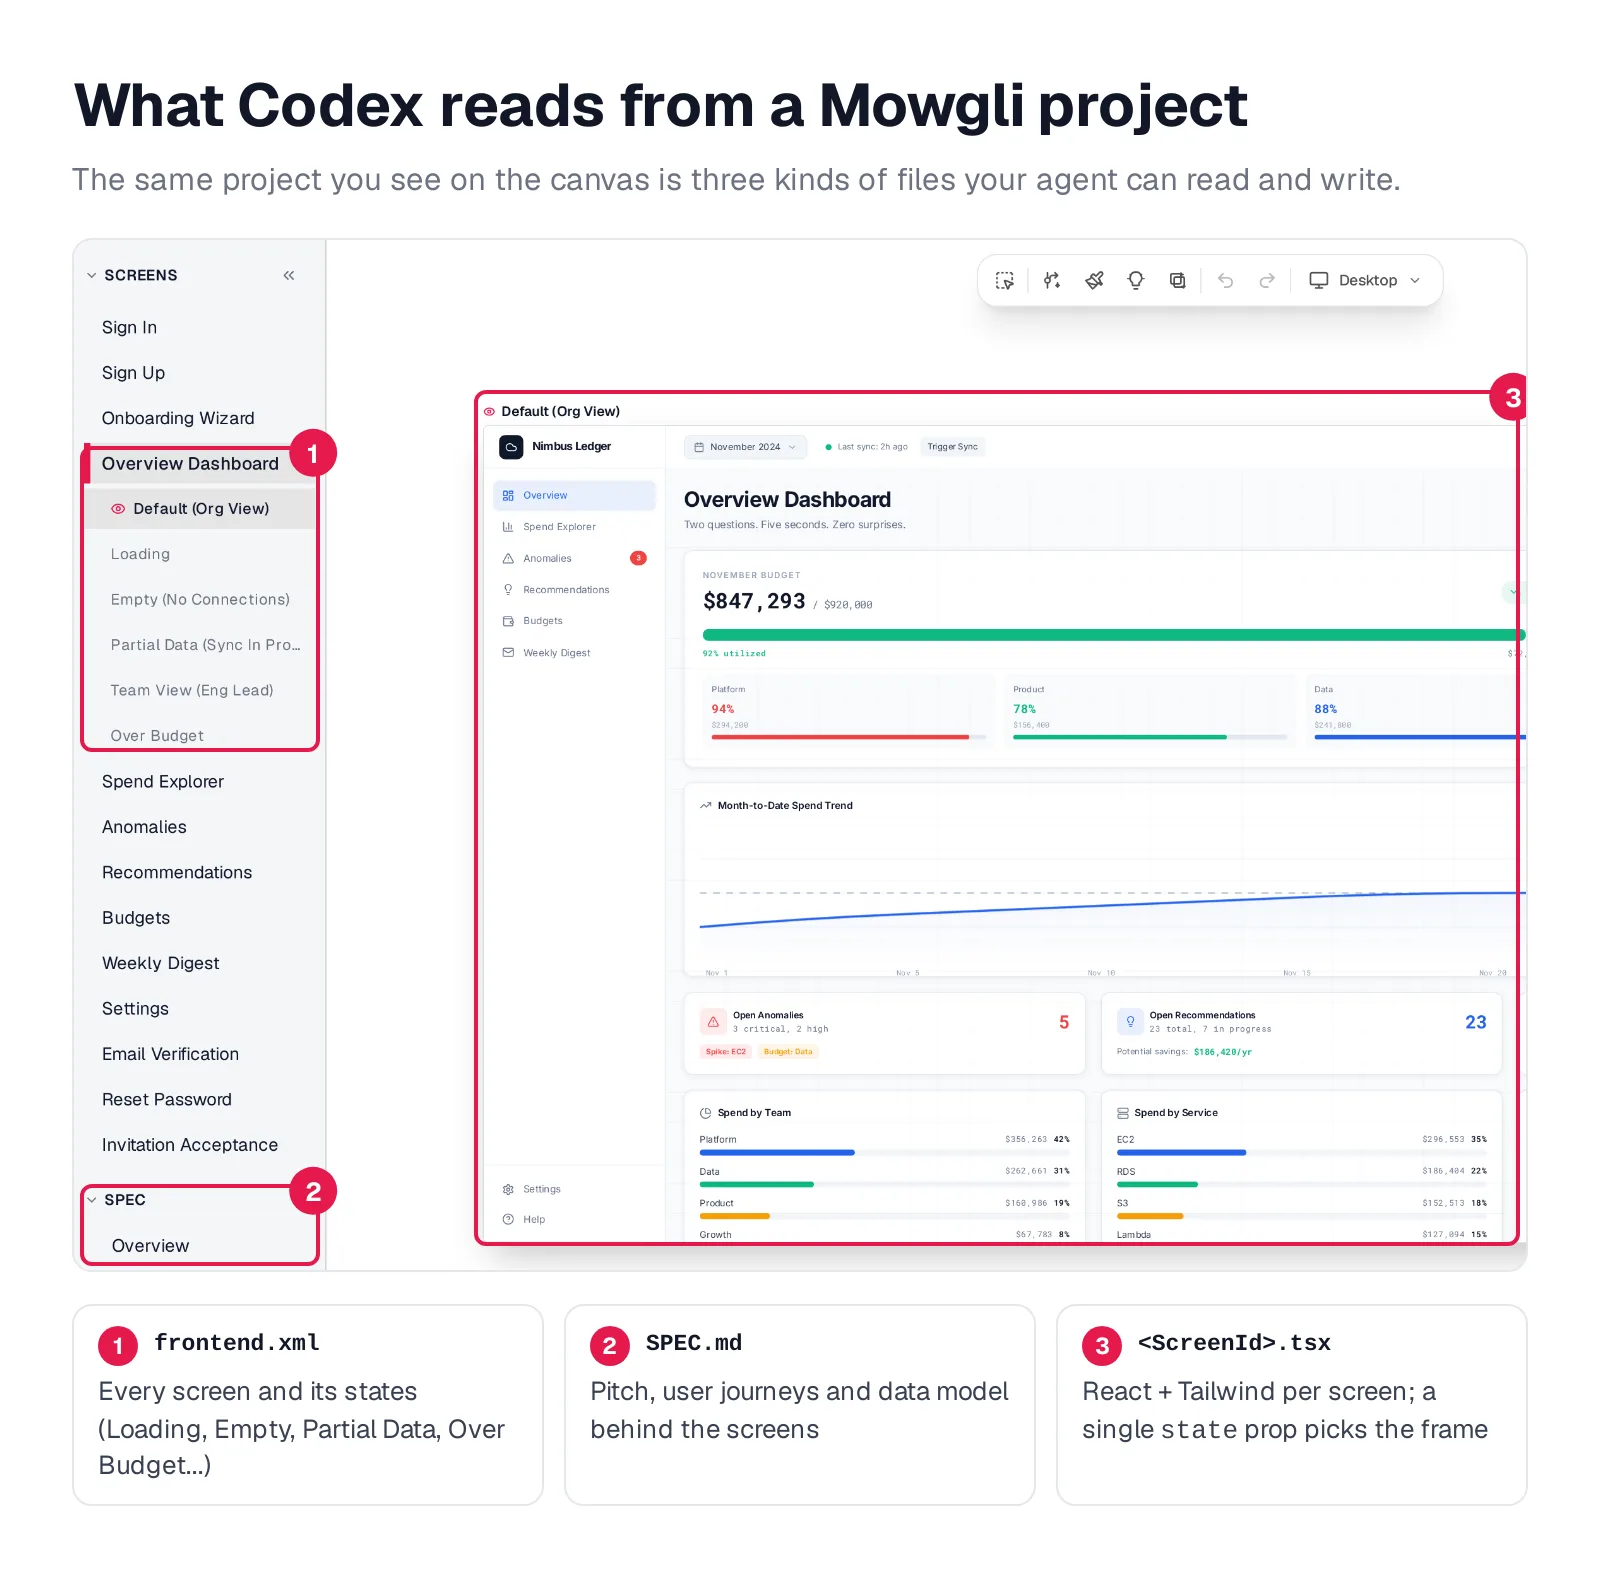
Caption: Cloud cost dashboard demo in Mowgli, annotated with the files Codex reads. Captured October 2026.
For guided setup, open Connect MCP in a project, select OpenAI Codex, and paste the generated prompt into Codex. Setup prioritizes the skill, then CLI or MCP.
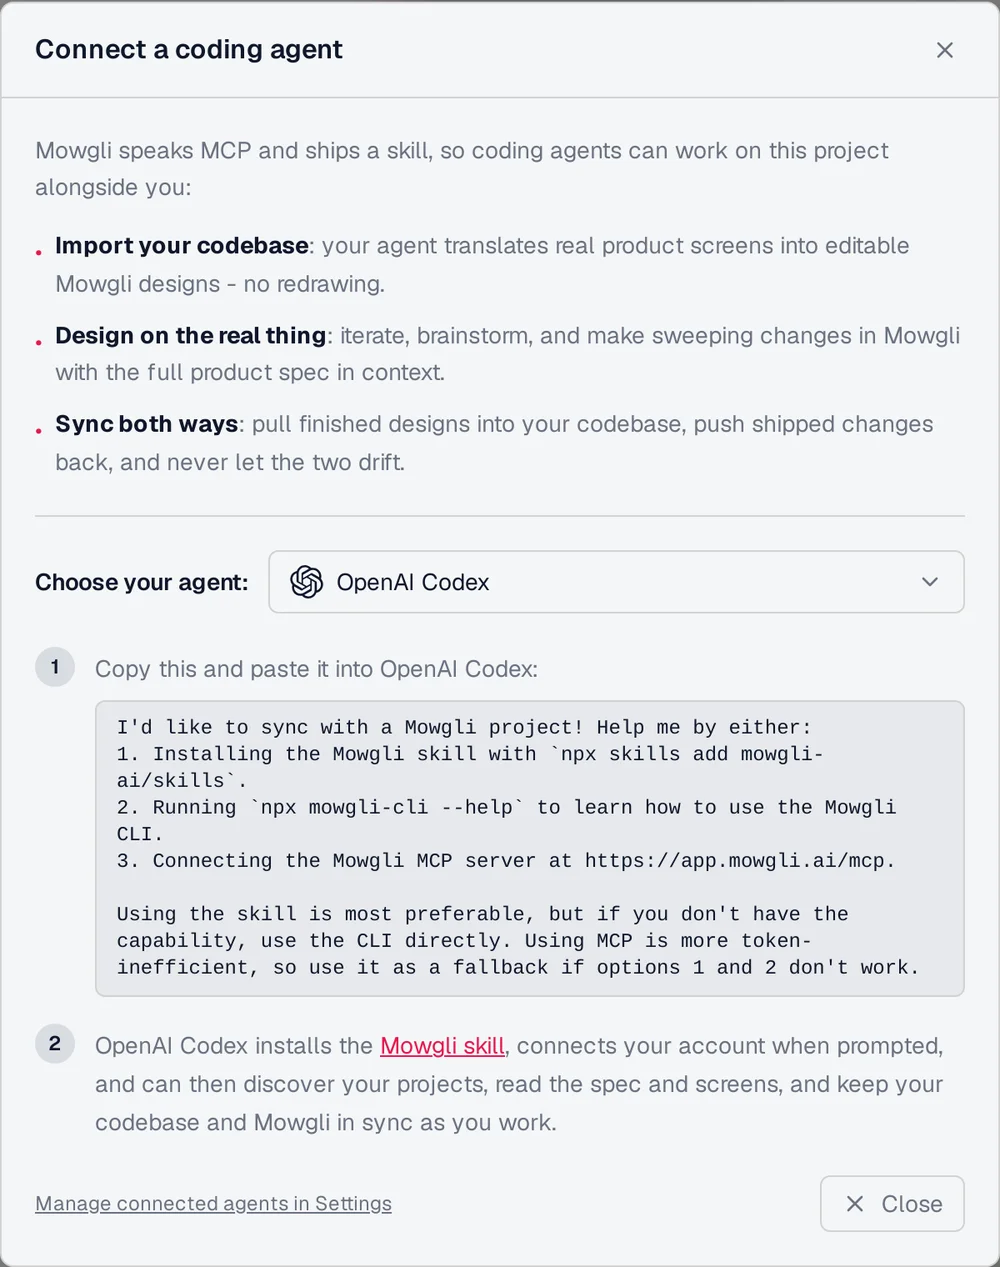
Caption: Mowgli's Connect a coding agent dialog with Codex selected (captured October 2026).
Install the skill manually with:
npx skills add mowgli-ai/skills -a codex
Add -g to install it globally under ~/.agents/skills/. Alternatively, connect the MCP server:
codex mcp add mowgli --url https://app.mowgli.ai/mcp
On Codex CLI 0.158.0, this wrote the configuration, detected OAuth, and started sign-in without requiring an API key.
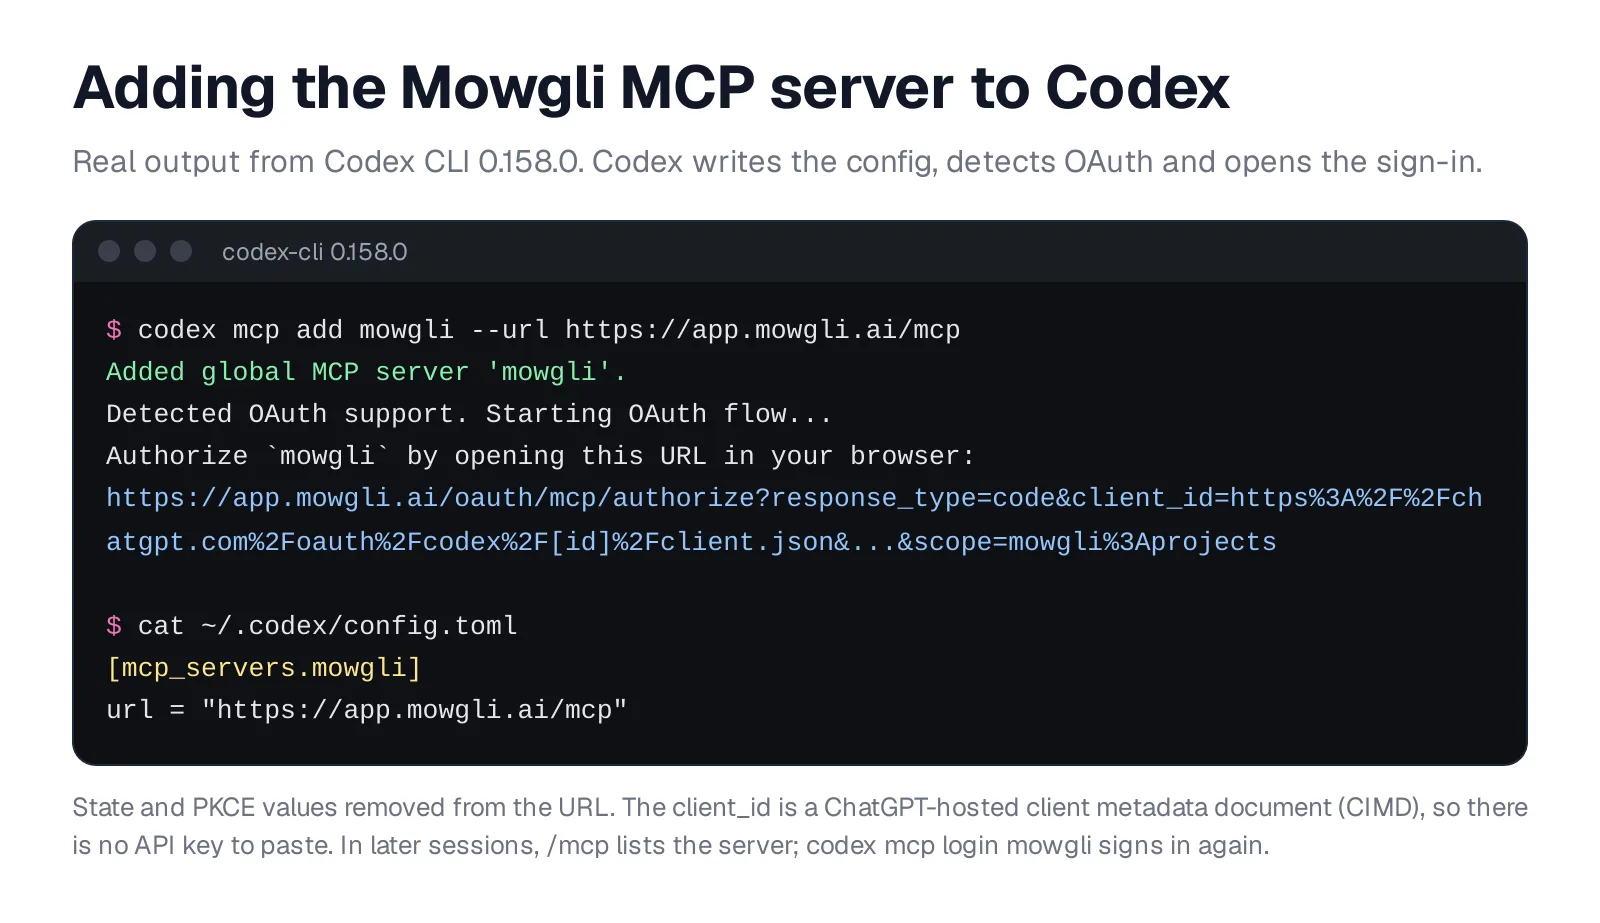
Caption: Real output from codex mcp add, with session values removed from the URL. Captured October 2026.
The shared configuration is:
[mcp_servers.mowgli]
url = "https://app.mowgli.ai/mcp"
Use codex mcp login mowgli to reauthenticate and /mcp to inspect the connection. Then prompt Codex with a specific screen:
Use the Mowgli skill (or the mowgli MCP server). Open the Mowgli project
"[name]" and read SPEC.md and frontend.xml.
1. Map every Mowgli screen to a route in this repo and list the gaps.
2. For [ScreenId]: read [ScreenId].tsx and implement it, mapping its
   styles to our tokens and components.
   Implement every state from its frontend.xml entry and wire each one
   to the real data condition that triggers it.
3. Screenshot each state at 390 and 1440 and compare with the Mowgli
   frame. Fix differences, max 3 rounds.
See the Mowgli MCP, Mowgli skill, and Mowgli + Codex workflow for connection details.
Design sources for Codex compared
Choose the source by job, not by file format.
| Design source | What Codex receives | States covered | Setup in Codex | Cost |
|---|---|---|---|---|
| Screenshots | Pixels | Only those captured | codex -i | Free |
| Image Gen (Build Web Apps) | Generated mockups | Those generated | /plugins | Codex usage |
| Figma MCP | Design context, variables | What was drawn | codex mcp add figma | 20 calls/mo on Starter or View/Collab; 200-600/day on paid Dev/Full |
| Google Stitch MCP | HTML + Tailwind per screen | Per screen | config.toml, API key | Daily credit limit |
| Mowgli | React + Tailwind, states, spec; syncs back | Every screen and state | Skill, CLI or MCP | Free to start (300 credits); credit packs from $12; plans from $15/mo |
Prices are from each vendor's pricing page, October 2026.
For one existing screen, use screenshots plus the bounded visual-check loop. For a landing page or one dashboard without a design, use the Build Web Apps concept-first flow. For an established Figma workflow, use Figma MCP with a suitable Dev or Full seat. For a whole multi-screen product with every state specified and synchronized with code, use Mowgli through its skill or MCP. For a side project that mainly needs stronger constraints, start with AGENTS.md.
For related workflows, read the backend developer's design playbook, MCP servers for UI design, and design handoff to coding agents.
Common mistakes to avoid
Starting Codex above nested frontend rules
A nested AGENTS.md is not loaded when it sits below the starting folder. Start Codex in the frontend directory or reference the nested file from the root AGENTS.md.
Providing only one screenshot
Unshown states must be inferred. Supply mobile and desktop targets plus loading, empty, error, selected, and other relevant interaction states.
Copying pixels without token mapping
Translate target colors, spacing, typography, and radii into existing tokens. Do not copy sampled values directly into components.
Running unlimited correction loops
Check fixed 390 and 1440 widths. Stop after three rounds, list remaining differences, and review them manually.
Using a concept-first plugin over an existing design
Declare the authoritative design source. This keeps generated concepts from replacing an approved screenshot or design file.
Representing a large product only with screenshots
Use a queryable source that contains screens, states, and product context. Screenshots alone cannot describe the complete flow.
FAQ
How do I use Codex for frontend design?
Define tokens, prohibited patterns, required states, and completion checks in AGENTS.md. Provide screenshots or a connected design source, build one screen at a time, and verify it with Playwright or @Browser.
Can Codex use screenshots as a design reference?
Yes. Use codex -i screen.png or --image a.png,b.png in the CLI, or paste and Shift + drag in the IDE extension and desktop app. Include desktop, mobile, empty, loading, error, and relevant interaction states.
How do I add an MCP server to Codex?
Use codex mcp add <name> --url <url> for a remote server or codex mcp add <name> -- <command> for a local server. You can also add [mcp_servers.<name>] manually to ~/.codex/config.toml. The CLI, IDE extension, and desktop app share this configuration.
Where is OpenAI's frontend-skill for Codex?
It was removed from openai/skills on April 23, 2026. The workflow moved to the OpenAI Curated Build Web Apps plugin, which you can install through /plugins in the CLI or the desktop app's Plugins tab.
Can Codex check its own frontend in a browser?
Yes. The desktop app provides a built-in browser through @Browser, with Annotate and Adjust. In the CLI or IDE extension, use Playwright MCP, playwright-interactive, or Playwright CLI with fixed viewports and a maximum of three comparison rounds.
Can Codex read Mowgli designs?
Yes. Install the skill with npx skills add mowgli-ai/skills -a codex or connect MCP with codex mcp add mowgli --url https://app.mowgli.ai/mcp. Codex can read SPEC.md, frontend.xml, and the React + Tailwind screen files, including every defined state.
Sources
- OpenAI: Build responsive front-end designs
- OpenAI: Turn Figma designs into code
- OpenAI: AGENTS.md configuration
- OpenAI: Image inputs
- OpenAI: Appshots
- OpenAI: Image generation
- OpenAI: Built-in browser
- OpenAI: MCP
- OpenAI: Build skills
- OpenAI: Plugins
- OpenAI: Codex pricing
- OpenAI: Frontend prompting guide
- OpenAI: Designing delightful frontends with GPT-5.4
- OpenAI: Rethinking skills and prompts for GPT-6 Astra
- OpenAI skills removal commit
- OpenAI: Playwright interactive skill
- OpenAI: Build Web Apps plugin
- OpenAI: Figma plugin
- Microsoft: Playwright MCP
- Microsoft: Playwright CLI
- Figma MCP rate limits and access
- Google Stitch MCP guide
- Vercel Labs skills
- Mowgli agent skills
- Mowgli
- Mowgli MCP endpoint
- Mowgli pricing
- Mowgli MCP
- Mowgli skill
- Mowgli for Codex
- Why AI-built apps look the same
- Empty, error, and loading states
- Why DESIGN.md is not enough
- Backend developer's frontend design playbook
- MCP servers for UI design
- Design handoff to coding agents